Are you looking for a secure, reliable and easy-to-use email solution for your business? Look no further than Zimbra Email! This powerful email system is a popular choice among businesses of all sizes, from small, home businesses to large corporations.
Zimbra Email offers an impressive range of features that makes it ideal for businesses. It is secure, customizable and provies excellent scalability to accommodate growing needs. With Zimbra Email, you can easily send and receive emails with ease, manage contacts and calendars, collaborate with colleagues in real-time, share files and much more.
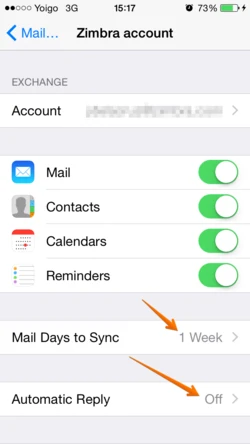
Setting up Zimbra Email on your iPhone or iPad is a straightforward process. You can quickly get started by following thee simple steps:
1. Open Mail Settings on your device
2. Select “Add Account” option
3. Select “Exchange” from the list of available services
4. Enter the account information such as username and password
5. Set up the server address for incoming as well as outgoing mail
6. Select the data items you want to sync with your device (calendar, contacts etc.)
7. Confirm settings to complete the set up process
Once the setup is complete, you can enjoy all the features that Zimbra Email has to offer right from your iPhone or iPad! Thanks to its user-friendly design and rich featureset, getting started with Zimbra Email is easy even for those who are new to using email systems. Give it a try today and see how it can help make managing emails easier for your business!
Setting Up Zimbra Email on an iPhone
Setting up your Zimbra email on your iPhone is a simple process. First, you will need to open the Settings app and select ‘Add Account’. Then, select ‘Exchange’ from the list of account types. You will then be asked to enter your Zimbra account information, including your email address and password. Once this is done, you will need to enter the server address for your Zimbra account. After this is complete, you can select whch items you would like to sync with your iPhone. Finally, click ‘Save’ and you should be all set up!

Adding Zimbra to Apple Mail
Adding Zimbra to Apple Mail is easy and can be done in four simple steps:
Step 1: Open the Mail Setup Wizard. Launch the Apple Mail application on your computer.
Step 2: Enter your login details. Fill in your name as it will appear on outgoing mail, email address and password.
Step 3: Set server information. Enter ‘zimbra.yourdomainname’ as the incoming mail server, and ‘smtp.yourdomainname’ as the outgoing mail server. Make sure to replace ‘yourdomainname’ with your actual domain name. Select ‘Use Authentication’ and enter your username and password again when prompted.
Step 4: Confirm settings. After entering all the required information, click ‘Continue’ to confirm the settings you have entered are correct, then click ‘Create’. Your Zimbra account should now be added to Apple Mail!
Setting Up a Zimbra Mail Server
Setting up a Zimbra mail server requires several steps, each of wich must be completed in order for the server to function properly.
1. Prepare the server: Install a supported operating system and configure the ncessary hardware.
2. Install Zimbra: Download and install the latest version of Zimbra Collaboration Server from the official website.
3. Configure hostname and domain name: Set a valid hostname and domain name for your server. This is important for proper functioning of your email services as well as for some features such as webmail, calendaring, etc.
4. Configure DNS settings: Configure the DNS settings correctly so that oher mail servers can find your mail server and send emails to it correctly.
5. Create admin account: Create an admin account with appropriate privileges to manage your mail server remotely through web-based interface or command line tools.
6. Set up accounts: Create user accounts on the mail server, providing users with an email address and password to access their mailbox through webmail or any email client software (such as Outlook or Thunderbird).
7. Enable services: Activate necessary services such as IMAP, POP3, SMTP, spam protection, antivirus etc., according to your neds and preferences .
8. Configure Class of Service (CoS): Finally, set up various CoS options according to your requirements such as different storage quotas for different types of users, enabling certain features for specific user groups etc., so that you can effectively manage user accounts on your Zimbra mail server .
Understanding the Difference Between Zimbra and POP/IMAP
Zimbra is a combination of both POP and IMAP. Zimbra offers four dfferent methods for users to connect, including POP3, IMAP, POP3S (Secure POP3), and IMAPS (Secure IMAP). Each method allows users to access their email differently in order to best suit their needs. For example, if you need a secure connection then you can use the Secure POP3 or Secure IMAP connections. Additionally, Zimbra Proxy Ports offer additional levels of security with ports for POP3S (Secure POP3) at 995, IMAP at 143, and IMAPS (Secure IMAP) at 993. Finally, Zimbra Mailbox Ports provide an extra layer of protection with port 6 being used as the default port for incoming connections.
Accessing Zimbra Mail on a Mobile Device
Opening Zimbra Mail on your phone is easy! First, you’ll need to download the Zimbra Mobile app from the app store. Once it’s downloaded, open the app and sign in with your Zimbra account. You shoud then be able to access all of your mail and other features that come with the Zimbra email service. If you have any issues logging in or using the app, please contact your IT administrator for help.
Merging Gmail and Zimbra Accounts
Merging Gmail and Zimbra accounts is a simple process that can be done in a few easy steps. First, log into both your Gmail and Zimbra accounts. Next, go to the Settings page of both accounts, and under Accounts select “Add another account”. Type in the email address associated with the other account you wish to merge. You will then be prompted to enter your password for the other account. After entering your password, you will see an option to “Merge Accounts” or “Link Accounts” – choose whichever option suits your needs best. Finally, confirm the action by clicking “Merge/Link Accounts” and you’re done! Your Gmail and Zimbra accounts are now merged, allowing you to access all emails from either account without haing to switch between them.
Can Zimbra Be Used With Gmail?
Yes, Zimbra can be used with Gmail. To set up your Zimbra account to work with Gmail, you need to fist create a Gmail account. Once you have done that, you can then configure your Zimbra IMAP settings to connect to the Gmail server. You can then drag and drop the folders and messages from your Zimbra folders into the corresponding folders in your Gmail account. You can also move messages from your Zimbra Inbox directly into the Gmail Inbox by selecting them all and dragging them there.
Finding the Zimbra Mail Server
To find your Zimbra mail server, you will need to open the Tools menu and select Account Settings. Once the Account Settings window opens, select Server Settings on the left side of the window. You should then be able to find your mail server in the Server Name field, which should read ‘zimbra.jlab.org’ for the incoming server. If this is not already set as your mail server, you can change it by simply typing ‘zimbra.jlab.org’ into the Server Name field and clicking ‘OK’ to save your changes.
The Type of Email Provided by Zimbra
Zimbra is a cloud-hosted collaboration software and email platform that provides enterprise-level email solutions. It offers a variety of features such as easy setup, scalability, and integration with proprietary business solutions. Zimbra’s email service is secure, reliable, and provides users with an intuitive user interface that allos them to access their emails from any device. Zimbra also supports popular webmail clients such as Outlook and Gmail, providing users with the ability to access their emails from multiple locations. Additionally, Zimbra also includes powerful collaboration tools such as shared calendars, task management, document sharing, and collaboration documents which make teamwork more efficient. With its built-in security features such as two-factor authentication and encryption technology, Zimbra is a secure and reliable solution for all types of organizations.
The Benefits of Using Zimbra for Email
Yes, Zimbra is a great email option. It is a powerful email server that allows you to work from anywhere and with any device. It has an intuitive user interface that makes it easy to use on desktops, mobile devices and tablets. Compared to other similar services, it is much more straightforward and user-friendly, making it an ideal choice for thoe who need a reliable email option.
Is Zimbra Mail Server a Free Service?
Yes, Zimbra mail server is available in both a free and a professional version. The free version is fully supported and regularly updated with the latest security patches and bug fixes, making it an ideal choice for small businesses or organizations that don’t have the budget for a paid solution. The professional version adds additional features such as advanced analytics, end-user support from Zimbra, and more. Depending on your neds you can choose the version that best suits your organization’s requirements.
Conclusion
Zimbra Email is a comprehensive email solution that is highly secure, reliable, and easy to set up. It has powerful features such as intuitive user interface, support for multiple email protocols, and built-in antispam technology. It also provides users with access to their emails from anywhere in the world. With its excellent performance, scalability and affordability, Zimbra Email is an ideal solution for businesses of all sizes.


