In today’s digital age, having an Apple ID is essential for accessing various Apple services and devices. However, it is equally important to ensure that your account information is up to date and accurate. One crucial aspect of your Apple ID is the reachable addresses, such as email addresses or phone numbers, that you have associated with your account. These reachable addresses are essential for communication purposes, including FaceTime.
If you find that your Apple ID account has no reachable addresses, don’t worry. Apple provides a straightforward process to add new email addresses or phone numbers to your account so that you can be easily reached via FaceTime and other communication services.
To add reachable addresses to your Apple ID account, follow these steps:
1. Start by signing in to appleid.apple.com, which is the official Apple ID account website.
2. Once signed in, navigate to the “Personal Information” section.
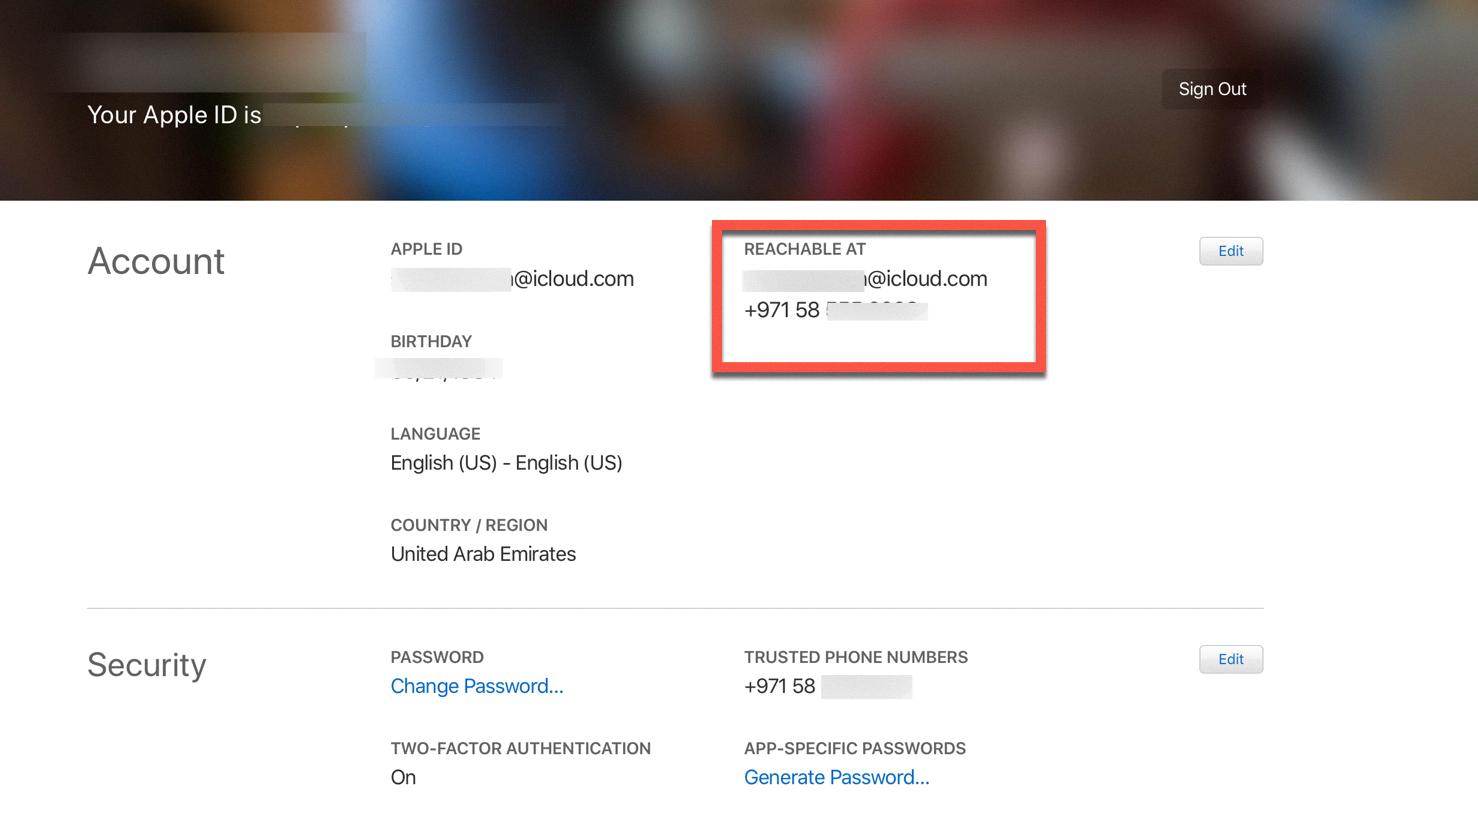
3. Under the “Reachable At” option, click on the “Add” button.
4. You will be prompted to enter the new email address or phone number that you want to associate with your account.
5. After entering the required information, click on “Continue” to proceed.
Now that you have added the new reachable address to your Apple ID account, it’s time to configure FaceTime to use this address for communication.
If you are using a Mac, follow these steps to update your FaceTime settings:
1. Open the FaceTime app on your Mac.
2. From the menu bar at the top, choose “FaceTime” and then select “Settings”.
3. In the FaceTime settings window, click on the “General” tab.
4. Here, you can select the email addresses and/or phone number where you want to be reached for FaceTime.
5. Simply check the boxes next to the desired reachable addresses to enable them for FaceTime.
By following these steps, you can ensure that your Apple ID account has reachable addresses and that FaceTime is configured to use these addresses for communication. This will enable you to stay connected with your friends, family, and colleagues via FaceTime, enhancing your overall Apple experience.
Remember, keeping your account information up to date is crucial for smooth communication and access to Apple services. Regularly review and update your reachable addresses to ensure that you can be reached easily and enjoy all the benefits that Apple has to offer.
How Do You Add Reachable Addresses to FaceTime?
To add reachable addresses to FaceTime, follow these steps:
1. Sign in to your Apple ID account by visiting appleid.apple.com.
2. Once signed in, click on “Personal Information” to access your account details.
3. Under the “Reachable At” section, click on the “Add” button.
4. A new window will appear, allowing you to enter the reachable addresses for FaceTime.
5. Enter the desired reachable addresses, such as phone numbers or email addresses, in the provided fields.
6. You can add multiple reachable addresses by clicking on the “Add More” button.
7. Once you have entered all the desired reachable addresses, click on the “Save” button to save the changes.
By following these steps, you will successfully add reachable addresses to FaceTime. These reachable addresses can include phone numbers and email addresses, allowing others to easily contact you through FaceTime using any of these methods.

How Do You Add a Reachable Address to FaceTime On Mac?
To add a reachable address to FaceTime on your Mac, follow these steps:
1. Open your web browser and go to the Apple ID account website.
2. Sign in using your Apple ID and password.
3. Once signed in, click on “Personal Information” on the left-hand side of the page.
4. Look for the “Reachable At” section and click on it.
5. Here, you can enter either an email address or a phone number that you want to add as a reachable address for FaceTime.
6. After entering the desired email address or phone number, click on the “Continue” button.
7. Now, switch to the FaceTime app on your Mac.
8. In the menu bar at the top of the screen, click on “FaceTime” and then select “Settings.”
9. In the FaceTime settings window, click on the “General” tab.
10. You should now see the reachable address you added earlier listed under the “You can be reached for FaceTime at” section.
That’s it! You have successfully added a reachable address to FaceTime on your Mac. Now you can use this address to receive FaceTime calls on your computer.
How Do You Change Your Email Address For FaceTime?
To change your email address for FaceTime, you can follow these steps:
1. Open FaceTime on your device.
2. Look for the FaceTime menu at the top of the screen and click on it.
3. In the dropdown menu, select “Settings.”
4. Within the Settings menu, locate the “General” tab and click on it.
5. Under the General tab, you will find the option to manage your email addresses and phone numbers for FaceTime.
6. Click on the email address section to make changes.
7. You can add a new email address by clicking on the “+” button or remove an existing one by clicking on the “-” button.
8. If you want to change the primary email address associated with FaceTime, click on the desired email address and make it the primary one.
9. You can also rearrange the order of your email addresses by dragging them up or down in the list.
10. Once you have made the desired changes, close the Settings window.
It is important to note that FaceTime uses your Apple ID email address by default. So, if you wish to change your primary email address for FaceTime, you will need to update your Apple ID email address through your Apple ID account settings.
By following these steps, you can easily change or update your email address for FaceTime.
How Do You Change FaceTime Settings On Your Macbook Pro?
To change FaceTime settings on your MacBook Pro, follow these steps:
1. Open the FaceTime app on your Mac.
2. In the menu bar at the top of the screen, click on “FaceTime” and then select “Preferences” from the drop-down menu.
3. The FaceTime preferences window will open, showing several tabs for different settings.
4. Click on the “General” tab to access general FaceTime settings.
5. In the “Sign In” section, you can sign in or out of your FaceTime account by entering your Apple ID and password.
6. Under the “Caller ID” section, you can choose the phone number or email address that others will see when you make FaceTime calls.
7. If you want to enable or disable the ability to make and receive phone calls on your Mac using FaceTime, check or uncheck the box next to “Calls from iPhone.”
8. In the “Settings” section, you can choose whether or not to allow Live Photos during FaceTime calls by checking or unchecking the box next to “Allow Live Photos.”
9. You can also choose a custom ringtone for FaceTime calls by clicking on the “Ringtone” drop-down menu and selecting your preferred option.
10. After making any desired changes, simply close the preferences window to save your settings.
That’s it! You have successfully changed the FaceTime settings on your MacBook Pro.
Conclusion
Managing your Apple ID account and personal information is essential for ensuring a seamless and personalized experience across various Apple devices and services. By regularly updating your reachable at email addresses and phone numbers, you can ensure that you receive important notifications and messages through FaceTime and other Apple services.
To add or update your reachable at information, you can sign in to appleid.apple.com and navigate to the Personal Information section. From there, select Reachable At and click the Add button to enter the desired email address or phone number.
Additionally, on your Mac, you can access FaceTime settings by opening the FaceTime app and choosing FaceTime > Settings. Under the General tab, you can manage the email addresses and phone numbers where you can be reached for FaceTime.
Taking the time to review and update your account information not only helps you stay connected but also enhances the security and convenience of your Apple ID. By ensuring that your contact information is up to date, you can easily stay in touch with friends and family through FaceTime and other Apple services.


