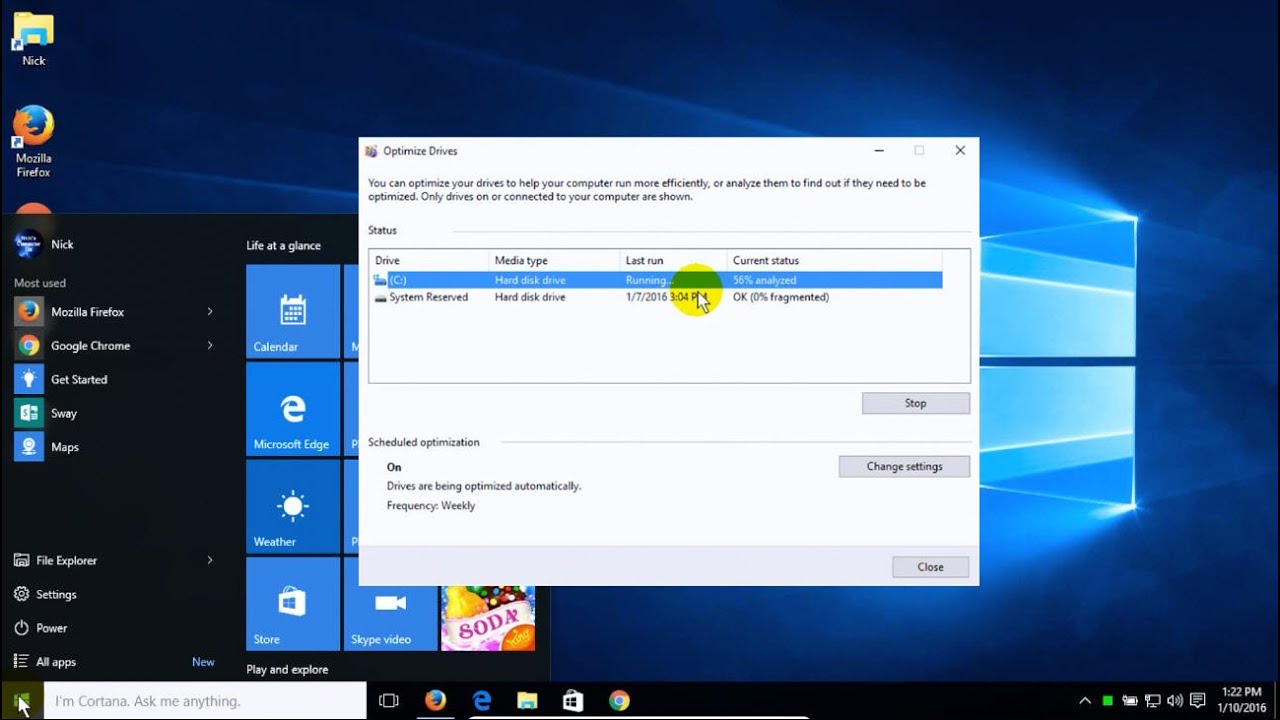
Defragmentation is an essential process for maintaining the performance and efficiency of your hard drive. Windows 10, along with Windows 8 and Windows 7, offers a built-in tool called Disk Defragmenter that helps you organize the data stored on your hard drive. This tool performs three passes to ensure that your data is stored in contiguous blocks, ultimately improving the speed and responsiveness of your computer.
During the first pass, the Disk Defragmenter analyzes the data on your hard drive. It examines the arrangement of files and identifies any data that is not stored in contiguous blocks. When data is fragmented, it is scattered across different parts of the hard drive, which can result in slower access times. By identifying fragmented data, the first pass provides a clear picture of the current state of your hard drive.
The second pass of the defragmentation process is where the magic happens. Once the fragmented data is identified, the Disk Defragmenter attempts to relocate this data so that it is stored in contiguous blocks. By rearranging the data in this way, the hard drive can read files more efficiently, leading to faster performance. It is worth noting that the time it takes for the defragmentation process to complete can vary depending on the size and degree of fragmentation of your hard disk. It could range from several minutes to a few hours.
Despite the defragmentation process running in the background, you can still use your computer without any major interruptions. This allows you to continue with your tasks while the Disk Defragmenter optimizes your hard drive.
To check the status of your hard drive after defragmentation, you can look at the Current Status displayed by the Disk Defragmenter. For HDD users, an ideal status would be “OK” with 0% fragmentation. This indicates that the defragmentation process was successful and your hard drive is now organized. For SSD users, the status will simply state “OK” along with information about when the TRIM command was last run. TRIM is a command that helps maintain the performance of SSDs.
As a general rule of thumb, it is recommended to defragment your hard drive whenever it is more than 10 percent fragmented. This ensures that your files are stored in a more organized manner, leading to improved performance. In Windows 10, Windows 8, and Windows 7, you can even schedule defragmentation to occur automatically, based on your preferences and the level of fragmentation detected.
Defragmentation is a crucial process for optimizing the performance of your hard drive. Windows 10 and its predecessors offer a built-in tool called Disk Defragmenter that performs three passes to analyze and rearrange the data on your hard drive. By defragmenting regularly, you can ensure that your files are stored in contiguous blocks, leading to faster access times and a more efficient computer.

How Many Passes Before Defrag Finishes?
Windows 10 performs a total of three passes when defragmenting a hard drive. Each pass serves a specific purpose in optimizing the data storage on the drive.
1. Analysis Pass: In the first pass, Windows 10 analyzes the data on the hard drive. It examines the arrangement of files and identifies any fragmented data. Fragmentation occurs when a file is stored in non-contiguous blocks on the disk, making it less efficient to access and slowing down the overall performance of the drive.
2. Relocation Pass: After the analysis, the second pass is executed. This pass aims to relocate the fragmented data so that it is stored in contiguous blocks. By doing this, Windows 10 can improve the efficiency of data access, resulting in faster read and write operations.
3. Consolidation Pass: The third and final pass is known as the consolidation pass. In this pass, Windows 10 further optimizes the data placement on the hard drive. It consolidates the free space and redistributes the files, ensuring that they are stored in the most efficient manner.
By performing these three passes, Windows 10 aims to minimize the fragmentation of data, optimize disk performance, and enhance the overall speed and efficiency of the hard drive.
How Long Should a Defrag Take?
The duration of a disk defragmentation process can vary depending on the size and level of fragmentation of your hard disk. Typically, it can take anywhere from several minutes to a few hours to complete. The larger the disk and the more fragmented it is, the longer the defragmentation process will take.
During the defragmentation process, your computer is still usable, so you can continue using it for other tasks. However, it is recommended to avoid running resource-intensive programs or performing tasks that heavily utilize the hard disk while the defragmentation is in progress. This helps ensure that the defragmentation process can work efficiently without any interruptions.
To give you a better understanding, here is a breakdown of the factors that can influence the duration of a defragmentation process:
1. Disk Size: The larger the hard disk, the more data it contains, and the longer it will take to defragment. This is because there is more data to organize and rearrange.
2. Fragmentation Level: If your hard disk is highly fragmented, meaning the files are scattered in many fragments across the disk, the defragmentation process will take longer. This is because the defragmenter needs to analyze and rearrange more fragmented files.
3. System Resources: The speed of your computer’s processor and the amount of available RAM can affect the defragmentation process. Higher-end systems with more processing power and RAM may complete the defragmentation faster than lower-end systems.
It’s important to note that you can still use your computer while the defragmentation is in progress, but keep in mind that running resource-intensive tasks may slow down the defragmentation process. It’s generally recommended to schedule defragmentation during a time when you don’t need to use your computer intensively, such as overnight or during periods of low activity.
The time it takes for a defragmentation process to complete depends on the size and level of fragmentation of your hard disk. It can range from several minutes to a few hours. It’s advisable to avoid running resource-intensive tasks during defragmentation to ensure optimal performance.
Is 0% Fragmented Good?
Having 0% fragmentation on your HDD is considered good. Fragmentation occurs when files on your hard drive become divided into smaller pieces and scattered across different physical locations. This can happen over time as files are created, modified, and deleted.
When fragmentation occurs, it can slow down the performance of your computer because the hard drive has to work harder to access the scattered pieces of a file. It can also lead to longer load times for applications and files.
Having 0% fragmentation means that all the files on your hard drive are stored in contiguous blocks, which allows for faster and more efficient access. This can result in improved overall system performance and faster file access times.
On the other hand, if your hard drive shows a high level of fragmentation, it may be beneficial to defragment it. Defragmentation is the process of reorganizing the files on your hard drive to eliminate fragmentation and improve performance.
Having 0% fragmentation on your hard drive is considered good because it indicates that files are stored in contiguous blocks, resulting in faster and more efficient access.
What Percentage Fragmentation is Acceptable?
The acceptable percentage of fragmentation for a disk is generally considered to be less than 10 percent. When a disk is fragmented, it means that files are scattered and not stored in contiguous blocks, which can slow down the performance of your computer. Therefore, it is recommended to defragment your disk whenever it exceeds this threshold.
In Windows 10, Windows 8, and Windows 7, you have the option to schedule regular defragmentation to ensure your disk remains optimized. By setting up a schedule, you can automate the process and ensure that your disk is defragmented as often as necessary. This helps maintain optimal performance and keeps your computer running smoothly.
To schedule defragmentation in Windows, follow these steps:
1. Open the “Disk Defragmenter” tool by typing “defragment” in the Windows search bar and selecting the “Defragment and Optimize Drives” option.
2. In the Disk Defragmenter window, you will see a list of your drives. Select the drive you want to schedule defragmentation for.
3. Click on the “Configure schedule” button. This will open the “Scheduled Optimization” settings.
4. Check the box that says “Run on a schedule (recommended)”.
5. Choose the frequency at which you want the defragmentation to occur. You can select daily, weekly, or monthly. Additionally, you can specify the time when the defragmentation process should start.
6. Click on the “OK” button to save the schedule.
Once you have set up the schedule, Windows will automatically defragment your disk according to the frequency you have chosen. This ensures that your disk remains optimized and helps improve the overall performance of your computer.
It is important to note that defragmentation may take some time, especially if your disk is heavily fragmented. Therefore, it is recommended to schedule the defragmentation during a time when your computer is not in use, such as overnight or during periods of low activity.
By regularly defragmenting your disk, you can help maintain its performance and ensure that your computer runs efficiently.
Conclusion
When it comes to defragmenting your hard drive, Windows 10 performs three passes to optimize the organization of your data. The first pass is an analysis of the data, identifying any fragments that are not stored in contiguous blocks. The second pass is the actual relocation of this fragmented data, ensuring that it is stored in contiguous blocks. the third pass verifies the success of the defragmentation process.
During this process, Disk Defragmenter may take anywhere from several minutes to a few hours to complete, depending on the size and level of fragmentation on your hard disk. However, it is important to note that you can still use your computer while the defragmentation is in progress.
It is generally recommended to defrag your hard drive if it is more than 10 percent fragmented. This can help improve the overall performance and speed of your system. In Windows 10, Windows 8, and Windows 7, you can schedule defragmentation to occur regularly, ensuring that your hard drive remains optimized.
For those using an SSD, the status will simply show as “OK” with information about when the TRIM command was last run. SSDs have a different method of managing data, so traditional defragmentation is not necessary for these drives.
Defragmenting your hard drive is an important maintenance task to keep your system running smoothly and efficiently. By organizing your data into contiguous blocks, you can improve the speed and performance of your computer.


