QuickTime is a powerful media player and screen recording tool that is pre-installed on all Mac computers. It is an excellent option for recording your screen, whether you are creating a tutorial, recording a presentation, or capturing gameplay footage. One of the most useful features of QuickTime screen recording is the ability to record internal audio, which means that you can record the sounds from your computer’s system and apps without using an external microphone.
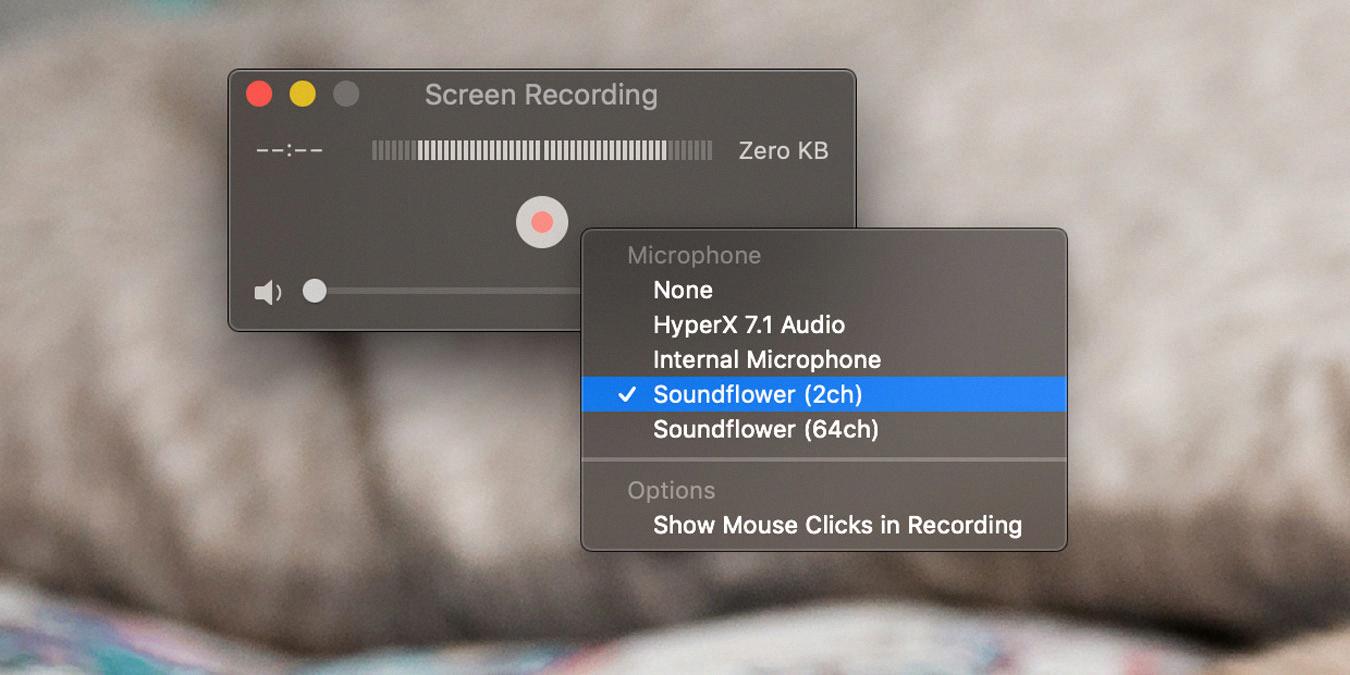
To get started with QuickTime screen recording, simply open the application and click on “File” and then “New Screen Recording.” A small recording window will appear on your screen, and you can customize the recording settings by clicking on the small arrow next to the red record button. Here, you can select your microphone input, choose to show or hide the mouse cursor and select the quality of the recording.
When it comes to recording internal audio, you will need to use a special tool called Soundflower. Soundflower is a free, open-source application that allows you to route audio from one application to another. To use Soundflower with QuickTime, you will need to download and install the application on your Mac. Once you have installed Soundflower, you can select it as your microphone input in the QuickTime recording settings. This will allow you to record the sounds from your computer’s system and apps, without picking up any external noise.
One thing to keep in mind when using QuickTime screen recording with internal audio is that it can be a bit tricky to get the settings right. You may need to adjust your volume levels or tweak your recording settings to get the best results. It is also important to make sure that you have enough disk space on your computer to save your recordings, as screen recording can take up a lot of space.
QuickTime is a powerful and versatile tool for screen recording on Mac computers. With the ability to record internal audio using Soundflower, you can easily capture high-quality recordings of your computer’s system and apps. However, it is important to take the time to adjust your settings and ensure that you have enough disk space before you start recording. QuickTime is an excellent option for anyone looking to create high-quality screen recordings on their Mac computer.

Recording Internal Audio with QuickTime Player
To record internal audio with QuickTime Player, you need to use a third-party tool called “Soundflower (2ch).” Here are the steps to follow:
1. Open QuickTime Player and click on File>New Screen Recording.
2. Click the little arrow on the side of the Quicktime window.
3. Under the microphone section, click on “Soundflower (2ch).”
4. Start recording your screen, and the internal audio will be captured along with it.
5. If you would rather record ONLY audio and not the screen, click File>New Audio Recording, and select “Soundflower (2ch)” as your input source.
It’s important to note that Soundflower (2ch) is a free tool that you will need to download and install on your Mac before you can use it with QuickTime Player. This tool allows you to route audio from one application to another, which is why it’s useful for recording internal audio with QuickTime Player.

Screen Recording with Internal Audio
It is possible to screen record with internal audio on Android devices. However, not all screen recorders support this feature. To record internal audio, you need to use a screen recorder that has the option to capture internal audio.
There are several screen recorders available on the Google Play Store that support internal audio recording. Some of the popular ones include AZ Screen Recorder, DU Recorder, ADV Screen Recorder, and Mobizen Screen Recorder.
To use these apps, you need to download and install them on your Android device. Once installed, open the app and select the option to record the screen. You will then be prompted to select the audio source. Select the internal audio option to capture the audio coming from your device.
It is important to note that some of these apps may require root access to record internal audio. However, there are also screen recorders that allow internal audio recording without rooting your device.
Yes, you can screen record with internal audio on Android devices, but you need to use a screen recorder that supports this feature.
Recording Mac Screen with Ingame Audio
To record your Mac screen with in-game audio, you can use QuickTime, which is a built-in screen recording tool on your Mac. Here’s how to do it:
1. Open QuickTime on your Mac.
2. Click “File” on the menu bar, and select “New Screen Recording”.
3. Click on the small arrow beside the red record button to customize the recording settings.
4. Choose your desired audio input from the dropdown menu. If you want to record the in-game audio, select “Internal Microphone” or “Built-in Input”.
5. Click the record button to start recording your screen.
6. Play the game and the in game audio will be recorded along with the screen.
7. To stop the recording, click on the stop button on the menu bar.
8. Save your recording by clicking on “File” > “Save”.
Note that some games may require additional settings to be adjusted to enable the recording of the in-game audio. You can check the game’s settings or documentation for more information.
Conclusion
QuickTime is a powerful and versatile screen recording tool that allows users to capture both video and audio from their Macs. With its user-friendly interface and customizable settings, QuickTime makes it easy for users to record their gameplay, tutorials, presentations, and more. Additionally, QuickTime offers the ability to record internal audio, which is a valuable feature that not all screen recording tools provide. QuickTime is a reliable and efficient option for anyone looking to record their Mac screen and audio.


