Spell check is a great tool for catching spelling errors in Mac Word. Unfortunately, it doesn’t always work as expected. Fortunately, there are a few quick and easy solutions to get the spell check feature up and running again.
The first step is to make sure that the correct language is selected in the Language dialog box. To access this, click on the Tools menu and select Language. Once inside, make sure that the correct language is selected from the drop-down menu. Then make sure that the “Do not check spelling or grammar” check box is UNCHECKED.
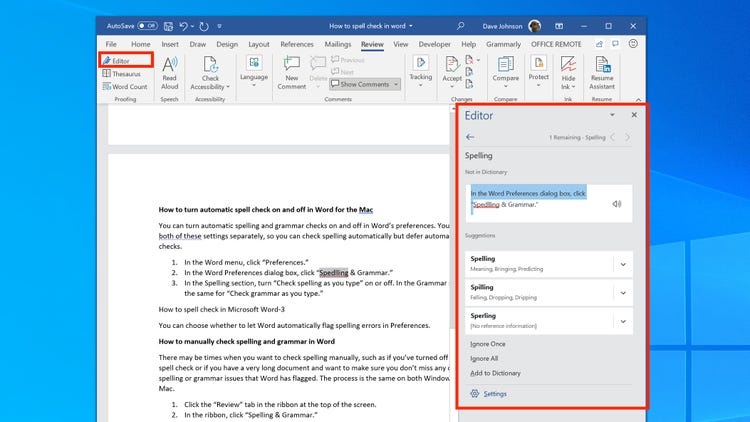
If you are still having issues with spell check, you can try manually checking your spelling by clicking on Review > Spelling & Grammar. This will bring up a list of any potential mistakes that you have made in your document and allow you to fix them quickly and easily.
Finally, if you would like to turn spell check back on, simply go back into File > Options > Proofing and select the “Check to spell as you type” box. This will allow Word to automatically detect any errors in your document as you type without having to manually go through it every time you write something new.
Whether you use spell check regularly or not, it’s always important to double-check your work for accuracy before sending out any documents or emails! A quick glance over your text with the spell-check feature can help save embarrassment down the line when a mistake slips past unnoticed!

Using Spell Check on a Mac
The spell check shortcut on Mac is Command (?) – semicolon (;). To use this shortcut, simply press Command (? ) and then the semicolon key. This will open up the “Show Spelling and Grammar” window, which allows you to review any spelling errors in your document. You can also use the keyboard shortcut Command (?) – colon (:) to open the “Check Document Now” window, which will automatically run a spell check on your document.
Troubleshooting Spell Check Issues in Word for Mac
Spell check may not be working in Word for Mac because the language setting is incorrect or the spelling and grammar check box is not checked. To make sure spell check is enabled, click on the Tools menu, select Language, and make sure the correct language is selected. Then verify that the check box “Do not check spelling or grammar” is unchecked. If these settings are correct but spell check still isn’t working, try restarting your computer and running a repair on Microsoft Office for Mac.
Turning On Spell Check in Microsoft Word
To turn spell check on in Word, open the program and click File > Options > Proofing. Check the box next to ‘Check spelling as you type’, and then click OK. This will enable spell check for all documents you create or edit in Word. To manually check your spelling, you can click Review > Spelling & Grammar. If a word is misspelled or incorrect, it will be highlighted in red, and suggested corrections will appear in a pop-up window. You can then choose to accept or ignore the suggestion.
The Challenges of Spell-Checking a Word Document
There could be several reasons why you can’t spell-check a Word document. Firstly, make sure the file is opened. If it is, click on the File tab in the menu bar and select Options. Select Proofing and make sure “Check to spell as you type” is checked under “When Correcting Spelling and Grammar in Word”. If this is already enabled, try disabling it, saving the document, and then re-enabling it to see if that works. Another reason why you may not be able to spell-check a document is that it may contain text written in a language other than your default language setting. To change this setting, go to File > Options > Language and select the language of your choice from the dropdown menu. If none of these options work for you, your version of Microsoft Word might be out of date or corrupt. Try reinstalling the program or updating it to the latest version to see if that helps resolve the issue.
Conclusion
In conclusion, Spell Check is an incredibly useful tool in Mac Word. It helps detect and correct spelling and grammar errors quickly and easily. To turn it on, you can click the “Tools” menu and select the “Language” option. Make sure that the “Do not check spelling or grammar” box is unchecked. You can also turn it on by clicking File > Options > Proofing, clearing the “Check to spell as you type” box, and clicking OK. To manually review your document for mistakes, click Review > Spelling & Grammar. With this knowledge, you are now ready to take advantage of this helpful feature in Mac Word!


