In today’s digital age, we often find ourselves capturing precious moments and memories using our smartphones. With the advancement of technology, newer file formats have emerged to optimize storage space while maintaining image quality. One such format is HEIC (High Efficiency Image Format), which is commonly used in iPhones and iPads. However, HEIC files may not be compatible with all devices and platforms, making it necessary to convert them to a more universally accepted format like JPG (JPEG). In this article, we will explore the process of converting HEIC to JPG and also discuss how to email HEIC files in JPG format.
Converting HEIC to JPG:
There are several methods and apps available to convert HEIC files to JPG, but we will focus on two simple and widely accessible options: using the Preview app on a Mac and utilizing the “Save to Files” feature on an iPhone.
Option 1: Using the Preview app on a Mac
1. Open the HEIC photo you want to convert in Preview.
2. Click on “File” in the menu bar and select “Export.”
3. In the export window, choose a location to save the converted file.
4. In the “Format” dropdown menu, select “JPEG” (JPG).
5. Click “Save” to convert and save the HEIC image as a JPG file.
Option 2: Utilizing the “Save to Files” feature on an iPhone
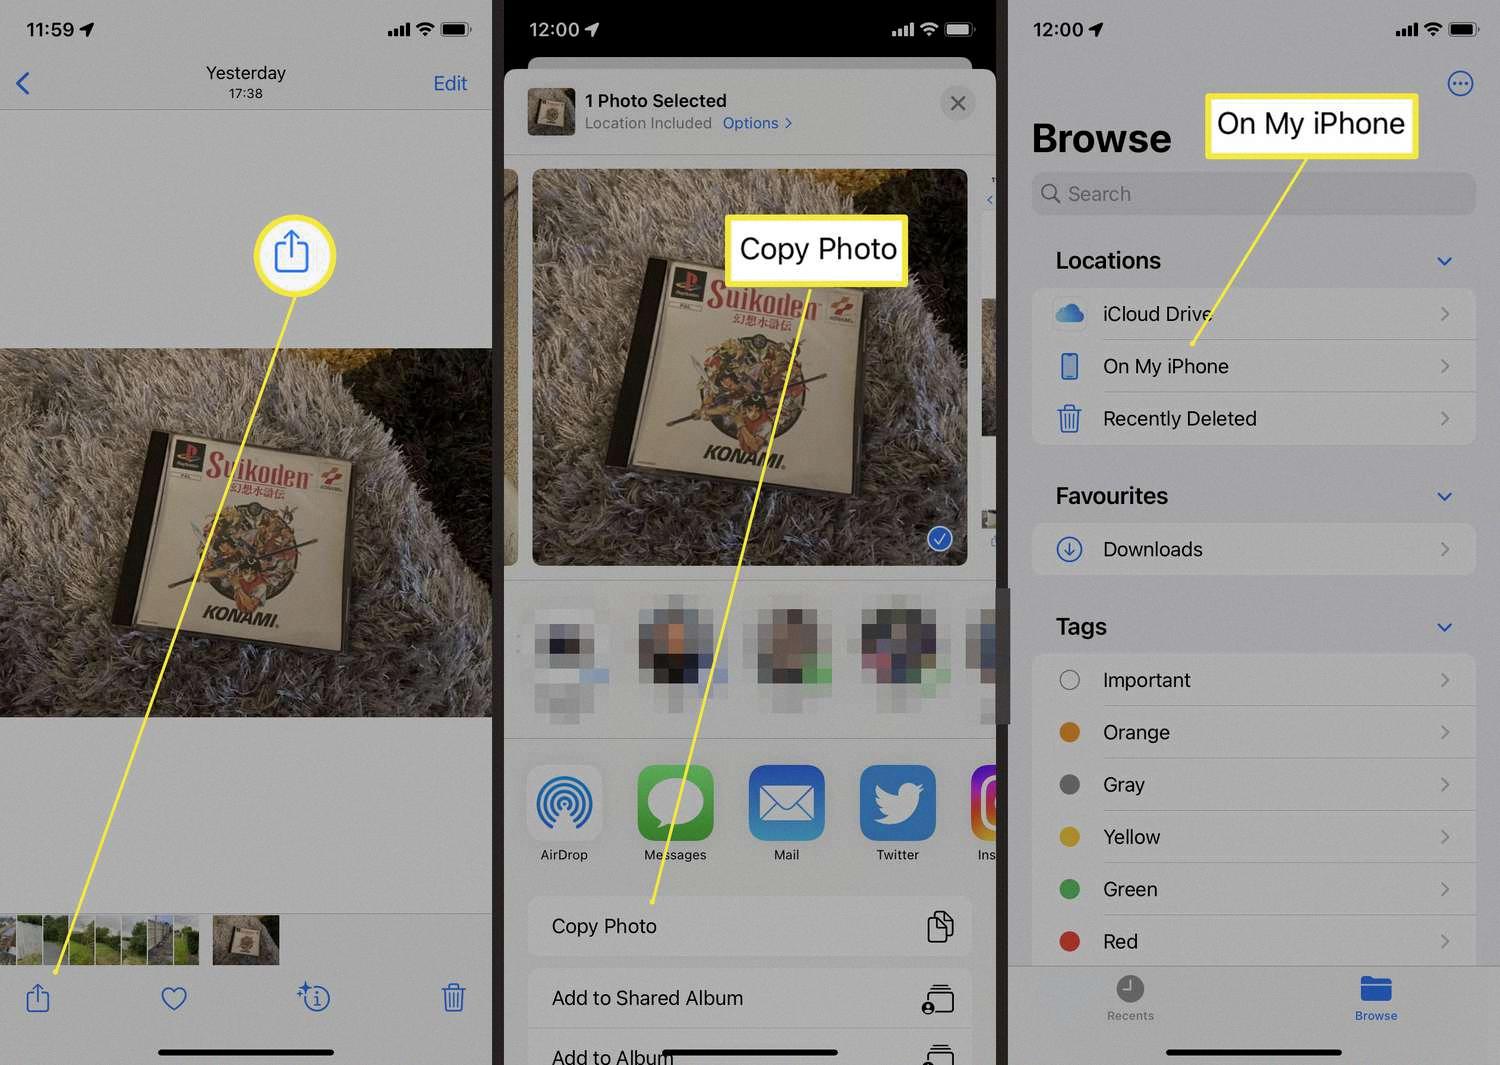
1. Open the Photos app on your iPhone and locate the HEIC photo you wish to convert.
2. Tap on the share icon (usually represented by a square with an arrow pointing upwards).
3. From the share sheet options, select “Save to Files.”
4. Choose a location to save the file (e.g., “On My Phone” > “Downloads”).
5. Open the saved file in the Files app.
6. Tap on the share icon again and select “Mail.”
7. Compose your email, add recipients, and send the email. The image will be attached as a JPG file.
Emailing HEIC Files in JPG Format:
Now that you have converted your HEIC file to JPG, you may want to email it to someone. Here’s how you can do it:
1. Open the Mail app on your iPhone or computer.
2. Create a new email.
3. Add the recipient’s email address, subject, and any additional message you want to include.
4. Click on the attachment icon (usually represented by a paperclip).
5. Select the converted JPG file from your device or file location.
6. Wait for the file to upload, and then click “Send” to send the email with the HEIC file in JPG format.
Converting HEIC to JPG is a simple process that allows you to make your photos more compatible with various devices and platforms. Whether you choose to use the Preview app on a Mac or the “Save to Files” feature on an iPhone, you can easily convert your HEIC files to JPG. Additionally, emailing HEIC files in JPG format is as straightforward as attaching any other file to an email. By following the steps outlined in this article, you can ensure that your photos can be easily accessed and shared across different devices and platforms.
How to Convert HEIC to JPG in Email?
To convert HEIC to JPG in email, you can follow these step-by-step instructions:
1. Open your email application and compose a new email.
2. Attach the HEIC photo that you want to convert to JPG by clicking on the attachment icon or using the attach file option.
3. Once the HEIC file is attached, you can either right-click on it or click on the options menu (usually represented by three dots or a gear icon) to find the option to convert the file.
4. Look for an option like “Convert to JPG” or “Save as JPG” and select it. This action will convert the HEIC file to a JPG format.
5. After selecting the conversion option, the email application will automatically convert the HEIC file to JPG. This process may take a few seconds, depending on the file size.
6. Once the conversion is complete, the email application will replace the HEIC file with the JPG version. You will see the new JPG file listed as the attachment.
7. you can continue composing your email or add any additional information before sending it to the intended recipient.
Remember, the availability of the conversion option may vary depending on the email application you are using. If your email application does not have a built-in conversion feature, you can save the HEIC file to your device and use a third-party app or an online converter to convert it to JPG before attaching it to the email.
How Do You Email HEIC Photos?
To email HEIC photos, you can follow these steps:
1. Save the HEIC photo to your device: When you receive an HEIC photo or have one saved on your device, you’ll need to save it locally. You can do this by using the “Save to Files” option in the Photos share sheet. Choose a location on your device, such as “On My Phone” > “Downloads.”
2. Open the HEIC photo in Files: Once you have saved the HEIC photo locally, navigate to the Files app on your device. Locate the HEIC photo in the folder where you saved it.
3. Share the HEIC photo via Mail: Tap on the HEIC photo to open it. In the top-right corner, you will find a share button (usually represented by a square with an arrow pointing upward). Tap on this share button to open the share sheet. Look for the option to share via Mail and select it.
4. Compose your email: After selecting the Mail option, a new email draft will open with the HEIC photo attached. Enter the recipient’s email address, subject, and any additional message you want to include.
5. Send the email: Once you have composed your email and reviewed it for accuracy, tap the send button (usually represented by a paper plane icon). Your email, along with the attached HEIC photo, will be sent to the recipient.
Please note that when sending HEIC photos via email, the recipient’s device and email client should support HEIC file format. If the recipient’s device or software doesn’t support HEIC, they may encounter issues in opening or viewing the photo. In such cases, you can consider converting the HEIC photo to a more widely compatible format like JPEG before sending it.
Can You Email An HEIC File?
Emailing an HEIC file may not be possible, depending on the email client or platform you are using. HEIC files are not universally supported and may not be compatible with all email services. When attaching an HEIC file to an email, some email clients may automatically convert it to a compatible format, such as JPEG, while others may not support it at all. If you’re unsure whether your recipient can open an HEIC file, it is recommended to convert it to a more widely supported format, such as JPEG or PNG, before sending it via email. This ensures that the recipient will be able to view and access the file without any issues.
How Do You Send iPhone Picture As JPEGs?
To send iPhone pictures as JPEG files, you can follow these steps:
1. On your iPhone, go to the “Settings” menu.
2. Scroll down and tap on “Photos.”
3. Keep scrolling down until you reach the bottom of the menu.
4. Look for the “Transfer to Mac or PC” header.
5. Under this header, you’ll find different options for transferring your photos.
6. If you want your iPhone to automatically convert HEIC files to JPEG when sharing to incompatible devices, make sure the “Automatic” option is selected.
7. Once you’ve selected the desired option, you can exit the settings menu.
By enabling the “Automatic” option, your iPhone will automatically convert HEIC files (the default format for iPhone photos) to JPEG files when you use sharing options that could go to a device that doesn’t support HEIC. This way, you can ensure compatibility with other devices or platforms.
Remember that if you prefer to manually convert specific photos to JPEG, you can use various third-party apps or software on your computer to convert the files. This can be useful if you want more control over the conversion process or need to convert a large number of photos at once.
You can send iPhone pictures as JPEG files by adjusting the “Transfer to Mac or PC” settings in the “Photos” menu. Enabling the “Automatic” option will ensure that your iPhone converts HEIC files to JPEG when sharing to incompatible devices.
Conclusion
Converting HEIC files to JPG format is a simple process that can be done using various methods. One of the easiest ways is to use the Preview app on a Mac, where you can open the HEIC photo and export it as a JPG file. Another option is to use the “Save to Files” feature in the Photos app on iOS devices, which allows you to save the HEIC file locally and then open it in the Files app. From there, you can share it as an attachment in an email or any other platform that supports JPG files.
It’s important to note that HEIC files are not compatible with all platforms, so converting them to JPG format may be necessary if you want to share or use them on non-iOS devices or platforms. By converting HEIC files to JPG, you ensure that they can be easily viewed, shared, and used across different devices and platforms.
Additionally, if you have the “Automatic” setting enabled in the Photos app on your iPhone, it will automatically convert HEIC files to JPEG when you use sharing options that could go to an incompatible device. This feature ensures that your photos are compatible with a wider range of devices and platforms without the need for manual conversion.
Converting HEIC files to JPG format is a simple and necessary step to ensure compatibility and ease of use when sharing or using your photos across different devices and platforms.

