Whether you’re trying to free up space on your Mac or just want to get rid of old updates, you may want to delete the Update folder. The Update folder is located in the Library folder of your macOS installation and contains all the software update files that have been downloaded from Apple. Removing this folder can save you a significant amount of disk space—especially if you haven’t been deleting old updates manually. But before you delete the Update folder, thee are a few important things to consider.
In some versions of macOS, the Update folder is protected by System Integrity Protection (SIP). This means that any attempts to delete it will be blocked by macOS itself. To check if SIP is enabled on your Mac, open Terminal and type “csrutil status”. If SIP is enabled, you won’t be able to delete the Update folder wihout disabling it first.
If SIP is not enabled on your Mac, then you can delete the Update folder manually. To do so, open Finder and navigate to the Library folder in your main user directory (you may need to press Command + Shift + G and enter ~/Library/). Once inside the Library directory, locate the Updates folder and move it to Trash.
Before deleting the Update folder permanently, make sure that none of its contents are needed by any other applications or processes—otherwise they may stop working correctly. You should also note that any future software updates from Apple will be downloaded into a new Updates folder once you empty Trash.
In summary, deleting an outdated or unwanted Update folder can help free up valuable disk space on your Mac. However, it should only be done with caution since removing system-protected files could cause unexpected issues with your computer’s performance or stability.
Removing an Update on a Mac
To remove an update on your Mac, you’ll need to use the System Preferences app. First, open the Apple Menu and select System Preferences. Then, select Software Update in the System Preferences window. You will be able to view a list of installed updates. To remove an update, simply click on it and select “Uninstall”. Confirm the uninstallation by clicking “Uninstall” agin in the confirmation window that appears. Once you click Uninstall, the update will be removed from your Mac.
The Update Folder on Mac
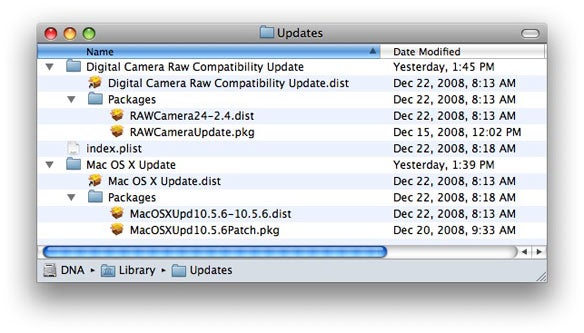
The update folder on Mac is located in /Library/Updates. This is where all the updates for your Mac are stored. It is created automatically when you download and install a software update via Software Update. If you’ve selected the option in Software Update to save downloads, then any downloaded updates will also be saved in your Downloads folder. This allows you to manually install updates if needed, or to back up the files for safe keeping.
Deleting a Folder That Won’t Delete on Mac
To delete a folder on your Mac that won’t delete, follow these steps:
1. Open the Finder on your computer and navigate to the folder you want to delete.
2. Right-click (or Ctrl-click) the folder and select Get Info from the menu that appears.
3. Expand the General tab and find the Locked checkbox. If it’s turned on, deselect it.
4. After unlocking the folder, go back and select it again, then press Command+Delete or choose Move to Trash from the right-click menu.
5. Empty your Trash to permanently delete the folder from your Mac.
Deleting Update Installers on Mac
Yes, you can safely delete update installers on Mac. These installers are used to update the operating system, such as upgrading to Big Sur or Monterey. If you delete them and decide to upgrade in the future, you can always download the one you want again. However, it is important to note that if you are currently running an older version of the operating system, these installers should not be deleted as they will be needed for the upgrade process.
Location of IOS Update Files on Mac
Answer: iOS update files are stored on your Mac in the ~/Library/iTunes/iPhone Software Updates folder. To access this folder, make sure you have Finder selected in your Dock (the smiley face icon on the far left of the Dock), then hold down the ALT key and select Go from the Menu. From there, select Library and you should find the iPhone Software Updates folder.
Deleting an Undeletable Folder
Solution: To delete an undeletable folder, first you need to close the folder or file that you are trying to delete. To do this, press the Ctrl + Alt + Delete keys simultaneously to open up the Task Manager. Once it is open, find the application in which your data is being used and select it. Then click “End task” to close the application. After that, try deleting the undeletable information once again. If it still won’t delete, you can use a third-party software such as Unlocker or MoveOnBoot to remove the folder from your computer entirely.
Forcing a Folder Deletion on Mac
To force-delete a folder on your Mac, fist select the folder and press Command-Delete. If the folder is locked, you will be prompted to confirm that you want to move it to the Trash. Once you confirm, the folder will be moved to the Trash and can then be permanently deleted from there. To delete items from your Trash, open the Trash in your Dock or Finder window and select the items you’d like to delete. Then click Delete Immediately (or press Command-Delete) to force-delete them.
Conclusion
In conclusion, deleting update folders on Mac can be done easily with a few simple steps. First, you need to open the Finder and locate the folder containing the update files. Then, you must unlock any locked files before they can be moved to Trash. Finally, select the folder and click on the delete button in order to remove it from your Mac. Following thse steps should ensure that your update folder is successfully removed from your Mac.


