The iPhone is a popular device that allows you to capture high-quality photos and videos. If you are an avid iPhone user, you may have accumulated a large collection of photos and videos over time. However, it can be challenging to manage your photos and videos if they are scattered across multiple devices. In this article, we will discuss how to copy iPhone photos to Mac.
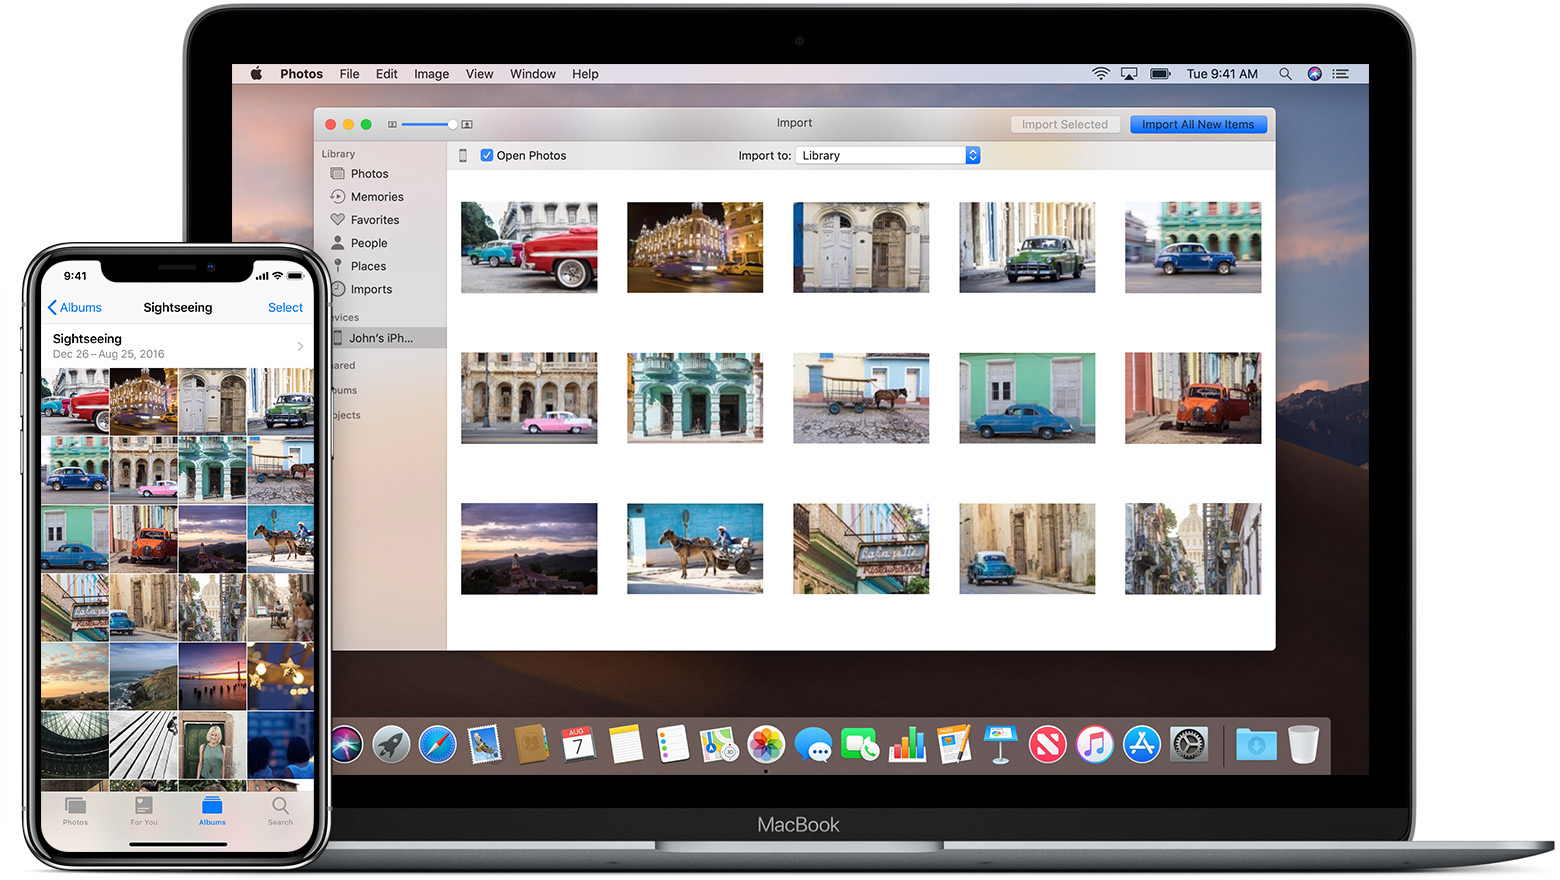
The process of copying iPhone photos to Mac is relatively simple. You can use the built-in Photos app on your Mac to import your photos and videos from your iPhone. Here are the steps to follow:
Step 1: Connect your iPhone to your Mac using a lightning cable.
Step 2: Open the Photos app on your Mac.
Step 3: Click on the Import tab located in the top toolbar of the Photos app.
Step 4: Select the photos and videos you wish to import to your Mac.
Step 5: Click on the Import Selected button to begin the transfer process.
Step 6: Once the transfer is complete, you can view your imported photos and videos in the Photos app on your Mac.
It’s important to note that you may need to unlock your iPhone using your passcode or Touch ID to allow the Mac to access your photos and videos. Also, if you have enabled iCloud Photos on your iPhone, your photos and videos may already be synced to your Mac via iCloud. In this case, you can access your photos and videos in the Photos app on your Mac without needing to import them.
Copying iPhone photos to Mac is a straightforward process that can be done using the built-in Photos app on your Mac. By following the steps outlined above, you can easily transfer your photos and videos from your iPhone to your Mac for safekeeping and easy access.

Transferring Photos From iPhone to Mac
To transfer photos from your iPhone to your Mac, you can follow these steps:
1. Connect your iPhone to your Mac using a USB cable.
2. Open the Photos app on your Mac.
3. If the Photos app doesn’t open automatically, click on the Photos icon in your Dock or Applications folder.
4. Once the app is open, you should see your iPhone listed under the “Devices” section on the left-hand side of the screen.
5. Click on your iPhone to select it.
6. You should now see all of the photos and videos on your iPhone in the main window of the Photos app.
7. Select the photos and videos you want to transfer to your Mac by clicking on them.
8. Once you have selected the photos and videos, click on the “Import Selected” or “Import All New Photos” button at the top right-hand side of the screen.
9. The Photos app will now begin importing your selected photos and videos to your Mac.
10. Once the import is complete, you can find your photos in the “Photos” tab of the Photos app.
It’s important to note that if you have iCloud Photos enabled on both your iPhone and Mac, your photos will automatically be synced across both devices. This means that any photos you take on your iPhone will also be available on your Mac without the need for manual transfer.
Transferring Photos from iPhone to Mac Quickly
The fastest way to transfer photos from an iPhone to a Mac is by using a Lightning-to-USB cable. This cable can be plugged into one of your Mac’s USB ports to establish a connection with the iPhone. Once connected, the macOS Photos app automatically opens and suggests importing the photos. Alternatively, you can also use the AirDrop feature to transfer photos wirelessly. To use AirDrop, both the iPhone and the Mac should be on the same Wi-Fi network and have the feature turned on. Select the photos you want to transfer on the iPhone and choose the Mac as the receiving device. The photos will be transferred wirelessly and saved to the Mac’s Downloads folder. Additionally, you can use iCloud to transfer photos from the iPhone to the Mac. In this case, you need to enable iCloud Photos on both devices and ensure they are connected to the internet. Once enabled, your photos will be automatically synced between the two devices, and you can access them from the Photos app on your Mac.
Transferring Photos From iPhone to Mac: Challenges and Solutions
There are several reasons why you may be experiencing difficulty transferring photos from your iPhone to your Mac. One common issue is that your device’s location and privacy settings may be preventing a successful connection. By restoring these settings, you can potentially resolve the problem.
To restore your iPhone’s location and privacy settings, follow these steps:
1. Open the Settings app on your iPhone.
2. Tap on General.
3. Scroll down and select Reset.
4. Choose either Reset Location & Privacy or Reset All Settings, depending on your needs.
After restoring your settings, try transferring your photos again. If the issue persists, there may be other factors at play, such as faulty cable or outdated software. In such cases, it may be helpful to seek assistance from an Apple support professional or consult online forums for further troubleshooting tips.


