Calibrating your GPS on an Android device is a simple yet effective way to enhance your location tracking and navigation accuracy. By following a few easy steps, you can ensure that your device accurately pinpoints your location and displays the correct direction.
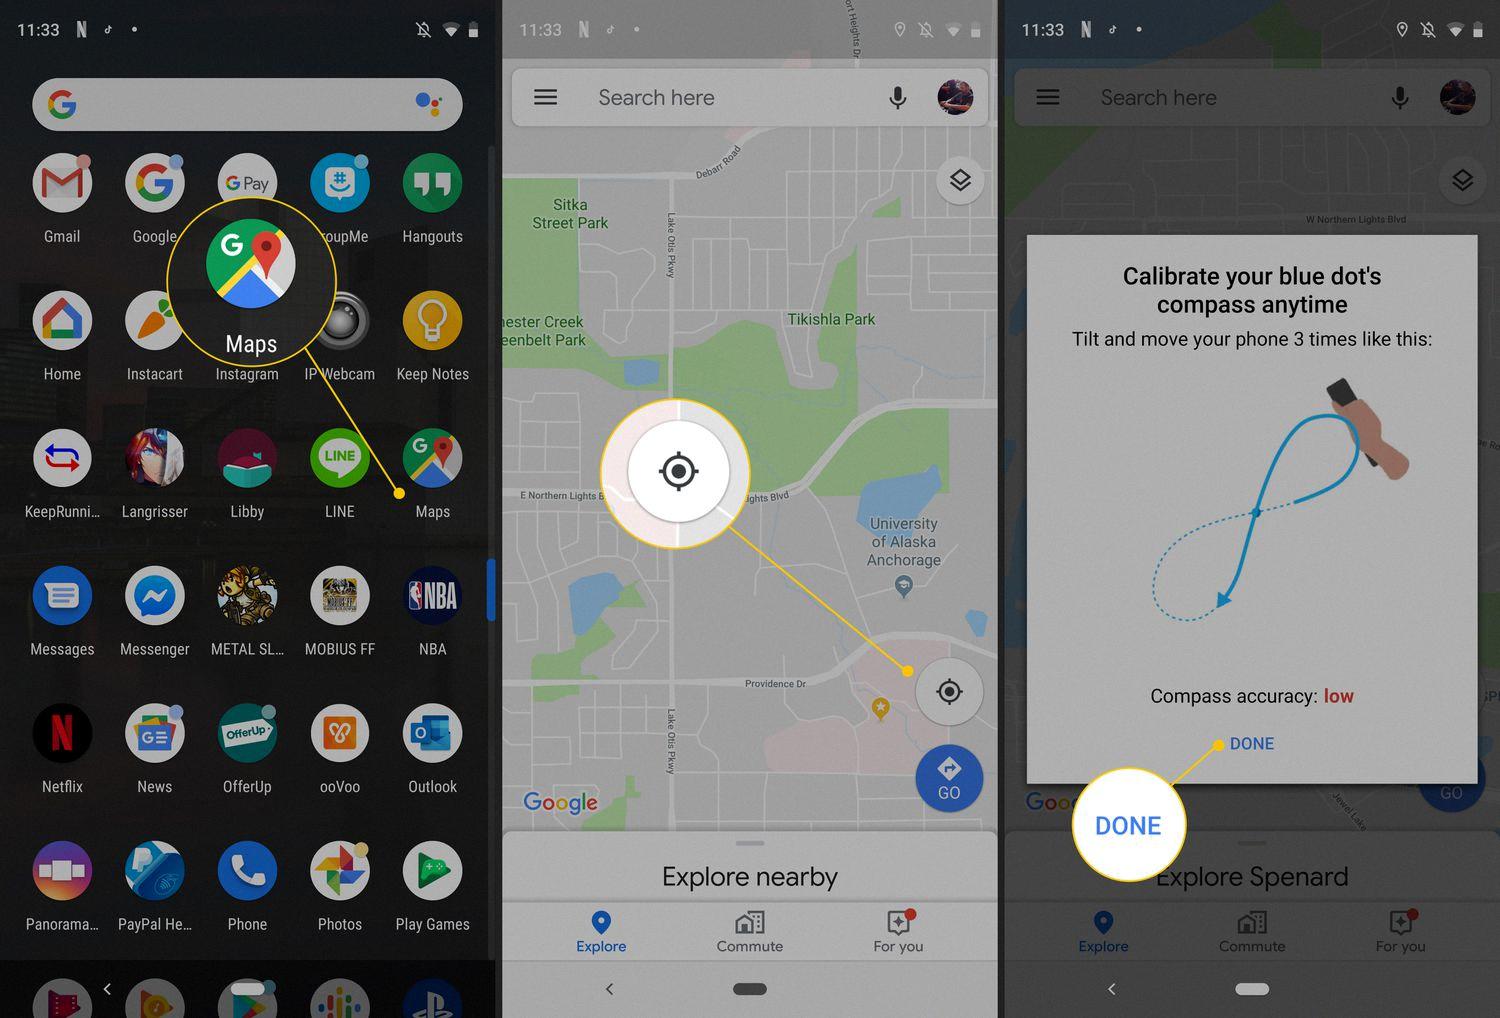
To begin, open the Google Maps app on your Android device. Look for the blue dot that represents your current location and tap on it. A pop-up menu will appear, offering various options. Select “Calibrate compass” from this menu.
Next, it’s important to enable high accuracy mode for optimal GPS performance. To do this, go to the Settings app on your Android device and tap on “Location.” Toggle the location setting to “On” and then tap on “Mode.” From the options provided, select “High accuracy.”
Now, let’s focus on compass calibration. If you notice that the blue dot in your Google Maps app is not pointing in the right direction or is displaying an incorrect location, it’s time to calibrate your compass. Here’s how to do it on an Android phone:
1. Open the Google Maps app, if it’s not already open.
2. Look for the blue dot representing your location.
3. Hold your phone flat and move it in a figure-eight motion until the compass is calibrated.
4. You may need to repeat this process a few times to ensure accurate calibration.
Calibrating your GPS and compass on your Android device can significantly improve location accuracy, making your navigation experience smoother and more reliable. By following these simple steps, you’ll be able to enjoy accurate location tracking and precise directions when using apps like Google Maps.
Steps to Calibrate Your GPS on Your Android
To calibrate your GPS on your Android device, follow these steps:
1. Open the Google Maps app on your Android device.
2. Tap on the blue dot that represents your current location on the map.
3. A pop-up menu will appear with several options. Select “Calibrate compass” from the list.
4. A screen with a circle and some instructions will appear. Hold your device in your hand and move it in a figure-eight motion until the compass is calibrated. This helps the GPS system accurately determine your direction.
5. Once the compass is calibrated, you will see a message confirming the calibration.
To ensure the best GPS accuracy, it’s recommended to calibrate your compass regularly, especially if you have recently traveled long distances or changed your location significantly.
It’s worth noting that the steps may vary slightly depending on your Android device and the version of the Google Maps app you are using. However, the general concept of calibrating the compass remains the same.
By calibrating your GPS, you can improve the accuracy of your location tracking and navigation experience on your Android device.

How Do You Fix an Inaccurate GPS on Your Android?
To address the issue of an inaccurate GPS on your Android device, you can follow these steps:
1. Open the Settings app on your Android phone or tablet. You can usually find it in the app drawer or by swiping down from the top of the screen and tapping the gear icon.
2. In the Settings menu, locate and tap on the “Location” option. This is where you can manage your device’s location settings.
3. Make sure that the location is turned on by toggling the switch at the top of the screen. This enables your device to use GPS, Wi-Fi, and mobile networks to determine your location accurately.
4. Once the location is turned on, tap on the “Mode” option. This is where you can choose the level of accuracy for your device’s location services.
5. In the Mode menu, select “High accuracy.” This option utilizes GPS, Wi-Fi, mobile networks, and other sensors to provide the most precise location information.
6. After selecting High accuracy mode, your Android device will recalibrate and use various sources to determine your location accurately. This may include GPS satellites, nearby Wi-Fi networks, and cellular towers.
By enabling high accuracy mode, you are allowing your device to access multiple location sources simultaneously, improving the accuracy of your GPS. Keep in mind that using high accuracy mode may consume more battery power compared to other modes.
How Do You Reset Your Android GPS?
To reset the GPS on your Android device, you can follow these steps:
1. Open the GPS Status & Toolbox app on your Android device.
2. Tap anywhere on the screen to bring up the menu options.
3. Look for the menu icon, which is typically represented by three dots or lines, and tap on it.
4. From the menu, select “Manage A-GPS state.” A-GPS stands for Assisted GPS, which is a technology that helps improve GPS performance by using additional data from cellular networks.
5. In the Manage A-GPS state menu, you should see an option to “Reset” the A-GPS data. Tap on it.
6. Confirm the reset by tapping on “OK” or “Reset” when prompted.
7. The GPS on your Android device will now be reset, which may help resolve any issues or improve its performance.
Please note that the exact steps may vary slightly depending on the version of the GPS Status & Toolbox app you are using or the specific Android device you have. However, the general process should be similar.
What Does Calibrate Do in Google Maps?
Calibrating in Google Maps helps to ensure that the blue dot, which represents your location, is accurately displayed on the map. It can correct any issues with the direction the blue dot is pointing or if it is showing your location incorrectly.
To calibrate your Google Maps on an Android phone, follow these steps:
1. Open your Google Maps app if it is not already open.
2. Tap on the blue dot that represents your current location on the map.
3. A small blue dot with a white directional arrow should appear. This represents your location and the direction you are facing.
4. Hold your phone in your hand and move it in a figure-eight motion, similar to the motion you would make while stirring a pot.
5. Continue moving your phone in this motion until the calibration process is complete.
6. Once the calibration is finished, the blue dot should be pointing in the correct direction and accurately representing your location on the map.
By calibrating your Google Maps, you can improve the accuracy of the location and direction information provided by the app. This can be especially useful when navigating or using location-based services.
Conclusion
Calibrating the GPS on your Android device is a simple yet effective way to improve your location tracking and navigation experience. By following the steps outlined above, you can ensure that your GPS is accurate and provides you with reliable information. This calibration process can help you avoid incorrect directions, inaccurate location markers, and other issues that may arise when using GPS services. Taking a few minutes to calibrate your GPS can save you time and frustration in the long run, allowing you to navigate confidently and efficiently. So, if you notice any discrepancies or inaccuracies in your GPS readings, don’t hesitate to calibrate your device and enjoy a more precise and reliable navigation experience on your Android device.


