A WPS (Wi-Fi Protected Setup) connection allows users to easily connect to a wireless network without having to enter the network’s password. It is an incredibly convenient feature that offers easy Wi-Fi setup and can be used in both residential and commercial settings.
The process is incredibly simple; all you have to do is press the WPS button on your router and then press the WPS button on your device. This will initiate a secure connection between the two devices, and you will be connected to the wireless network seamlessly.
The great thing about this feature is that it eliminates the need for manual configuration, so you don’t have to worry about entering passwords.

Unfortunately, those looking for Mac Wi-Fi setup via WPS are out of luck. WPS is not supported on macOS, and there is no way to add WPS to Mac.
Does Mac Support WPS Wi-Fi?
No, Mac WPS compatibility is non-existent. You can’t connect via a WPS GUI connection or WPS terminal connection. Unfortunately, Apple has not added any way to connect to Wi-Fi via WPS on Macs.
Connecting a Mac to WPS Wi-Fi
Unfortunately, Mac WPS setup is not supported. I can’t provide WPS connection steps for Mac, but instead of using the WPS button, you can use an Ethernet cable to connect your Mac directly to the router if your Mac has an Ethernet port.
Connecting a Mac to WPA/WPA-2 Wi-Fi

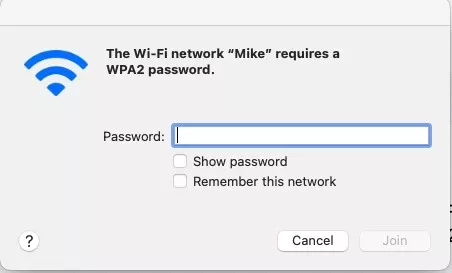
WPA stands for Wi-Fi Protected Access. The current and most widely used version of WPA is WPA-2, which is highly secure. When you enter a Wi-Fi password, you are using WPA-2. WPA security is highly safe, unlike predecessors such as WEP.
To connect your Mac to a WPA Wi-Fi network, you will need to click on the Wi-Fi icon at the top of your screen. Select your Wi-Fi network, and then enter the password for your Wi-Fi network. It’s as simple as that! Your Mac Wi-Fi setup is now complete.
Adding a WPS Printer to a Mac
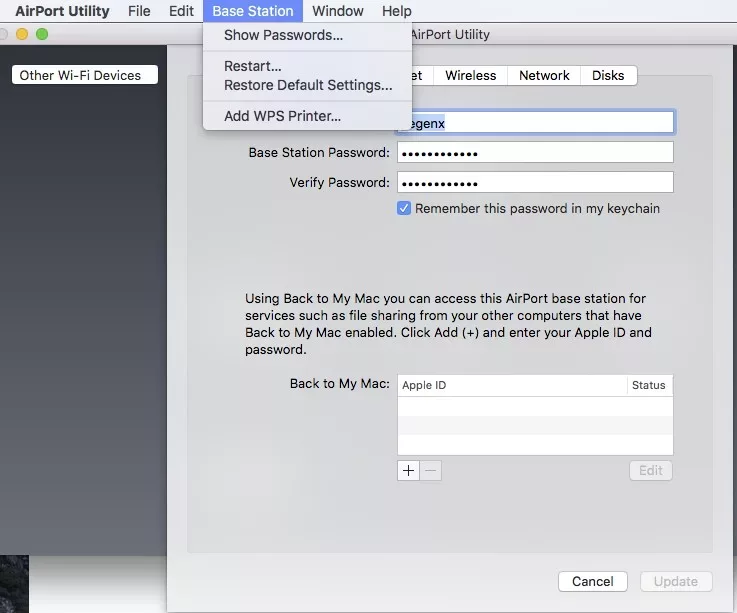
To connect a WPS printer to a Mac via WPS, you will need to use Airport Utility, which is an app on macOS that helps you manage your networks.
Your base station allows you to manage your wireless network or local area network. You can learn how to set up a base station here.
To connect your WPS printer to your Mac, you can go to Airport Utility, select your base station, and click on “Add WPS Printer.” You can then allow the printer to connect by entering the printer’s WPS pin. Alternatively, you can click on “First Attempt” to bypass the printer’s WPS pin and allow the first printer that requests access to the network to connect.
Finally, you can go to Printers & Scanners in your Mac’s settings and select the new printer you just added to enable it for printing and scanning over the network.

Sounds complicated? Don’t worry; here are some simpler options.
For Mac printer setup with a WPS printer, you have a few options, including a direct connection. You can connect the printer to your Mac via a USB cable, bypassing the need for WPS.
An alternative option for wireless printer Mac connections is connecting the WPS printer to your internet router.
You can connect a WPS printer to a router that has a WPS button by clicking the WPS buttons on both devices. Then, you can connect your Mac to the network by entering its WPA-2 password, just like you normally would. If the WPS printer is connected to the same wireless network, it will show up on your Mac.
Macs have printer drivers for most printers, so that shouldn’t be something you should worry about.
Understanding and Using WPS on Your Router
If you have a WPS enabled router, you can connect certain devices (like Windows devices) to it, but not Macs. Here is how to check router WPS compatibility.
Look for a button that is labeled “WPS” or has the WPS icon, which looks like two arrows pointing in opposite directions, as in the following image.

If your router supports WPS, the WPS router settings allow you to connect a device to the router by pressing the WPS button on your router and clicking on the WPS option on the device you want to connect to the network. It’s a one-click setup, so there’s not much more to it.
Some printers, though, will additionally have a WPS pin that you can use to connect the printer to your network and computer via WPS.
Troubleshooting Mac Wi-Fi and WPS Connection Issues
Are you facing WPS connection issues? If WPS is not working, you might have been looking for WPS troubleshooting tips to help with fixing Mac Wi-Fi issues.
The answer to your problems is that Mac doesn’t support WPS at all, so that’s why it’s not working. That explains your Mac Wi-Fi problems when trying to connect via WPS.
Enabling WPS on a Laptop
Are you looking to use WPS on a laptop? WPS is already enabled on Windows laptops. All you need to do is select the network and then click the WPS button on your router instead of entering the password on your computer to complete the laptop WPS setup.
On Mac, you can’t enable WPS.
Does the MacBook Pro Have a WPS Button?
No, there is no MacBook WPS button.
In Airport Utility, which is an app to manage networks on macOS, you can simulate a WPS button. However, this is only for the purposes of connecting WPS printers to your network, and not to connect your Mac to a router.
In other words, it simulates the WPS button on your router, not the WPS button on your computer.
Comparing WPS and Wi-Fi: Which Is Better?
WPS (Wi-Fi Protected Setup) and Wi-Fi itself serve different purposes. Wi-Fi creates a wireless network, allowing devices to connect to the internet. WPS, on the other hand, simplifies the process of connecting devices to your existing Wi-Fi network.
While WPS offers undeniable convenience, it comes at the cost of potentially weaker Wi-Fi security, because when you click the WPS button on your router, anyone can connect, even without the password. That means that visitors can connect to your Wi-Fi network without you knowing.
Although WPS can also work with a PIN, this WPS function itself is highly susceptible to hackers, who can target this function to overcome its security measures and gain access to your network. That’s because the way WPS PINs work is highly insecure and susceptible to brute force attacks, although that’s really beyond the scope of this article.
Traditional Wi-Fi security methods involve entering a password, providing a stronger layer of defense against unauthorized access. So, in the WPS vs. Wi-Fi WAP-2 debate, WPA-2 wins.
In fact, one of the reasons WPS is not supported on Mac is precisely due to its security concerns.
Should I Enable WPS on My Router?
For the sake of your network’s security, it’s generally recommended to disable WPS on your router. Security vulnerabilities have been identified in WPS, making it a potential entry point for hackers.
A more secure approach is to rely on WPA-2 encryption with a strong, unique password for your Wi-Fi network. This offers a robust defense against unauthorized access and keeps your network safe.
Additional WPS Information
While pressing the WPS button simplifies connecting devices, it initiates a two-minute window in which devices can join your network without needing the password. This can be risky.
Note that there is no WPS reset function; disabling WPS on your router altogether is the recommended approach.
WPS is a feature that streamlines the Wi-Fi connection process by automatically sharing your network’s security details with compatible devices upon a button press. Remember, security is paramount, so consider disabling WPS and using a strong WPA2 password for optimal network protection.
Conclusion
Unfortunately, there is no way to add WPS to Mac if your goal is to connect your Mac to your network. However, if you want to connect a WPS-enabled printer to your Mac, you can do that in the Airport Utility app.
In any case, WPS is not very secure, so it’s not recommended to use it. Instead, use a password to protect and connect to your Wi-Fi network.


