If you’re an iPhone user, you know how convenient it is to take photos and videos with your device. But what do you do when you want to transfer those photos and videos to your Mac?
Fortunately, the process of linking your iPhone’s photos and videos to your Mac is actually quite simple. All you need is the right tools and a few minutes of your time. Here’s how to get started:
Step 1: Make sure that both devices are up-to-date with the latest software. On your iPhone, open the Settings app and go to General > Software Update. On your Mac, click on the Apple menu in the top left corner and select System Preferences > Software Update.
Step 2: Connect your iPhone to your Mac using a Lightning or USB-C cable. Once connected, unlock your iPhone if prompted and tap Trust on both devices if asked for permission by either device.
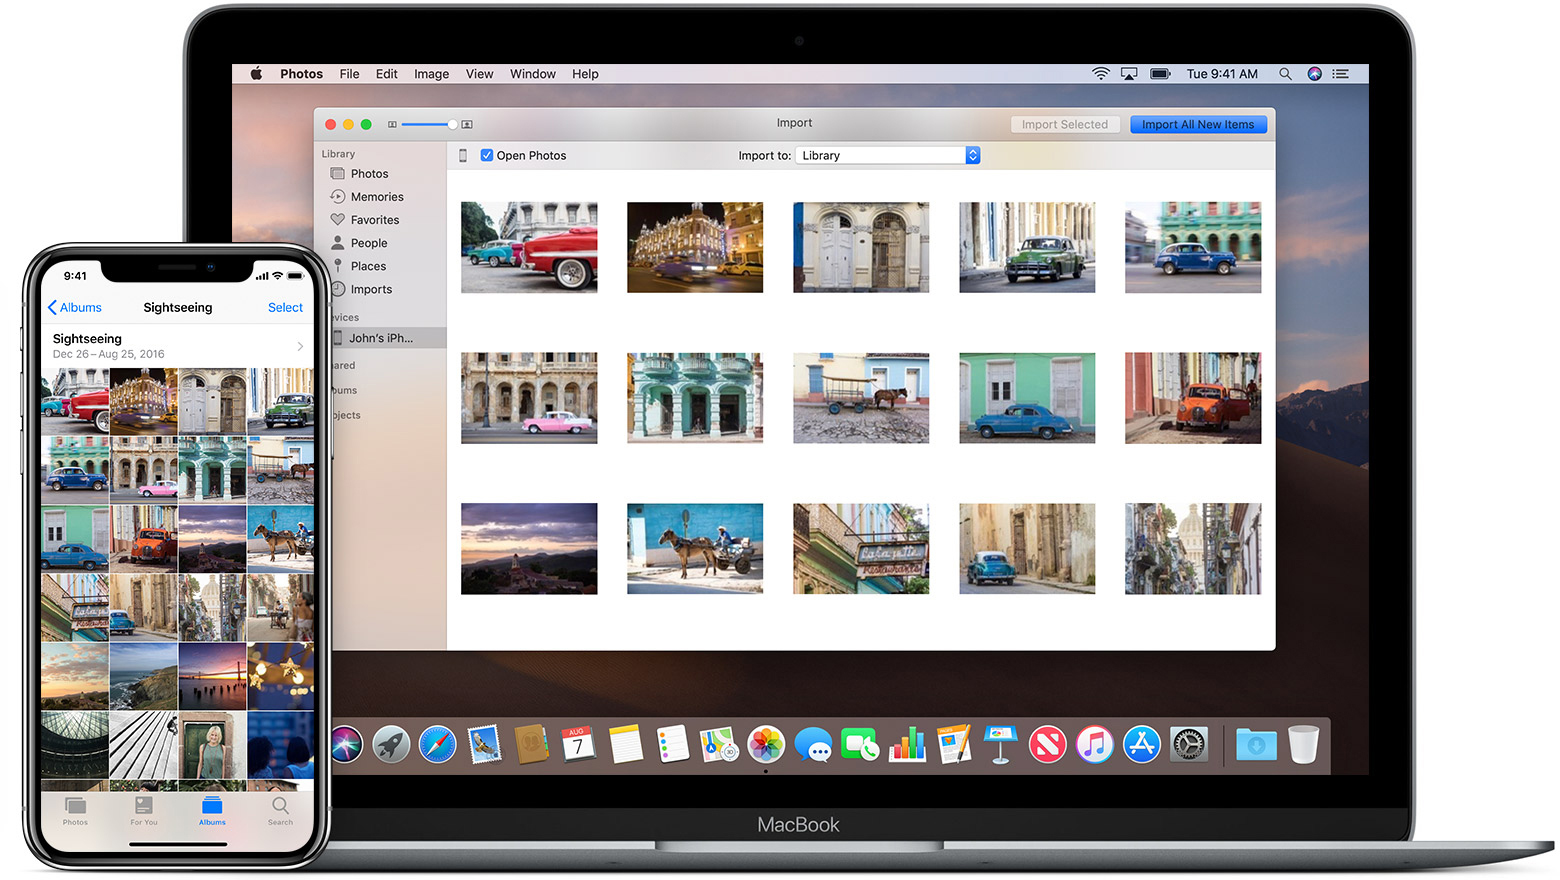
Step 3: Open Photos on your Mac (it’s found in Applications). Click File > Import from [Device Name] (the name of your iPhone). The Photos app will recognize that there is an iPhone connected and will list all of its contents for you to choose from.
Step 4: Select which photos and/or videos you want to import onto your Mac by selecting them individually or selecting all of them at once. Once selected, click Import Selected or Import All in the lower right corner of the window. The items will begin transferring onto your Mac where they can be accessed in Photos or any other folder that you choose.
That’s all there is to it! With just a few clicks of a button, you can quickly transfer any photos or videos from your iPhone onto your Mac without ever needing an internet connection. And if you ever need to transfer more items over, just repeat these steps again!

Troubleshooting iPhone Photos Not Syncing to Mac
There are several possible reasons why your iPhone photos are not syncing to your Mac. The most common issue is that iCloud Photos may not be enabled in the Photos app on your Mac. To enable iCloud Photos, open the Photos app on your Mac and select Photos > Preferences from the menu bar. Then switch to the iCloud tab and check the box next to iCloud Photos.
Additionally, it’s possible that you may have signed into a different Apple ID on your Mac than on your iPhone, which can cause issues with photo syncing. Try signing out of any other Apple IDs in the System Preferences > iCloud and make sure that both devices are using the same Apple ID for iCloud services.
Finally, if none of these steps work, you can try disabling and then re-enabling iCloud Photos on your Mac. To do this, open the Photos app and select Photos > Preferences from the menu bar. Then switch to the iCloud tab and uncheck the box next to iCloud Photos. Wait a few minutes and then check it again to force Photos into syncing correctly again.
Automatically Syncing Photos From iPhone to Computer
To automatically sync photos from your iPhone to your computer, first, connect your iPhone to your computer with the USB cable that came with it. Then open the iTunes app on your PC and click the Device button near the top left of the iTunes window. Click Photos, then select Sync Photos. Choose an album or folder from the pop-up menu, and iTunes will begin syncing photos from your iPhone to your computer. If you don’t see Sync Photos in iTunes, you’re using iCloud Photos to share photos and you don’t need to sync with iTunes.
Troubleshooting Issues With Photo Syncing to Mac
There are several possible reasons why your photos are not syncing to your Mac. First, make sure that the iCloud feature is enabled on all of your devices and that they are all signed in with the same Apple ID. Additionally, make sure that your Mac is connected to the internet. If these steps do not resolve the issue, it is possible that there are software updates available for your devices; check for updates in the App Store or System Preferences on each device. Finally, if you have recently made changes to your photo library or settings on one device, it may take some time for those changes to sync across all of your devices.
Wirelessly Transferring Photos From iPhone to Mac
Yes, you can wirelessly transfer photos from your iPhone to your Mac. To do this, you will need to use Apple’s AirDrop feature. First, make sure that both Wi-Fi and Bluetooth are enabled on both your iPhone and Mac. Then, make sure that you are signed in to both devices with the same Apple ID. Next, select the photos you would like to transfer from your iPhone and tap the “Share” icon. Finally, select the Mac from the list of available AirDrop devices and wait for the transfer to complete.
Does Mac Automatically Sync Photos?
Yes, Mac can automatically sync photos across all of your devices. With iCloud Photos enabled, any new photos or edits you make on your Mac will be uploaded to the cloud and then synchronized to all your other devices. This synchronization happens when you’re connected to a Wi-Fi or cellular network, so it’s convenient and easy to keep all your photos in one place.
Troubleshooting iCloud Photos Not Syncing to Mac
If your iCloud photos are not syncing to your Mac, it could be due to a few different issues. First, make sure that you have the latest version of macOS installed on your computer and that you are using the same Apple ID on both your Mac and iOS devices. Additionally, check that the “iCloud Photos” checkbox is checked in your Mac’s “Preferences” under the “iCloud” tab. If it isn’t checked, images stored in the Photos app won’t sync with iCloud. Also, make sure that you have enough storage space in iCloud for all of your images. Lastly, try restarting your Mac and iOS devices and verify that everything is connected to the same Wi-Fi network.
Enabling Photo Sync on Mac
To turn on photo sync on your Mac, follow these steps:
1. Connect your device to your Mac.
2. In the Finder on your Mac, select the device in the Finder sidebar.
3. Click Photos in the button bar.
4. Select the “Sync Photos to your device from” checkbox, then choose Photos, Pictures, or a folder from the pop-up menu.
5. Choose whether you want to transfer photos and videos from all albums or just selected albums and click Apply.
6. Depending on the size of your library, it may take some time for photo sync to complete its process. When it’s done, you’ll see a confirmation message that all photos have been synced successfully!
Troubleshooting Issues with Photos Not Showing Up from iPhone on Computer
It’s possible that your iPhone is not properly authorized on your computer. This means that you need to authorize the connection between your iPhone and computer in order for the photos to be visible. To do this, connect your iPhone to your computer with a USB cable, open iTunes, then go to Menu > Account > Authorizations > Authorize this Computer. Enter your username and password when prompted, and you should now be able to see the DCIM folder and photos on your device.
Can I Use AirDrop to Transfer Files From an iPhone to a Macbook?
Yes, you can AirDrop from an iPhone to a Macbook. To do so, both devices must be signed in to iCloud using the same Apple ID. Then, when sending an item from one device to the other, a notification will appear on the Macbook. From there, you can click the Accept pop-up menu and choose an option for how you’d like to receive the item.
Transferring Photos From iPhone to Mac Without iCloud
Yes, you can transfer photos from iPhone to Mac without iCloud. AirDrop is a great way to do this quickly and easily! To transfer photos from iPhone to Mac using AirDrop, open the Photos app on your iPhone and select the photos you want to transfer. Next, click the Share button in the bottom left corner and select your Mac in the AirDrop section. Finally, accept the transfer on your Mac and the photos will be imported automatically. Using similar steps, you can also AirDrop photos from iPhone to iPhone.
Sending Photos from iPhone to Laptop Wirelessly
To send photos from your iPhone to your laptop wirelessly, you can use AirDrop. First, select the photo(s) that you would like to transfer on your iPhone. Then tap the share button and select AirDrop from the menu. Next, select your laptop from the list of available devices and it will begin transferring the photo(s). Make sure that both your iPhone and laptop are connected to the same Wi-Fi network for this to work.
Conclusion
In conclusion, the iPhone is one of the most popular and powerful smartphones on the market today. It has a wide range of features and capabilities, from its intuitive display and design to its powerful hardware and software. With its cutting-edge camera capabilities, long battery life, and comprehensive security features, it provides a great user experience for everyone from casual users to professionals. Additionally, with options like iCloud Photos and AirDrop, transferring photos and files between devices is easier than ever before. All in all, the iPhone is a great option for those looking for an all-in-one smartphone that can keep up with their busy lifestyle.


