Getting your work email on your iPhone can be an incredibly useful and convenient tool for staying connected and organized. With the right setup and some simple steps, you can quickly get your work email on your iPhone and start using it to its fullest potential.
The first step in setting up work email on your iPhone is to make sure that POP and IMAP are enabled on your email account. If they’re not, you won’t be able to add them to your device. To check if the settings are enabled, contact your system administrator or email provider.
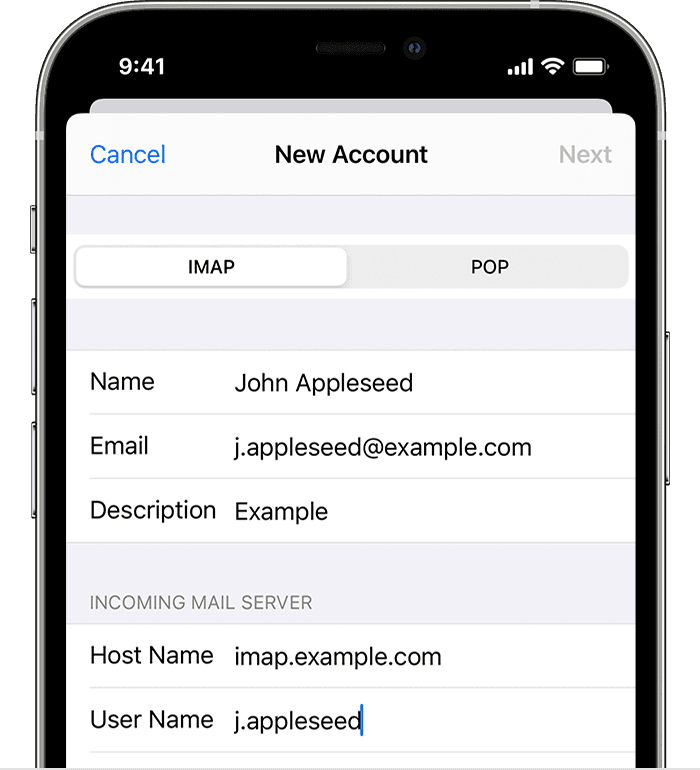
Once you’ve checked that POP and IMAP are enabled, the next step is to add the account to your device. In Outlook for iOS, go to Settings > Add Account > Add Email Account. Enter your name, email address, password, and a description for your account, and then tap Next. Your device should try to find the email settings automatically and finish the account setup from there.
The third step is configuring any additional settings you want or need for the account. This may include setting up notifications or enabling push notifications so that emails are sent directly to your device as soon as they arrive in the inbox. You can also set up filters so that emails from specific senders or with certain keywords are automatically sent to specific folders so they don’t clog up your inbox.
Finally, once everything is set up correctly you should be able to access all of the emails in this account directly from your iPhone. You’ll be able to read them, reply or forward messages as needed, delete unwanted messages, and more – all from the convenience of your phone!
Having easy access to work emails on an iPhone can save time and make life easier by allowing users to manage their emails wherever they go. By following these simple steps you can quickly get started with managing all of their work emails from one convenient location!

Troubleshooting Issues with Email on an iPhone
There are a few reasons why you might not be able to get your email to work on your iPhone. First, make sure that you have entered the correct username and password for your email account. If you’ve changed your password recently, try entering the new one in the settings of your email account in the Mail app.
Second, check that all of the settings for your email account are correct. This includes server information, port numbers, and encryption settings. Contact your email provider or system administrator if you need help with this step.
Third, make sure that there are no restrictions on sending and receiving emails from certain devices or locations. Your email provider may have restrictions in place that prevent emails from being sent or received from certain devices or locations. Contact them to find out more information about these restrictions.
Finally, if you’re still having trouble getting your emails to work on your iPhone, try restarting both your device and the Mail app itself. Sometimes a simple restart can help fix any software issues that might be preventing emails from working properly on an iPhone.
Accessing Work Outlook Email on an iPhone
To access your work Outlook email on your iPhone, you’ll first need to set up your account in the Outlook app. To do this, open the Outlook app and go to Settings > Add Account > Add Email Account. Enter your work email address and then tap ‘Add Account.’ Depending on your organization, you may need to choose either Microsoft 365 or Exchange on the Select your email provider screen. Once you have entered the necessary information and chosen a provider, you should be able to access your work Outlook email on your iPhone.
Adding a Work Account to an iPhone
To add a work account to your iPhone, start by going to the Settings app. From there, go to Mail > Accounts and tap on the “Add Account” option. Select “Other” from the list of account types and then tap “Add Mail Account”. You’ll then be prompted to enter your name, email address, password, and a description of your account. Once you’ve filled out all the information, tap “Next” and the iPhone will attempt to automatically configure the settings for your work email account. If it is successful, you should be able to access your work emails right away!
Check out how to set up Spectrum email on Outlook for easy desktop email access.
Conclusion
Overall, setting up and using a work email can be complicated but it is an essential part of modern-day business. It allows you to keep in contact with colleagues, customers, and other important contacts quickly and easily. Setting up a work email requires specific settings, such as IMAP and POP enabled, that must be checked with your email provider or system administrator. Additionally, depending on your organization you may require special passwords or authorization to send and receive emails on your device. Work emails are essential for staying organized and connected in the workplace and are worth taking the time to set up correctly.


