The iPhone is a popular and versatile device that allows users to personalize their experience in many ways. One way to add a personal touch to your iPhone is by customizing your ringtone. With the release of macOS Big Sur, Apple has made it even easier to add custom ringtones to your iPhone. In this article, we will guide you through the process of adding a custom ringtone to your iPhone using Big Sur.
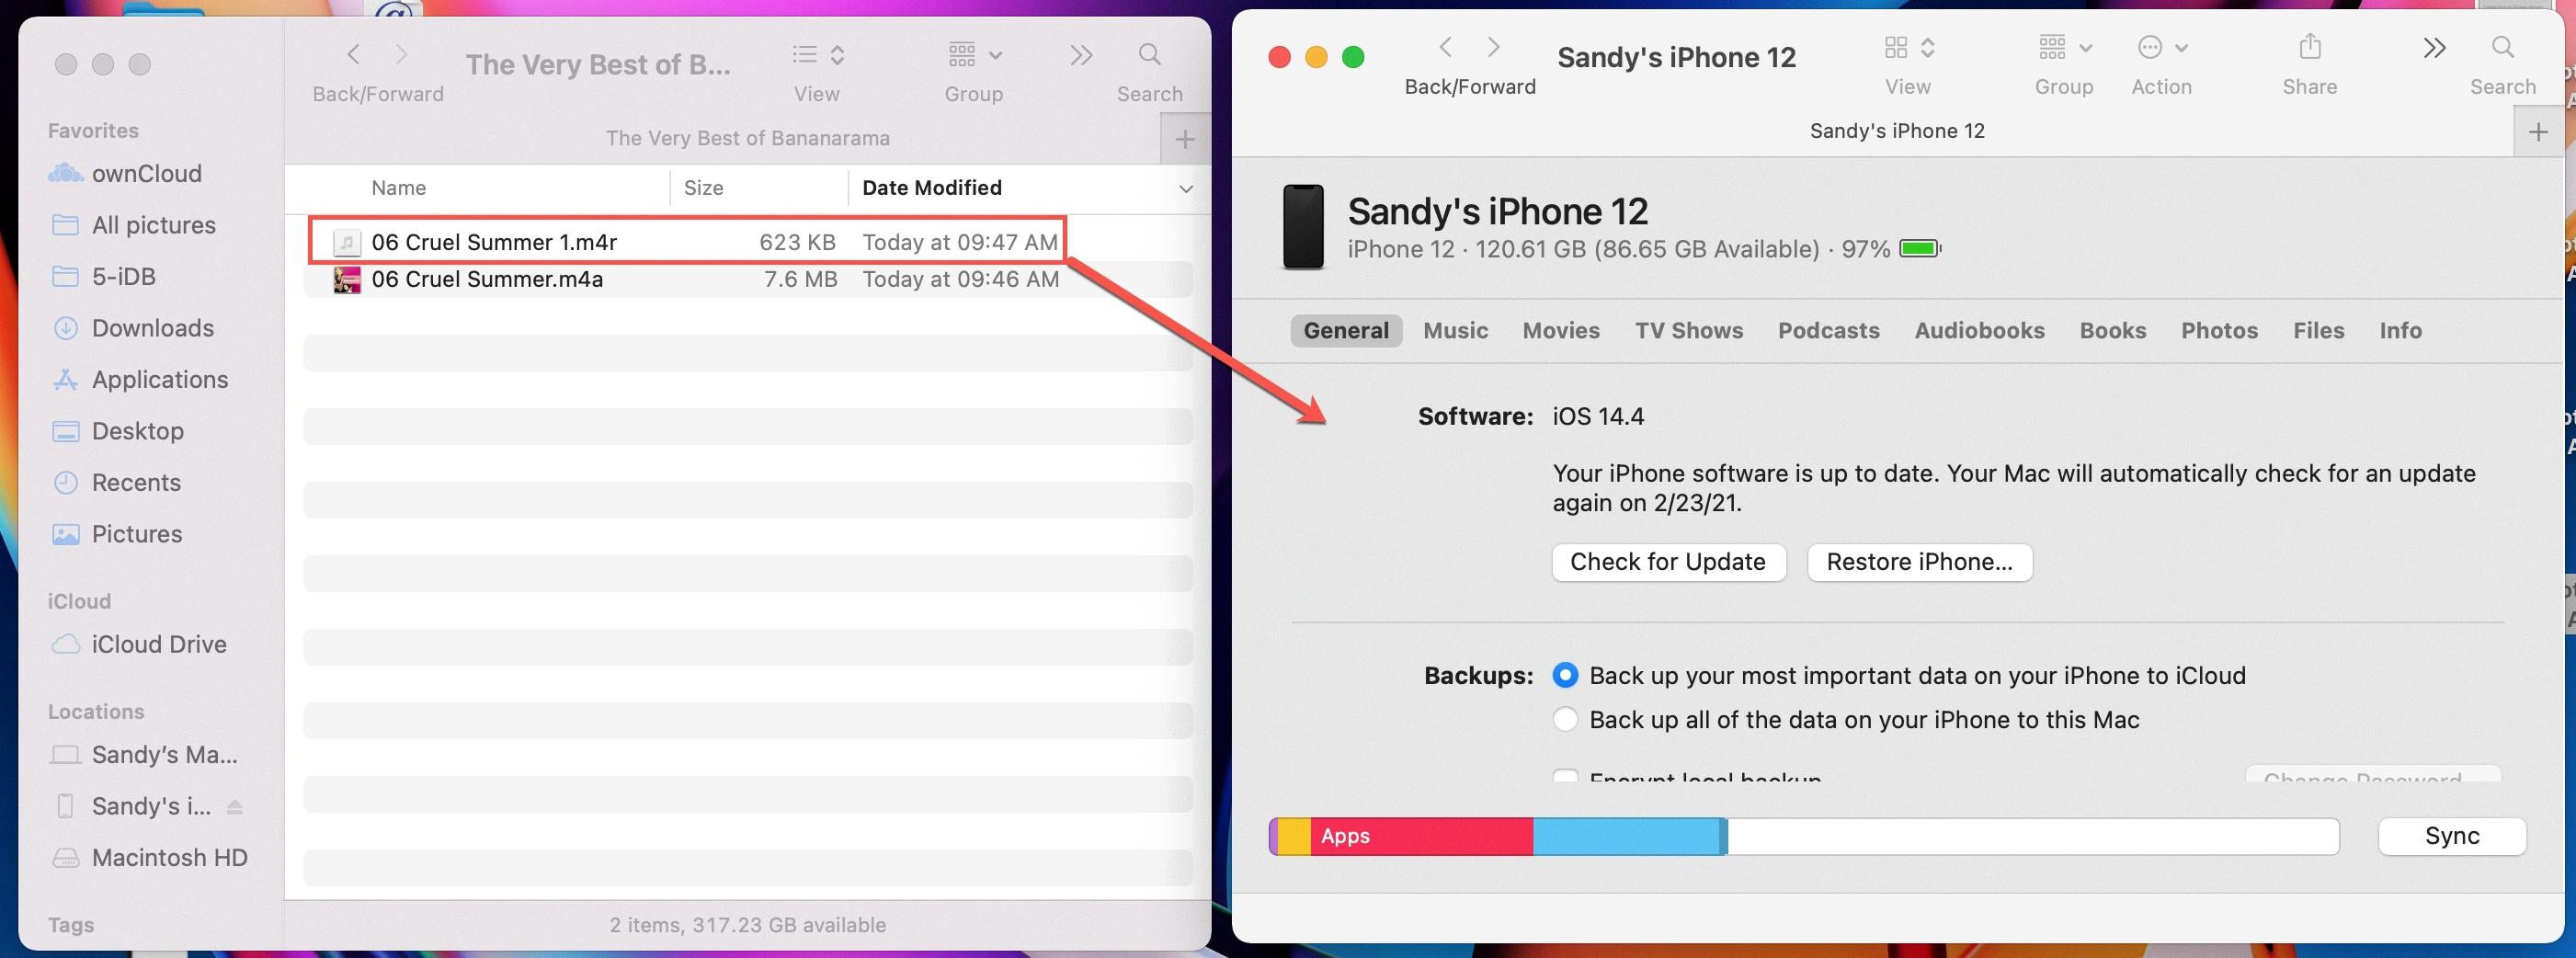
To get started, you will need to connect your iPhone to your Mac using the appropriate charging cable. Once connected, your iPhone should appear in the Finder window on your Mac.
Next, locate the .m4r ringtone file that you want to add to your iPhone. This file can be in any location on your Mac, such as your Downloads folder or a specific folder where you have saved your ringtones.
Now, simply drag and drop the .m4r ringtone file into the iPhone “Sync” window within Finder. This will initiate the syncing process and transfer the ringtone file to your iPhone.
Once the syncing process is complete, you can disconnect your iPhone from your Mac. The custom ringtone should now be available on your iPhone.
To set the custom ringtone as your default ringtone, go to the “Settings” app on your iPhone and tap on “Sounds & Haptics”. From there, select “Ringtone” and you should see your custom ringtone listed among the options. Tap on your custom ringtone to set it as the default for incoming calls.
In addition to setting a custom ringtone for incoming calls, you can also assign specific ringtones to individual contacts. This allows you to know who is calling without even looking at your phone. To do this, open the “Contacts” app on your iPhone and select the contact you want to assign a custom ringtone to. Tap on “Edit” in the top right corner, then scroll down and tap on “Ringtone”. Choose the desired ringtone for that contact and tap “Done” to save the changes.
Adding custom ringtones to your iPhone is a great way to personalize your device and make it truly your own. With macOS Big Sur, the process has become even easier, allowing you to quickly and effortlessly add your favorite tunes as ringtones. So go ahead, get creative, and make your iPhone ring in style!
How To Transfer Custom Ringtones From MacOS Big Sur To IPhone?
To transfer custom ringtones from MacOS Big Sur to your iPhone, follow these steps:
1. Start by connecting your iPhone to your Mac using a USB cable. Ensure that both devices are powered on and unlocked.
2. Once connected, your iPhone should appear as an icon on the desktop or in the Finder sidebar. Click on the iPhone icon to open a Finder window for your device.
3. In the Finder window, you will find various sections such as General, Music, Movies, etc. Look for the “Tones” section and click on it.
4. Now, locate the custom ringtone file on your Mac. This file should have a .m4r extension, which is the standard format for iPhone ringtones. You can use the search function in Finder or navigate to the specific folder where the file is saved.
5. Once you’ve found the custom ringtone file, simply drag and drop it into the “Tones” section of the Finder window for your iPhone. Alternatively, you can also copy and paste the file into the “Tones” section.
6. The custom ringtone will now be transferred to your iPhone. Depending on the file size, this process may take a few seconds to a minute.
7. After the transfer is complete, you can disconnect your iPhone from the Mac by safely ejecting it. To do this, either right-click on the iPhone icon and select “Eject,” or click on the eject button next to the iPhone icon in the Finder sidebar.
8. on your iPhone, go to the “Settings” app and navigate to “Sounds & Haptics” or “Sounds & Vibration Patterns,” depending on your iOS version. From there, you should be able to select your custom ringtone under the “Ringtone” or “Sound and Vibration Patterns” section.
By following these steps, you should be able to successfully transfer your custom ringtones from MacOS Big Sur to your iPhone. Enjoy personalizing your device with your favorite tunes!
How Do I Add A Ringtone File To My IPhone?
To add a custom ringtone to your iPhone, follow these steps:
1. Ensure that you have iTunes installed on your computer. This is necessary to manage your iPhone’s content.
2. Find a sound file that you want to use as a ringtone. This can be an MP3 or any other audio file format.
3. Convert the sound file to the AAC format. To do this, open the sound file in iTunes, go to the “File” menu, select “Convert,” and then choose “Create AAC Version.” iTunes will create a new version of the file in the AAC format.
4. Once the AAC version is created, right-click on it and select “Show in Finder” (on a Mac) or “Show in Windows Explorer” (on a PC). This will open the folder where the file is located.
5. Rename the AAC file by changing the file extension from “.m4a” to “.m4r”. This is the file format used for iPhone ringtones.
6. Connect your iPhone to your computer using a USB cable. Open iTunes and select your iPhone from the device list.
7. In iTunes, go to the “File” menu and select “Add File to Library” (on a Mac) or “Add Folder to Library” (on a PC). Choose the renamed AAC file from the folder where you saved it.
8. Once the file is added to your iTunes library, go to the “Tones” section under your iPhone in iTunes.
9. Check the box next to “Sync Tones” and choose either “All tones” or “Selected tones” depending on your preference.
10. Click the “Apply” or “Sync” button in iTunes to transfer the ringtone file to your iPhone.
11. On your iPhone, go to the “Settings” app and select “Sounds & Haptics” (or “Sounds” depending on your iOS version).
12. Under the “Sounds and Vibration Patterns” section, tap on “Ringtone” to set your custom ringtone. Your newly added ringtone should appear in the list of available options.
By following these steps, you can easily add a custom ringtone to your iPhone and personalize your device.
Conclusion
The iPhone is a revolutionary device that has transformed the way we communicate and interact with technology. With its sleek design, powerful performance, and user-friendly interface, the iPhone has become a must-have gadget for millions of people around the world.
One of the standout features of the iPhone is its ability to customize ringtones. By following a few simple steps, you can add your own unique ringtones to your iPhone, allowing you to personalize your device and stand out from the crowd.
Whether you want to use a pre-existing ringtone or create your own using your favorite song, the process is straightforward. By connecting your iPhone to your Mac and using Finder, you can easily drag and drop the .m4r ringtone file into the iPhone’s sync window.
Furthermore, if you don’t already have iTunes, it’s essential to download it as it is the key tool for managing your iPhone’s content, including ringtones. Once you have iTunes, you can convert your chosen sound file to AAC format and rename it to ensure it is recognized as a ringtone.
Adding custom ringtones to your iPhone not only allows you to express your individuality but also enhances your overall user experience. With a wide range of available options and the ability to create your own unique ringtones, you can truly make your iPhone reflect your personal style.
The iPhone offers a seamless and straightforward process for adding custom ringtones. By following the steps outlined above, you can easily personalize your device and enjoy a more personalized and enjoyable user experience. So go ahead, get creative, and make your iPhone truly your own.


