Transferring photos from a PC to an iPhone wirelessly has become much easier thanks to various cloud-based services and apps. In this article, we will explore different methods to accomplish this task effortlessly.
One popular method to transfer photos from a PC to an iPhone wirelessly is through the use of iCloud Photos. This method requires the iCloud app to be installed on both your PC and iPhone. To get started, sign in to iCloud on your PC and enable the iCloud Photos feature. This will sync your photos library to the cloud. Next, create folders in the iCloud menu via the File Manager and upload the desired photos to these folders. Once uploaded, you can access these photos on your iPhone by downloading the iCloud Photos app and signing in with the same iCloud account. This method ensures that your photos are readily available on both devices, making it convenient to access them wirelessly.
Another approach to transfer photos wirelessly is by using Google Photos. Begin by signing in to Google Photos on your PC with your Google account. Click on “Upload” and then select “Computer” to upload the photos from your PC to the cloud storage. Once the upload is complete, download the Google Photos app on your iPhone and sign in with the same Google account. You will then be able to access and view the photos from your PC in the “Photos” tab of the app. This method allows for seamless synchronization between your PC and iPhone, making it easy to share and view your photos wirelessly.
If you prefer not to use cloud-based services, you can transfer photos wirelessly using third-party apps such as Dropbox or OneDrive. These apps work similarly to Google Photos, allowing you to upload photos from your PC to their respective cloud storage platforms. Once uploaded, you can access and download these photos on your iPhone by downloading the corresponding app and signing in with your account. These apps provide a convenient way to transfer and access your photos wirelessly without relying on Apple’s ecosystem.
It is worth mentioning that Apple’s AirDrop feature, which allows for wireless file sharing between Apple devices, is not available for transferring files from a PC to an iPhone. AirDrop only works between Apple devices. However, with the aforementioned methods, you can easily transfer photos from your PC to your iPhone wirelessly, regardless of the device’s brand.
There are several methods available to transfer photos from a PC to an iPhone wirelessly. Whether you choose to use iCloud Photos, Google Photos, Dropbox, or OneDrive, these services offer convenient and seamless ways to sync and access your photos across different devices. By utilizing these methods, you can effortlessly transfer and enjoy your photos on your iPhone without the need for cables or physical connections.

Can You Directly Transfer Photos From PC to iPhone?
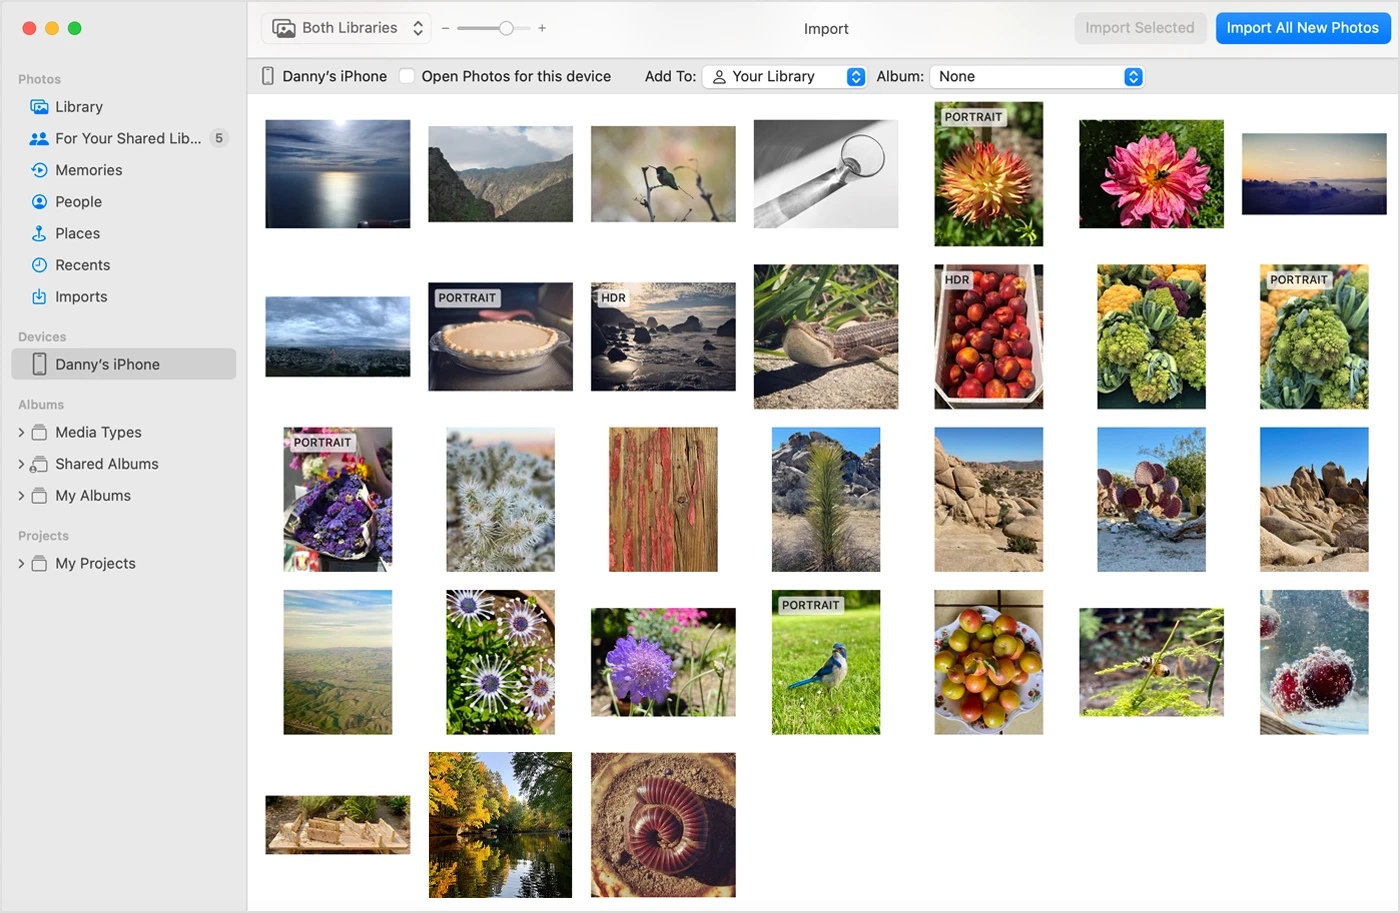
It is possible to directly transfer photos from a PC to an iPhone. There are several methods to do this, and I will explain two of the most common ones: using iTunes and using iCloud Photos.
Method 1: Transfer photos from PC to iPhone via iTunes.
1. Connect your iPhone to your PC using a USB cable.
2. Open iTunes on your PC. If you don’t have iTunes installed, you can download it from the Apple website.
3. Once iTunes is open, click on the device icon that appears in the top left corner of the iTunes window.
4. In the left sidebar, click on “Photos” under the “Settings” section.
5. Check the box next to “Sync Photos” or “Copy photos from” and select the folder or application from which you want to transfer the photos.
6. If you want to transfer all photos, select the option to sync your entire photo library. If you only want to transfer selected photos, choose the option to sync selected folders or albums, and then select the specific folders or albums you want to transfer.
7. Click on the “Apply” or “Sync” button in the bottom right corner of the iTunes window to start the transfer process.
8. Wait for the transfer to complete. The time it takes will depend on the number and size of the photos being transferred.
9. Once the transfer is finished, disconnect your iPhone from the PC, and you should find the transferred photos in the Photos app on your iPhone.
Method 2: Transfer photos from PC to iPhone via iCloud Photos.
1. Install iCloud for Windows on your PC if you haven’t already. You can download it from the Microsoft Store.
2. Open iCloud for Windows on your PC and sign in with your Apple ID.
3. In the iCloud app, click on the “Options” button next to “Photos”.
4. Check the box next to “iCloud Photos” and click on the “Apply” button.
5. Open the File Explorer on your PC and navigate to the folder where your photos are located.
6. Create a new folder in the iCloud Photos folder. You can do this by right-clicking in the iCloud Photos folder and selecting “New” > “Folder”.
7. Copy or move the photos you want to transfer from your PC to the newly created folder in the iCloud Photos folder.
8. Wait for the photos to upload to iCloud. The time it takes will depend on the size of the photos and your internet connection speed.
9. On your iPhone, open the Photos app and make sure you are signed in with the same Apple ID that you used on your PC.
10. Tap on the “Photos” tab at the bottom of the screen and wait for the photos to sync from iCloud. The time it takes will depend on the number and size of the photos being synced.
11. Once the sync is complete, you should find the transferred photos in the Photos app on your iPhone.
By following these methods, you can easily transfer photos from your PC to your iPhone without the need for any additional software or complicated steps.
How Can You Transfer Photos From PC to iPhone Without iTunes?
To transfer photos from your PC to your iPhone without using iTunes, you can follow these steps:
1. Method 1: Using iCloud Photos:
– On your PC, go to iCloud.com and sign in with your Apple ID.
– Click on “Photos” and then click on the “Upload” button.
– Select the photos you want to transfer from your PC and click on “Open” to start uploading them to iCloud.
– On your iPhone, go to the “Settings” app, tap on your name, and then tap on “iCloud.”
– Make sure the “Photos” toggle is enabled and select “Optimize iPhone Storage” or “Download and Keep Originals” depending on your preference.
– Wait for the photos to sync, and they will appear in the Photos app on your iPhone.
2. Method 2: Using Google Photos:
– On your PC, go to Google Photos (photos.google.com) and sign in with your Google account.
– Click on “Upload” and then select “Computer” to upload the photos from your PC to your Google Photos cloud storage.
– Download the Google Photos app from the App Store on your iPhone and sign in with the same Google account.
– Open the Google Photos app on your iPhone and go to the “Photos” tab to view the pictures you uploaded from your PC.
3. Method 3: Using Dropbox:
– Install Dropbox on your PC and sign in with your Dropbox account.
– Create a new folder in Dropbox and name it something like “PC Photos.”
– Copy and paste the photos you want to transfer from your PC into the “PC Photos” folder.
– On your iPhone, install the Dropbox app from the App Store and sign in with the same Dropbox account.
– Open the Dropbox app on your iPhone and navigate to the “PC Photos” folder to access and download the photos to your iPhone.
4. Method 4: Using OneDrive:
– Install OneDrive on your PC and sign in with your Microsoft account.
– Create a new folder in OneDrive and name it something like “PC Photos.”
– Copy and paste the photos you want to transfer from your PC into the “PC Photos” folder.
– On your iPhone, install the OneDrive app from the App Store and sign in with the same Microsoft account.
– Open the OneDrive app on your iPhone and navigate to the “PC Photos” folder to access and download the photos to your iPhone.
Remember to ensure you have a stable internet connection during the transfer process. These methods provide alternative ways to transfer photos without relying on iTunes.
Can You AirDrop to a PC?
You cannot directly AirDrop from an iPhone to a PC. AirDrop is a feature exclusive to Apple devices and is designed to work within the Apple ecosystem, allowing users to easily share files between Apple devices like iPhones, iPads, and Macs.
However, there are alternative ways to transfer files from an iPhone to a PC:
1. Use iCloud Drive: iCloud Drive is a cloud storage service provided by Apple that allows you to store and access files across multiple devices. You can upload the files you want to transfer to iCloud Drive from your iPhone and then download them on your PC by accessing iCloud Drive through a web browser or using the iCloud for Windows app.
2. Use a USB cable: You can connect your iPhone to your PC using a USB cable and transfer files manually. After connecting the iPhone to the PC, you can access the device’s internal storage or the Camera Roll through File Explorer (Windows) or Finder (Mac). Simply copy and paste or drag and drop the desired files from the iPhone to your PC.
3. Use third-party apps: There are several third-party apps available on both the App Store and Microsoft Store that allow you to transfer files wirelessly between an iPhone and a PC. These apps typically require you to install their companion app on both devices and establish a connection between them. Some popular options include Dropbox, Google Drive, and OneDrive.
Remember that the availability and functionality of these methods may vary based on the specific software versions and settings on your iPhone and PC. It’s always a good idea to check for updates and consult the documentation or support resources for the apps and services you choose to use.
How Do You AirDrop From Windows to iPhone?
To AirDrop files from a Windows PC to an iPhone, you cannot directly use the AirDrop feature since it is exclusive to Apple devices. However, there are alternative methods available to transfer files wirelessly between your PC and iPhone. Here’s a step-by-step guide using three popular cloud-based services:
1. Google Photos:
– Install the Google Photos app on your iPhone from the App Store.
– Open a web browser on your PC and visit the Google Photos website.
– Sign in to your Google account or create one if you don’t have it.
– Click on the “Upload” button and select the files you want to transfer from your PC.
– Once the files are uploaded, open the Google Photos app on your iPhone and log in with the same Google account.
– You should now see the uploaded files and can download them to your iPhone.
2. Dropbox:
– Install the Dropbox app on your iPhone from the App Store.
– Download and install the Dropbox desktop application on your PC.
– Sign in to your Dropbox account or create one if you don’t have it.
– Drag and drop the files you want to transfer from your PC into the Dropbox folder on your PC.
– Open the Dropbox app on your iPhone and log in with the same Dropbox account.
– You will find the transferred files in the Dropbox app on your iPhone and can download them.
3. OneDrive:
– Install the OneDrive app on your iPhone from the App Store.
– Download and install the OneDrive desktop application on your PC.
– Sign in to your OneDrive account or create one if you don’t have it.
– Copy or move the files you want to transfer from your PC into the OneDrive folder on your PC.
– Launch the OneDrive app on your iPhone and log in with the same OneDrive account.
– The transferred files will be available in the OneDrive app on your iPhone for downloading.
Note: Ensure that both your PC and iPhone are connected to the internet for successful file transfer. Additionally, consider the storage limits of these cloud services and make sure you have enough space to accommodate the files you want to transfer.
Conclusion
Transferring photos from your PC to your iPhone can be done in several ways depending on your preferences and the tools available to you. If you have a USB cable, you can use iTunes to sync your photos to your iPhone. This method allows for a direct transfer and ensures that your photos are stored locally on your device.
If you prefer a wireless transfer, you can use third-party apps like Google Photos, Dropbox, or OneDrive. These cloud-based services allow you to upload your photos from your PC to the cloud storage and then access them on your iPhone through their respective apps. This method is convenient as it eliminates the need for cables and allows you to access your photos from multiple devices.
Another wireless option is to use the iCloud Photos feature provided by Apple. By uploading your photos to iCloud via the iCloud app on your PC, you can then access them on your iPhone through the Photos app. This method requires an iCloud account and requires an internet connection to sync your photos.
There are multiple ways to transfer photos from your PC to your iPhone, each with its own advantages. Whether you prefer a direct USB transfer or a wireless cloud-based method, you can easily transfer your photos and enjoy them on your iPhone. Choose the method that suits you best and start enjoying your photos on your iPhone today.


