With the rise of mobile technology, it has become increasingly important for users to be able to access teir local network without any interruption. Fortunately, most iPhones offer a variety of ways to gain access and connect to a local network.
The simplest way to access a local network from your iPhone is through Wi-Fi. Wi-Fi networks are becoming more common in public places such as coffee shops, restaurants, airports and malls. Most businesses also provide wireless internet for their customers. To connect to a Wi-Fi network on your iPhone, simply go into the Settings app, tap on Wi-Fi and select the desired network.
Another way to access a local network is through Bluetooth. Many modern devices come with built-in Bluetooth capabilities that allow them to connect with other nearby devices such as printers or computers. To connect an iPhone to anoher device via Bluetooth, you will need to pair them first by enabling Bluetooth in both devices and then selecting the desired device from the list of available connections. Once connected, you can easily transfer data between devices or use other services such as printing documents or playing music.
Finally, if your local network requires authentication, you may need an Ethernet cable in order to gain access. This type of connection requires you plug one end of the cable into your router and the other end into your iPhone’s Lightning port (or USB port if using an adapter). Once connected, you will be able to communicate with other devices on the same network wihout any problems.
In conclusion, there are several ways for users to gain access and connect their iPhones to a local network depending on their needs and preferences. Whether you’re looking for wireless internet access or need an Ethernet connection for authentication purposes, there’s sure to be a solution that works best for you.
Access to Local Network on iPhone
Access to local networks on an iPhone allows apps to connect to and utilize the Wi-Fi and Bluetooth networks that are available nearby. This can be used for a variety of purposes, such as connecting to the internet, sending and receiving data, and playing multiplayer games. Some apps may also use this access to collect information about nearby devices in order to determine which networks you join and when.
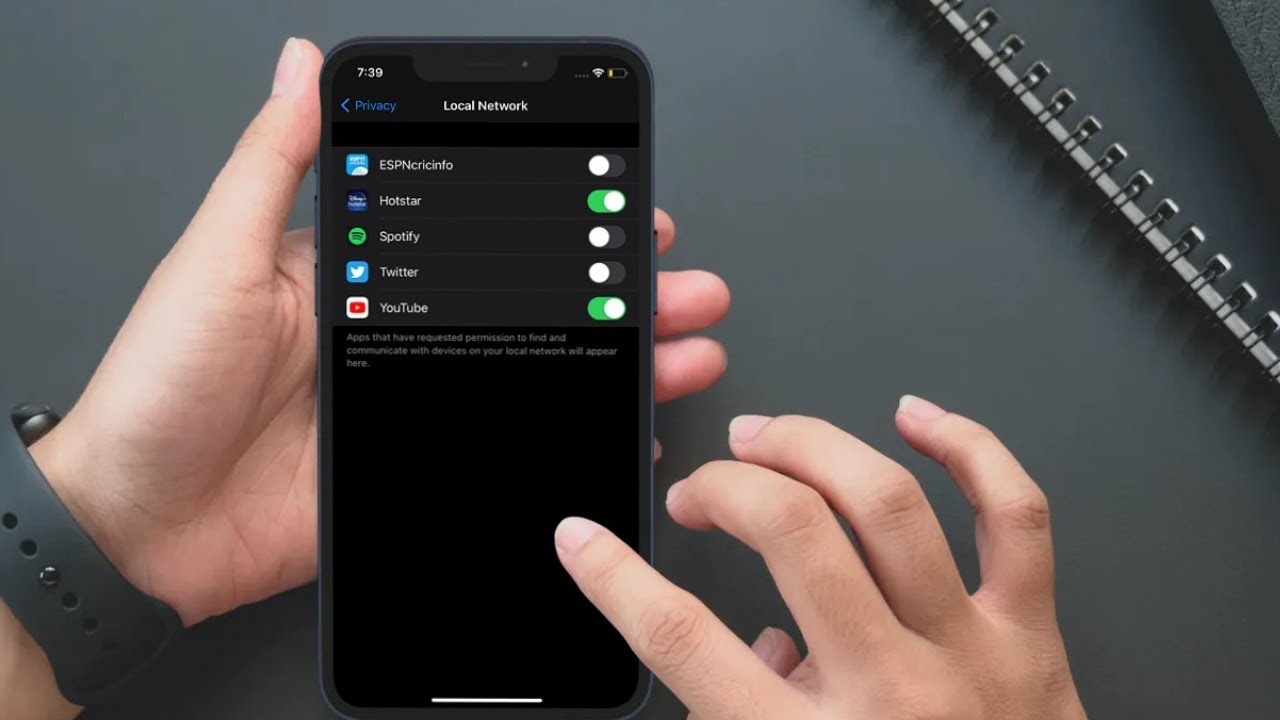
With iOS 14 and iPadOS 14, Apple has added new privacy controls for local networks. When an app requests access to your local network, you’ll now see an alert that provides more information about what the app is trying to do. You can then choose whether or not you want to alow the app access. If you decide not to give permission, the app won’t be able to use your local network connection or any related data from it. This helps protect your privacy by preventing apps from collecting information about nearby devices without your knowledge or consent.
Should I Enable Local Network on My iPhone?
The decision to enable local network access on your iPhone is entirely up to you. It’s important to take into consideration what type of app is requesting access and why it needs it. If an app is requesting access to your local network and you’re unclear about why it needs this permission, then we recommend that you don’t grant the permission. Generally speaking, apps that require local network access are using it for tasks such as sharing data between devices on the same network, sending notifications over the local network, or streaming audio or video content. Additionally, some apps may need access to certain ports on your router so they can communicate with other devices. If you feel comfortable granting the app access after considering thee factors and understanding what it will be used for, then go ahead and grant the app local network access. If at any point you decide that you want to revoke or grant access again, you can do so in the settings of your iPhone.
The Effects of Allowing an App to Access Local Network
When you allow an app to access your local network, it will scan the networks you connect to for devices. This allows apps to find and connect to devices like smart speakers and Chromecasts, as well as other network-enabled devices. The app can also collect and send data to or from tese devices, depending on how it is set up. This allows you to use these devices in conjunction with the app and make the most out of its features.
Connecting to a Local Network
Connecting to a local network means joining a group of computers that are linked together in one location. This connection allows these computers to communicate with each other and access shared resources, such as files, printers, and internet access. A local network can be wired or wireless, but is typically secured so only crtain users can access it. Connecting to a local network provides users with enhanced communication capabilities and the ability to use software, hardware, and other resources that may not be available elsewhere.
Understanding Nearby Devices Permission
Nearby devices permission is a new runtime permission introduced in Android 12. It allows apps to detect and communicate with nearby Bluetooth devices without the need for location permissions. This is especially useful for apps such as watch and headphone companion apps, which need to scan for nearby Bluetooth devices for pairing. By using this permission, it prevents unnecessary access to location data and gives users more control over their data privacy.
Changing Local Network on an iPhone
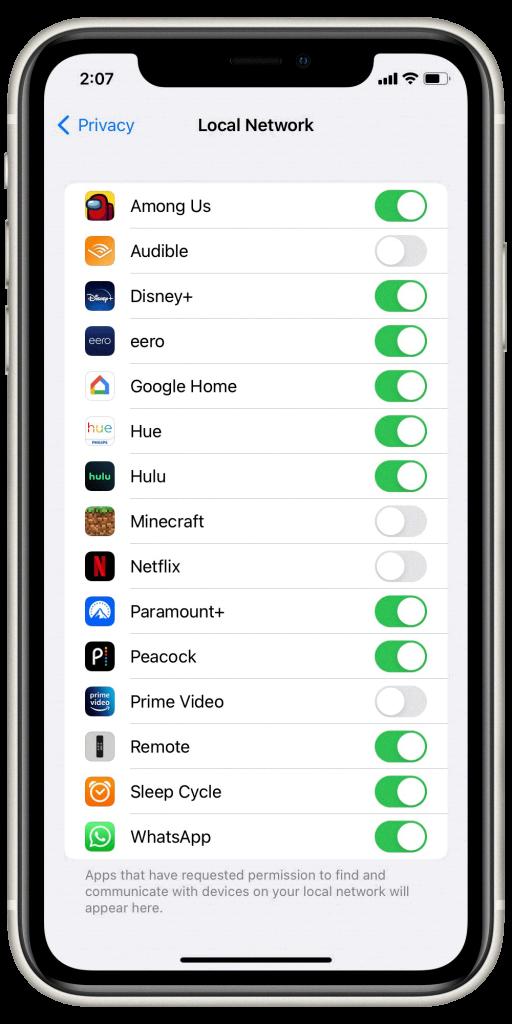
To change your local network on your iPhone, start by opening the Settings app. Then, tap Privacy and select Local Network. Here you can toggle on or off the varius apps that you would like to be able to access your local network. Once you have made your selection, your iPhone will be able to discover Cast-enabled devices and connect to them.
Identifying My Local Network
Your local network is the collection of devices connected to your router or modem, such as computers, phones, tablets, and other IoT devices. It is the network you use to access the internet when you are at home or in your office. Your local network is identified by an IP address that is assigned to it by your Internet Service Provider (ISP). You can find out what this IP address is by running the ipconfig command in a Command Prompt window. This will display various information about your local network, including its IP address and other pertinent details.
Source: macreports.com
Connecting to Devices on Local Network in iOS 14
With iOS 14, Apple has introduced a new privacy protection to protect user data. This means that any app attempting to access your local network will now cause an alert to appear that reads “Would like to find and connect to devices on your local network”. This alert is meant to give you a better understanding of the data an app is trying to access, so you can make a more informed decision about whether or not you want it to have access. In some cases, granting access to your local network may be necssary for certain features and services offered by the app. Ultimately, it is up to you whether or not you want the app to have access.
Understanding Why My iPhone Displays WLAN Instead of Wi-Fi
The reason your iPhone says WLAN instead of Wi-Fi is because they are both terms that refer to the same technology. WLAN stands for Wireless Local Area Network and is a more technical term for Wi-Fi, which is a more commonly used term for the same technology. Wi-Fi is simply an abbreviation for Wireless Fidelity, which refers to the same type of network. Basically, when you connect to either a WLAN or Wi-Fi network, you’re connecting to the same type of wireless networking technology.
Using WLAN on an iPhone
To use WLAN on your iPhone, you first need to make sure that it is enabled. To do this, go to the Settings app and tap Wi-Fi. Make sure the switch next to Wi-Fi is turned on. Your device will automatically search for available Wi-Fi networks nearby. Once it finds a network you’d like to connect to, simply tap the name of the network and enter any necessary password or security information. Once connected, you’ll be able to access the internet trough the WLAN connection.
Viewing Devices on a Local Network
To see the devices connected to your local network, you can use the arp -a command in a Command Prompt window. This will provide you with the IP addresses and MAC addresses of all of the devices that are currntly connected to your network. Additionally, if you have access to your router’s settings, you can view a list of connected devices there as well.
Connecting to a Local Network
To connect to your local network, first make sure that all of your devices are connected to the same router and are on the same Local Area Network (LAN). Then, open your computer’s Session Toolbar and click on the Computers icon. On the Computers list, click on the Connect On LAN tab to view a list of all computers that are connected to the same network. You can filter the list by name or IP address if you know it. Select the computer you want to access and click Connect. You will then be able to remotely access files, printers, and oher resources from that computer.
Identifying Devices on My Network
If your router has a companion mobile app, open it and look for the tab that lists all the devices connected to your network. It might be labeled Devices or Device Manager. This tab shoud list all the devices connected to your network, including any computers, phones, tablets, printers, gaming consoles, cameras, and other smart home devices.
If your router doesn’t have a companion mobile app, you can try using a free Wi-Fi analyzer app on your phone or tablet. These apps will allow you to monitor which devices are connected to your network and check their security settings. They can also provide detailed information aout each device such as its IP address and MAC address.
Identifying My Local IP Address Location
Your local IP address is a unique identifier that is assigned to your internet connection. It is used to help othr computers and networks identify you and communicate with you. Your local IP address location is a geographical area determined by the Internet Protocol (IP) address assigned to your network or device. Depending on what type of internet connection you have, your local IP address location can vary. For example, if you use an ethernet cable, your local IP address location will be the physical location of the router. If you’re using a wireless connection, then the local IP address location will be dependent on the signal strength of the wireless router in your area.
Giving Permission to an iPhone to Detect a Smart TV
In order to give your iPhone permission to detect a smart TV, you will need to go into your iPhone’s Settings. Once in Settings, select “Screen Mirroring” and make sure it is turned on. This will alow your iPhone to detect the smart TV and allow you to stream content from your iPhone onto the TV. Once you have enabled Screen Mirroring, open Control Center on your iPhone and tap AirPlay Mirroring. Then select your Apple TV or an AirPlay 2-enabled smart TV as the playback destination. If an AirPlay passcode appears on the TV screen, enter the passcode on your iPhone.
Conclusion
Local network access on an iPhone allows users to connect to their home or office network and use it to access the internet. It uses a Wi-Fi connection, which is secure and reliable. You can create a secure virtual private network (VPN) for added security, allowing you to securely access corporate networks from your home or any other place with an internet connection. This feature allows users to stay connected with their workplace even while they are away from the office, provding flexible and convenient access to files, applications, and other resources. Overall, local network access on an iPhone is a great way to stay connected and secure while on the go.

