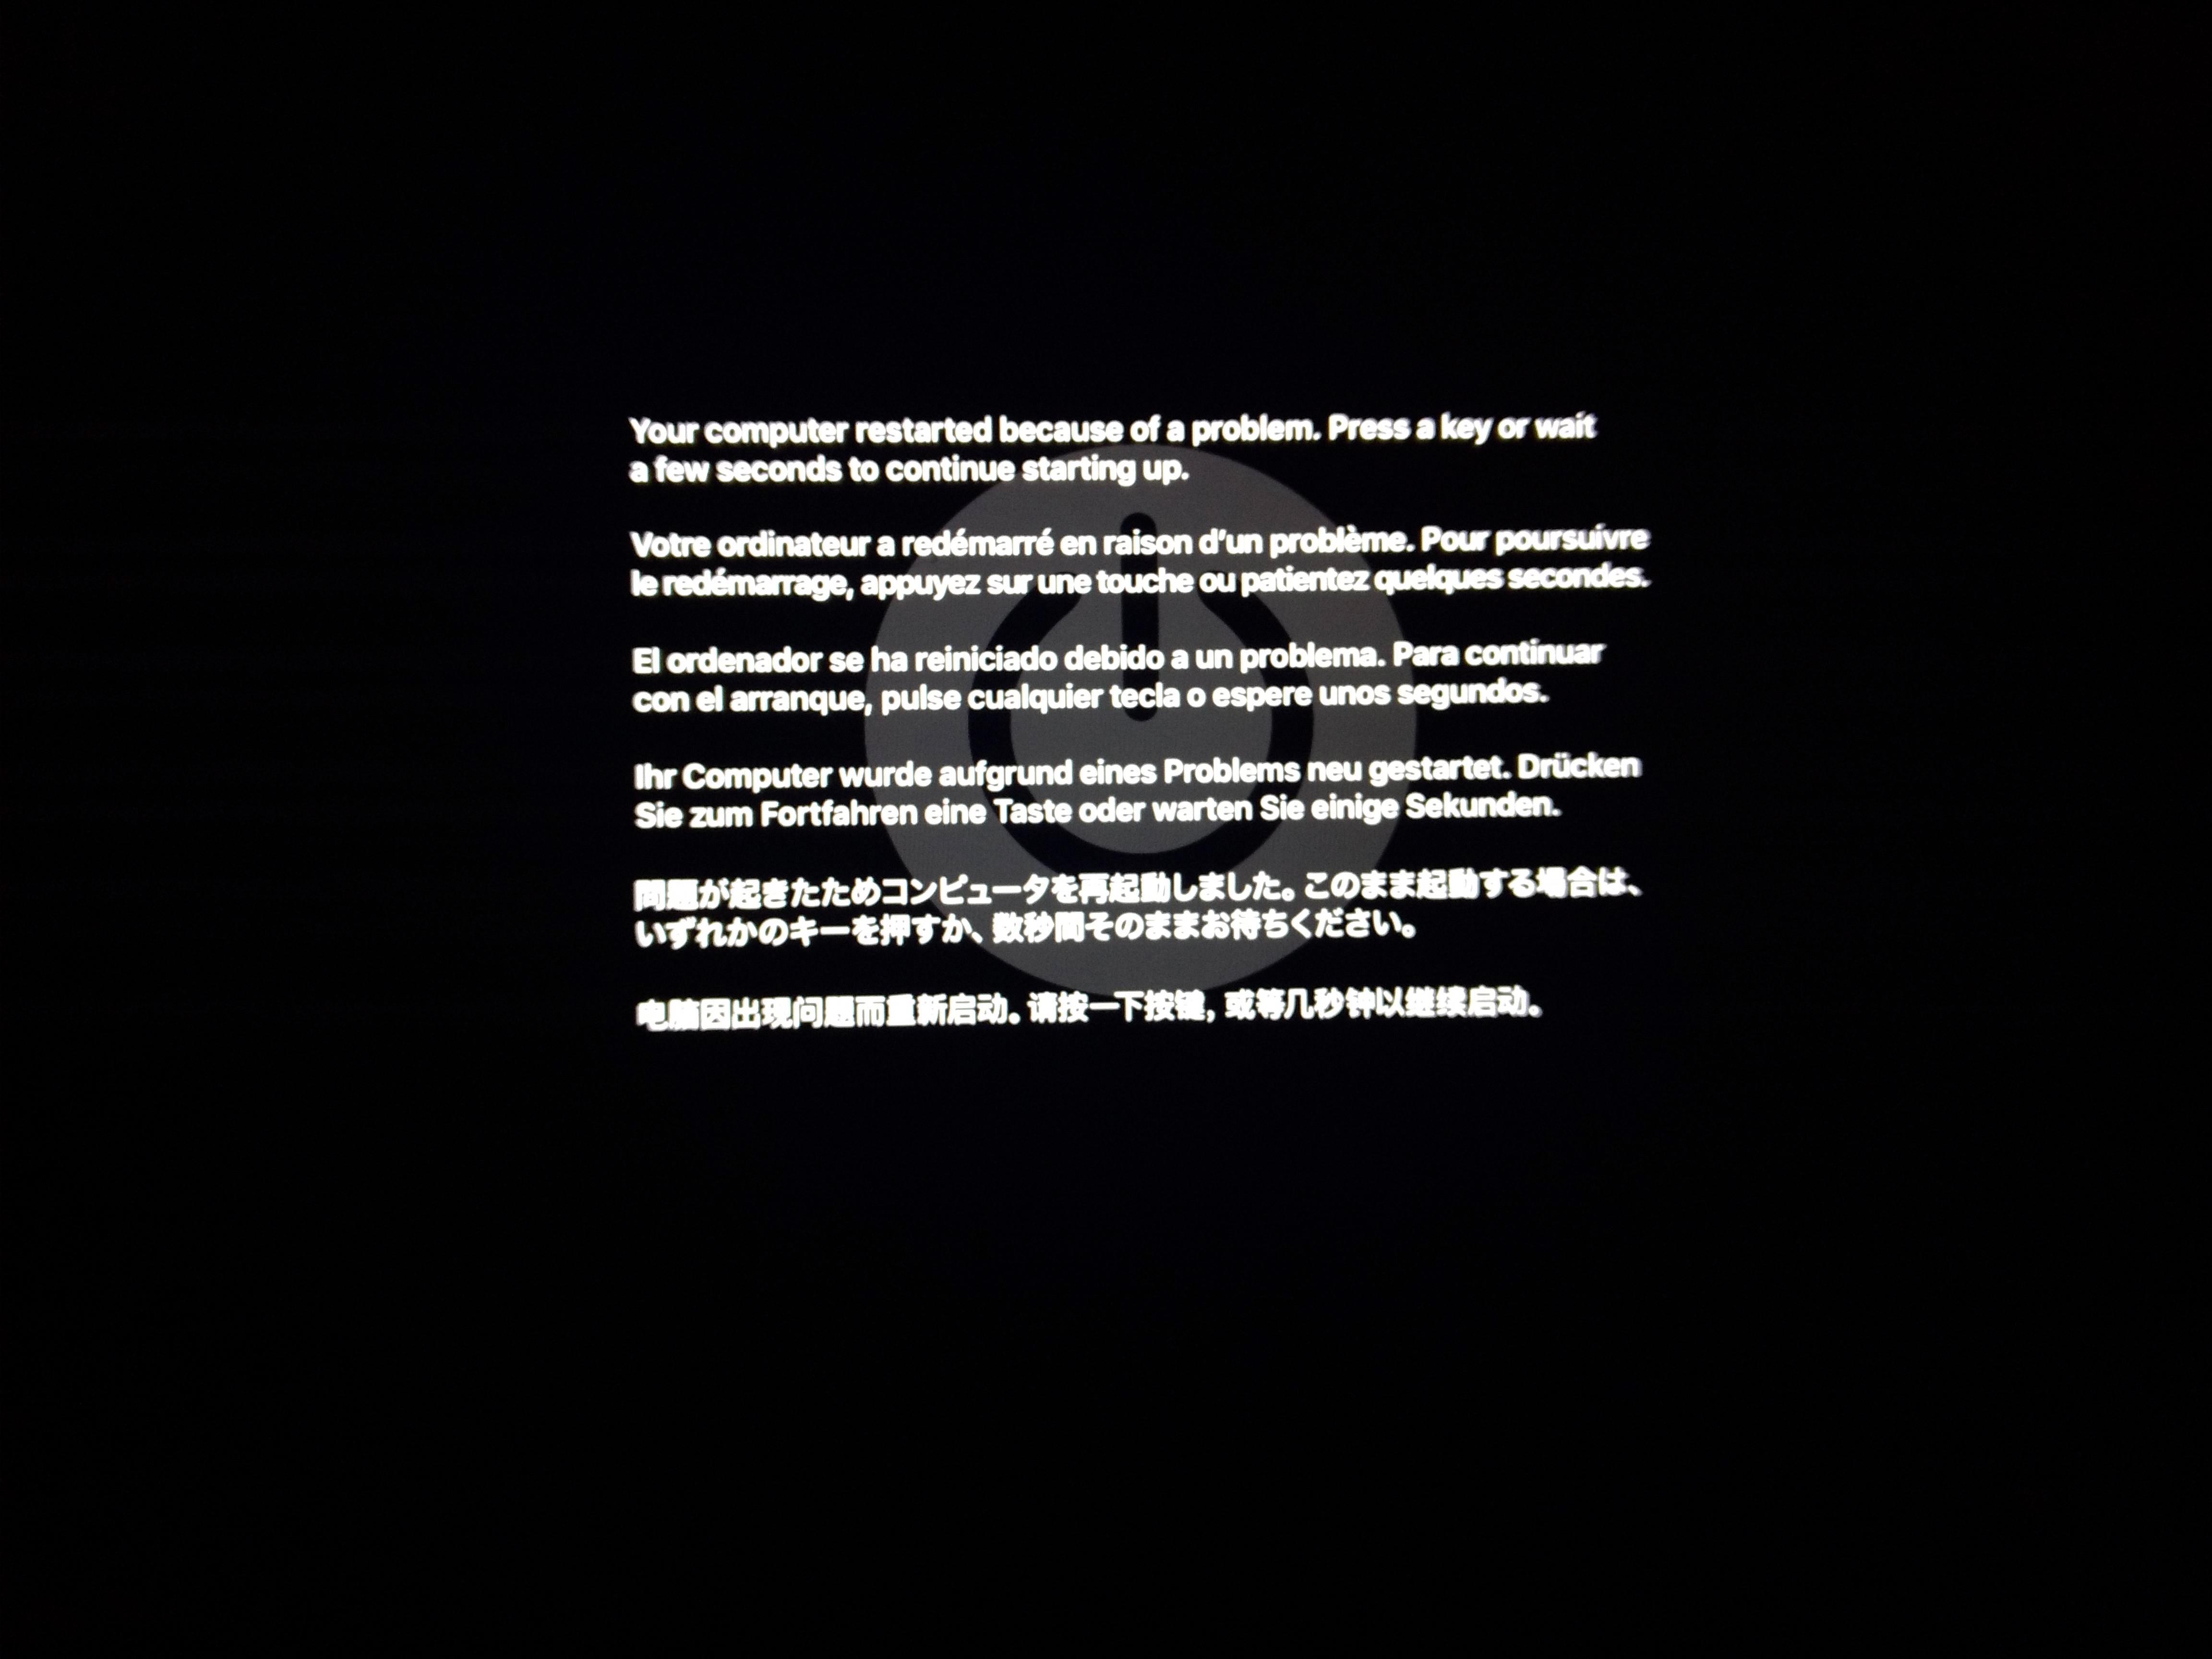
Kernel panics can be a frustrating experience for any Mac user. These sudden system crashes can disrupt your work and leave you wondering what went wrong. In this article, we will explore the causes of kernel panics in macOS Sierra and provide some possible solutions to fix the issue.
Kernel panic is a term used to describe a situation where the macOS operating system encounters a critical error that it cannot recover from. When this happens, the system displays a message on a gray background, instructing the user to restart their computer.
Causes of Kernel Panic in Sierra
1. Faulty Hardware: One common cause of kernel panics is faulty hardware. This can include issues with RAM modules, hard drives, graphic cards, or other peripheral devices connected to your Mac. If a problematic hardware component is causing the kernel panic, disconnecting or replacing it may resolve the issue.
2. Outdated Software: Another common cause of kernel panics is outdated software. If your operating system or any installed applications have not been updated to the latest version, compatibility issues can arise and lead to system crashes. It is essential to regularly update your software to ensure compatibility and stability.
3. Corrupted Applications: In some cases, a specific application or software can become corrupted, causing the system to crash. Identifying and removing these corrupted applications can help resolve the kernel panic issue. Check crash reports in the Console app to find which apps are causing the problem.
4. Insufficient Disk Space: If your Mac’s hard drive is running low on free space, it can lead to various issues, including kernel panics. Ensure that you have enough free space on your drive by deleting unnecessary files or transferring them to an external storage device.
Solutions to Kernel Panic in Sierra
1. Check Crash Reports: The Console app in macOS Sierra provides crash reports that can help identify the cause of kernel panics. Navigate to Applications > Utilities > Console and review the crash reports to determine the underlying issue.
2. Update Software: Keeping your operating system and applications up to date is crucial for maintaining system stability. Check for software updates regularly and install them to ensure compatibility and fix any known issues.
3. Remove Corrupted Applications: If you suspect that a specific application is causing the kernel panic, uninstall it from your system and check if the issue persists. If needed, reinstall the application from a reliable source.
4. Free Up Disk Space: Delete unnecessary files, clear caches, and transfer large files to an external storage device to free up disk space. This can help prevent kernel panics caused by low disk space.
5. Boot in Safe Mode: If the kernel panics persist, try booting your Mac in safe mode. Safe mode disables third-party extensions and starts your Mac with minimal software, allowing you to troubleshoot the issue more effectively.
6. Reinstall the OS: If none of the above solutions work, reinstalling the operating system can be a last resort to resolve kernel panics. This will ensure a clean installation and eliminate any software bugs or malware that may be causing the issue.
Kernel panics in macOS Sierra can be caused by various factors, including faulty hardware, outdated software, corrupted applications, and insufficient disk space. By following the suggested solutions, you can troubleshoot and resolve these kernel panic issues, ensuring a stable and reliable Mac experience.
Can Kernel Panic Be Fixed?
Kernel panic can be fixed. Kernel panic is a type of error that occurs in operating systems, including Mac OS. It is a critical system error that causes the operating system to halt and display a screen with diagnostic information. While kernel panics can be alarming, they are usually a result of software or hardware issues and can be resolved.
Here are some steps you can take to fix kernel panic on your Mac:
1. Restart your Mac: In some cases, a one-time kernel panic may occur due to temporary issues. Simply restart your Mac and see if the problem persists.
2. Update your software: Outdated software, including the operating system and applications, can sometimes trigger kernel panics. Make sure that your Mac is running the latest version of macOS and that all your applications are up to date. You can check for updates through the App Store or the System Preferences.
3. Check for incompatible software or drivers: Incompatible third-party software or drivers can cause kernel panics. If you recently installed new software or drivers before experiencing the issue, try uninstalling or updating them to see if it resolves the problem.
4. Disconnect peripherals: Sometimes, kernel panics can be triggered by faulty or incompatible peripheral devices such as external hard drives, printers, or USB devices. Disconnect all peripherals from your Mac and reconnect them one by one to identify if any specific device is causing the issue.
5. Run Disk Utility: Kernel panics can also be caused by disk errors. Open Disk Utility and run a First Aid scan on your startup disk to check for and repair any disk-related issues.
6. Reset NVRAM or PRAM: NVRAM (non-volatile random-access memory) or PRAM (parameter random-access memory) stores certain settings and preferences on your Mac. Resetting NVRAM/PRAM can sometimes resolve kernel panic issues. To do this, restart your Mac and hold down the Option + Command + P + R keys until you hear the startup sound a second time.
7. Perform a clean reinstall: If the above steps do not resolve the kernel panic, you may need to perform a clean reinstall of macOS. This involves erasing your startup disk and reinstalling the operating system from scratch. Remember to back up your important data before proceeding with this step.
If you are not comfortable troubleshooting the issue yourself, it is advisable to seek assistance from an Apple Authorized Service Provider or Apple Support.
Please note that these steps are general recommendations and may not solve all kernel panic issues. The underlying cause can vary, and it is important to identify the specific reason for the kernel panic to implement an appropriate solution.

How Do You Get Your Mac Out of Kernel Panic?
To resolve a Kernel Panic on your Mac, you can follow these software solutions:
1. Check crash reports: After a Kernel Panic occurs, your Mac generates a crash report. You can review this report to identify the cause of the problem. Open the Console application and go to the “User Diagnostic Reports” section to find these reports.
2. Update all your software: Outdated software can lead to compatibility issues and Kernel Panics. Make sure to update your macOS, applications, and drivers to the latest versions available. You can do this through the App Store and the System Preferences.
3. Find which apps are corrupted: In some cases, a specific application may trigger the Kernel Panic. You can try to identify this by systematically removing or disabling recently installed or updated applications. Restart your Mac after each removal to see if the issue is resolved.
4. Ensure you have enough free space on the drive: A full hard drive can cause performance issues and Kernel Panics. Check your available storage space and consider deleting unneeded files or transferring them to an external drive to free up space.
5. Open Disk Utility: Use Disk Utility to check and repair any potential disk errors. Open the application, select your startup disk, and click on the “First Aid” button. Follow the instructions to repair any issues that are detected.
6. Disable startup items: Some third-party software or login items may be causing conflicts and triggering Kernel Panics. To troubleshoot this, go to “System Preferences,” click on “Users & Groups,” and then select your user account. Go to the “Login Items” tab and remove any unnecessary startup items by selecting them and clicking on the “-” button.
Remember to restart your Mac after each step to see if the Kernel Panic is resolved. If the issue persists, it may be necessary to seek professional assistance from an Apple Authorized Service Provider or contact Apple Support for further guidance.
How Do You Fix Kernel Panic Mode?
To fix kernel panic mode, follow these steps:
1. Boot in safe mode: When your system is stuck in kernel panic mode, try booting up in safe mode. This mode loads only essential system files and drivers, which can help identify and troubleshoot the issue causing the kernel panic.
2. Identify the cause: Once in safe mode, examine recent changes or installations on your system. Kernel panics can be triggered by software conflicts, incompatible drivers, or hardware issues. Check for any recent software updates, driver installations, or new hardware additions that might be causing the problem.
3. Remove problematic software or drivers: If you suspect a specific software or driver is causing the kernel panic, uninstall or remove it from your system. Use the safe mode to access the uninstallation process if necessary. Ensure you have the latest compatible versions of software and drivers installed.
4. Perform hardware diagnostics: Kernel panics can also be caused by faulty hardware components. Run hardware diagnostics to check for any issues with your RAM, hard drive, or other critical components. Most computers have built-in diagnostics tools accessible through the BIOS or boot options.
5. Update the operating system: Outdated or corrupted system files can lead to kernel panics. Make sure your operating system is up to date with the latest patches and updates. Also, check for firmware updates for your hardware devices, such as BIOS updates for your motherboard.
6. Remove malware or viruses: Malware or viruses can also trigger kernel panics. Run a thorough scan of your system using reputable antivirus or anti-malware software. Remove any detected threats and ensure your system is protected by keeping your security software up to date.
7. Reinstall the operating system: If none of the above steps helped, reinstalling the operating system can be a last resort. This process ensures a clean installation, eliminating any software bugs or malware that might interfere with the system and cause kernel panics. Remember to back up your important files before reinstalling the OS.
By following these steps, you should be able to troubleshoot and fix kernel panic mode on your system. If the issue persists, consulting a professional technician or contacting the manufacturer’s support may be necessary.
How Do You Find Out What Causes Kernel Panic?
To find out what causes a kernel panic on a Mac, you can access the crash reports in the Console app. Here are the steps to follow:
1. Open the Console app: Go to the “Applications” folder, then open the “Utilities” folder, and finally click on the “Console” app.
2. View crash reports: In the Console app, you will see a list of logs on the left-hand side. Look for the section called “Crash Reports” and click on it to expand it.
3. Analyze crash reports: The crash reports will be displayed in the main window. Each report will contain information about the kernel panic, including the cause of the crash. Look for lines that mention “panic” or “kernel panic” to identify the specific crash report you want to investigate.
4. Examine the crash report: Double-click on the crash report to open it and view its contents. The report will provide detailed information about the crash, including the date and time it occurred, the specific error message, and any relevant system logs.
5. Identify the cause: Look for the section titled “Binary Images” in the crash report. This section lists the software and drivers that were loaded at the time of the kernel panic. Check for any third-party software or drivers that may be causing conflicts or compatibility issues with your system.
6. Further troubleshooting: If you are unable to determine the cause of the kernel panic from the crash report, you may need to consult Apple support or a professional technician for further assistance. They can help analyze the crash report and provide guidance on resolving the issue.
Note: It’s essential to keep your system and software up to date to minimize the risk of kernel panics. Additionally, if you recently installed new hardware or software before the kernel panic occurred, it’s worth considering whether they could be the cause.
Conclusion
Kernel panic on macOS Sierra can be a frustrating issue to deal with, as it can cause your Mac to freeze or crash unexpectedly. However, there are several software solutions that you can try to fix the problem. First, check the crash reports in the Console app to identify the cause of the kernel panic. Updating all your software, especially the operating system, can help resolve any bugs or compatibility issues that may be triggering the kernel panic. It’s also important to check for any corrupted apps and ensure that you have enough free space on your drive. Running Disk Utility to repair any disk errors can also be helpful. Disabling startup items and booting up in safe mode can assist in troubleshooting the issue further. If all else fails, reinstalling the operating system can provide a fresh start and eliminate any potential software bugs or malware that may be causing kernel panics. it’s crucial to troubleshoot and address the root cause of kernel panics to ensure the stability and performance of your Mac running macOS Sierra.


