IOS 12 is the latest operating system developed by Apple for its mobile devices, including iPhones and iPads. With its release, many users have been excited to explore the new features and improvements it brings. However, some users have reported issues with custom ringtones not working properly after updating to iOS 12. In this article, we will delve into this problem and provide some possible solutions.
One common issue that users have encountered is that their custom ringtones are not playing when they receive calls. This can be quite frustrating, especially if you have assigned specific ringtones to certain contacts or if you rely on distinctive ringtones to identify important calls.
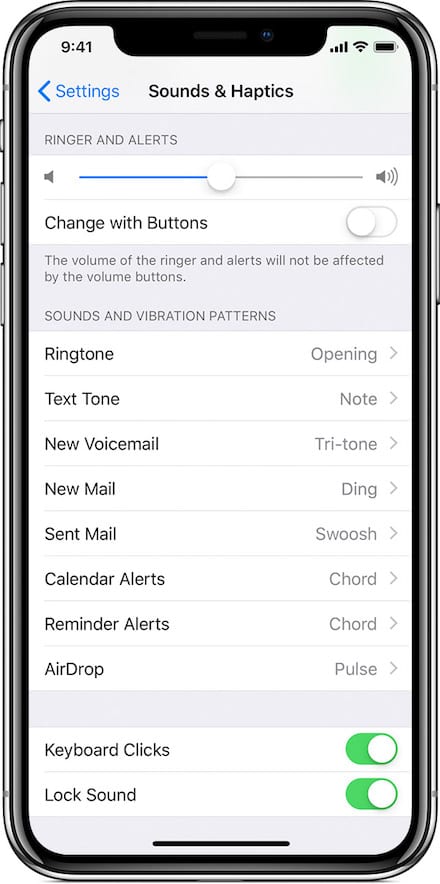
To troubleshoot this problem, the first step is to check if the custom ringtone is still selected as the default ringtone for incoming calls. Sometimes, after updating to iOS 12, the default ringtone settings may be reset or changed. To do this, go to Settings > Sounds & Haptics > Ringtone and select a new ringtone. If the custom ringtone is still not working, proceed to the next step.
Another possible cause for custom ringtones not working is that the custom ringtone file might have been corrupted during the update process. In this case, the solution is to delete the custom ringtone and re-install it. To do this, go to Settings > Sounds & Haptics > Ringtone and tap on the custom ringtone you want to remove. Then, tap on “Delete” to remove it from your device. After that, you can re-install the custom ringtone by following the same process you used to add it initially.
If the above steps do not resolve the issue, it is worth checking if the custom ringtone is set up correctly for specific contacts. Sometimes, the custom ringtone may not play if the contact’s ringtone setting is set to “Default” or if another ringtone is selected for that contact. To check this, go to Phone > Contacts, select the contact you want to assign a custom ringtone to, and make sure the correct ringtone is selected. If necessary, you can change the ringtone for that contact to the desired custom ringtone.
In addition to checking the custom ringtone settings, it is also important to ensure that the ringer volume is properly adjusted. Sometimes, the ringtone may not be audible if the ringer volume is set too low or if the device is in silent mode. To adjust the ringer volume, you can use the volume buttons on the side of your device or go to Settings > Sound and adjust the volume slider accordingly. Additionally, make sure that the device is not in silent mode by checking the position of the silent switch on the side of your device.
If you are experiencing issues with custom ringtones not working on iOS 12, there are several steps you can take to troubleshoot and resolve the problem. First, check if the custom ringtone is still selected as the default ringtone. If not, select a new ringtone. If that doesn’t work, try deleting and re-installing the custom ringtone. Additionally, make sure the custom ringtone is correctly set up for specific contacts and check the ringer volume and silent mode settings. By following these steps, you should be able to resolve the issue and enjoy your custom ringtones on iOS 12.

Why is Your Custom Ringtone Not Working on iPhone?
There could be several reasons why your custom ringtone is not working on your iPhone. Here are some possible explanations:
1. File Format: Custom ringtones for iPhones should be in the .m4r format. If your ringtone is in a different format, it may not be compatible with your iPhone and will not work. Make sure to convert your ringtone file to the appropriate format if needed.
2. Ringtone Length: Custom ringtones on the iPhone have a maximum length of 30 seconds. If your ringtone exceeds this limit, it will not play. Trim your ringtone to meet the duration requirement.
3. Storage Location: Custom ringtones should be stored in the “Ringtones” folder on your iPhone. If your ringtone is located in a different folder or location, it may not be recognized by the system. Move your ringtone file to the correct folder.
4. Syncing Issue: If you have recently added a custom ringtone to your iPhone, it is possible that the syncing process was interrupted or incomplete. Disconnect and reconnect your iPhone to your computer, then try syncing the ringtone again.
5. Volume Settings: Check the volume settings on your iPhone to ensure that the ringer volume is not turned all the way down or set to silent. Adjust the volume and test if the ringtone plays properly.
6. Software Update: If your iPhone is not running the latest version of iOS, it may cause compatibility issues with custom ringtones. Update your iPhone to the latest software version available.
7. Restart iPhone: Sometimes a simple restart can resolve minor software glitches. Restart your iPhone and see if the custom ringtone starts working.
If none of the above solutions work, you may need to consider reinstalling the custom ringtone or choosing a different ringtone altogether.
Why Your Custom Ringtone is Not Working?
There could be several reasons why your custom ringtone is not working on your phone. Here are some possible explanations:
1. Unsupported file format: Make sure that the custom ringtone you have selected is in a compatible file format. Commonly supported formats include MP3, AAC, and WAV. If your ringtone is in a different format, you may need to convert it to a compatible format using a file converter.
2. Ringtone file location: Check if the custom ringtone file is stored in the correct location on your phone. Different phones have different default directories for storing ringtones. Typically, you can place your custom ringtone file in the “Ringtones” or “Notifications” folder in your phone’s internal storage or SD card.
3. Ringtone length: Some phones have restrictions on the maximum length of a custom ringtone. If your ringtone exceeds the allowed duration, it may not work. Try shortening the length of the ringtone and see if that solves the issue.
4. Volume settings: Ensure that the volume setting for ringtones is not set to silent or too low. You can adjust the volume by pressing the physical volume buttons on your phone or by going to the sound settings in the phone’s system settings.
5. Phone mode: Check if your phone is set to silent, vibrate, or do not disturb mode. If it is, change the mode to regular or sound mode. This can usually be done by pressing the volume buttons or by going to the sound settings in the phone’s system settings.
6. Software updates: Sometimes, software updates can cause compatibility issues with custom ringtones. Make sure that your phone’s operating system is up to date. If not, install any available updates and see if that resolves the problem.
7. Ringtone app conflicts: If you are using a third-party ringtone app, it is possible that there could be conflicts with the default system settings. Try disabling or uninstalling any ringtone-related apps and see if that fixes the issue.
If none of these solutions work, it is recommended to consult the user manual of your specific phone model or contact the manufacturer’s support for further assistance.
Can You Still Set Custom Ringtones On iPhone?
It is still possible to set custom ringtones on an iPhone. Apple provides an easy way to personalize your iPhone’s ringtone by allowing you to choose from a variety of default options or create your own custom ringtones.
To set a custom ringtone on your iPhone, follow these steps:
1. Open the “Settings” app on your iPhone.
2. Scroll down and tap on “Sounds & Haptics” (or just “Sounds” on older iOS versions).
3. Under the “Sounds and Vibration Patterns” section, you will find various sound settings.
4. To change the default ringtone, tap on “Ringtone.”
5. You will see a list of pre-installed ringtones provided by Apple. You can scroll through them and tap on any ringtone to hear a preview.
6. If you want to use a custom ringtone, scroll to the top of the ringtone list and tap on “Custom” at the very top.
7. In the next screen, you can choose from various options to set a custom ringtone:
– “All Ringtones”: This option allows you to select a custom ringtone from your iPhone’s music library.
– “Tones”: If you have previously downloaded or purchased custom ringtones from the iTunes Store, they will appear here.
– “Voice Memos”: This option allows you to use any voice recordings you have made as a ringtone.
– “Classic”: Here, you can find the classic ringtones that were available on older iPhones.
8. Tap on the desired option and select the specific ringtone you want to set as your custom ringtone.
9. Once you have selected a custom ringtone, it will be set as your default ringtone for incoming calls.
Additionally, you can also assign distinctive ringtones to specific contacts on your iPhone. This allows you to easily identify who is calling without even looking at your phone. To assign a custom ringtone to a contact, follow these steps:
1. Open the “Contacts” app on your iPhone.
2. Find and tap on the contact you want to assign a custom ringtone to.
3. Tap on “Edit” in the top-right corner of the screen.
4. Scroll down and tap on “Ringtone.”
5. Choose the desired ringtone from the available options.
6. Tap on “Done” to save the changes.
Furthermore, if you prefer not to have any sound when receiving calls, you can easily turn off the ringer by switching the “Silent” switch on the side of your iPhone. When the switch is flipped to silent mode, your iPhone will only vibrate when receiving calls.
You can still set custom ringtones on your iPhone by accessing the “Sounds & Haptics” settings. You can choose from pre-installed options, use custom ringtones from your music library or iTunes Store, assign specific ringtones to contacts, and even turn off the ringer to rely solely on vibrations.
Conclusion
IOS 12 offers a range of new features and enhancements that aim to improve the overall user experience on Apple devices. From performance improvements to new customization options, Apple has focused on making iOS 12 faster, more efficient, and more personalized.
One of the standout features of iOS 12 is the improved performance, especially on older devices. Apple claims that apps will launch up to 40% faster, the keyboard will appear up to 50% faster, and the camera will open up to 70% faster on devices such as the iPhone 6 Plus. This is great news for users who may have been experiencing sluggishness on their older devices.
Another notable addition in iOS 12 is the introduction of Screen Time, a feature that helps users manage and understand their device usage. With Screen Time, users can set limits on app usage, track their screen time, and even set up parental controls for their children’s devices. This is a valuable tool for those looking to strike a better balance between their digital and real lives.
IOS 12 also brings improvements to notifications, with grouped notifications making it easier to manage and prioritize incoming alerts. Siri has also received some updates, with the ability to suggest actions based on user behavior and offer shortcuts for commonly used tasks. The Photos app has been enhanced with improved search capabilities and new sharing options, making it easier to find and share your favorite memories.
For those who enjoy augmented reality (AR), iOS 12 introduces ARKit 2.0, which allows for more immersive and realistic AR experiences. Developers can now create shared AR experiences, where multiple users can interact with the same virtual environment, opening up exciting possibilities for multiplayer gaming and collaborative experiences.
IOS 12 is a significant update that brings a range of new features and improvements to Apple devices. From performance boosts to enhanced customization options, Apple has focused on making iOS 12 faster, more efficient, and more personalized. Whether you’re looking to improve productivity, manage your device usage, or simply enjoy more immersive AR experiences, iOS 12 has something to offer.


