Are you a Mac user who’s not sure how to save scanned documents? Don’t worry, we’ve got you covered! Saving a scanned document on your Mac is easy once you know the steps.
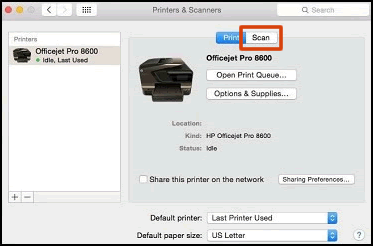
First, open the scanner application on your Mac. Depending on your scanner type and the software installed, this could be an app like Image Capture, or something more specialized like HP Smart. If you’re not sure which application to use, try searching in Finder for “scanner”.
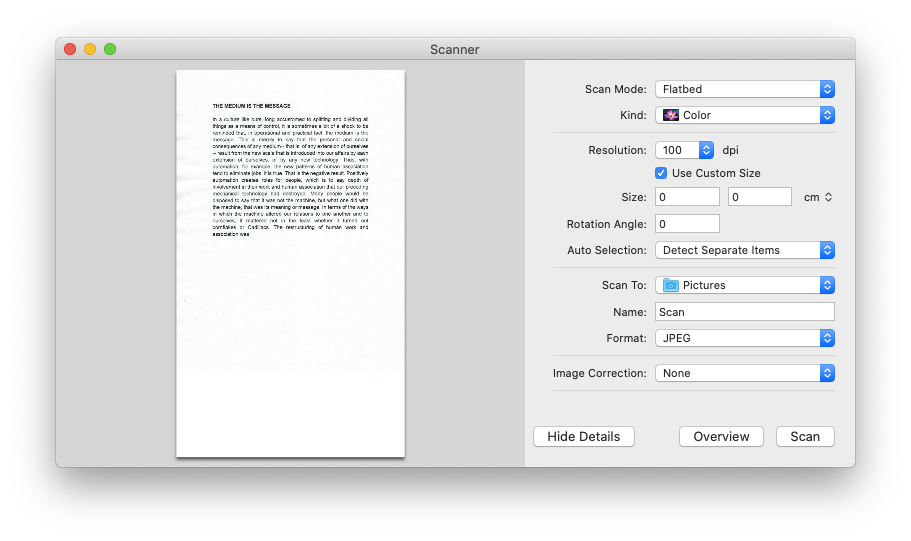
Once you have the scanner open, place the image or document that you want to scan onto the scanner bed or into the scanner tray. Then select “Scan To” from the list of options and choose where you want to save it – usually either your Desktop or Pictures folder (or a folder inside these). Then click “Scan” and wait for it to finish processing.
If you don’t have a scanner application installed, don’t worry – there are plenty of free options available online that allow you to quickly scan documents without having to install any software. For example, Google Drive allows users to easily scan documents from their browser (simply upload a photo of your document), while Evernote has its own Scanner app that can be used on both iOS and Android devices.
Once your document is scanned, it can be saved as a PDF file or another type of image files such as JPG or PNG. To do this, press Ctrl + S on your keyboard to open the Save As window. Type in a name for the document in the File Name box and select where you want to store it (e.g., in Documents or Pictures). Finally, click “Save” and your document will be saved in the chosen folder.
You can also combine multiple files into one PDF document if needed – simply select all of them with Command + Click before choosing Quick Actions > Create PDF from Finder. This is especially useful if you need to combine multiple scanned documents into one file for easy sharing or storage purposes.
We hope this guide has helped make saving scanned documents easier on your Mac! If you have any questions about scanning documents or anything else related to using Macs, please feel free to contact us at any time – we’re always happy to help!
Saving Scanned Documents on Mac
By default, scanned documents on Mac are saved in the “Pictures” folder in the Finder. To locate this folder, open the Finder and select the “Go” menu at the top of your screen. From there, select “Pictures,” and any documents you have scanned will be stored there. You can also change your scanner’s settings to save documents to a different folder if you choose.
Saving a Scanned Document
To save a scanned document, you will need to ensure that the scanner is connected and working properly. Next, open the scanning software that came with the scanner, and follow the instructions to scan your document. Once scanned, you will be prompted to save your document. Click on the ‘Save As’ option and type in a name for your document in the File Name box. Then select a folder whee you want to store it and click ‘Save’ to finish saving your document.
Saving Scanned Documents as PDFs on Mac
Saving scanned documents as PDFs on Mac is easy and straightforward. First, you will need to open your scanner application and select the document you wish to scan. Then click “Scan” from the main menu. Once your document has been scanned, you will be prompted to save it as a file. Select “PDF” from the dropdown menu and enter a file name for your document. Finally, click “Save” and your scanned document will be saved as a PDF on your Mac!
Saving a Document as a PDF After Scanning
When scanning a document to save it as a PDF, you will need to use Adobe Acrobat. To do so, open the program and go to Tools > Create PDF. The Create a PDF from any format interface will open. Choose Scanner from the options available and then click the settings or gear icon to customize your scan settings. When you are ready, click Scan to begin the process of scanning your document and creating a PDF file. Once the scan is complete, you can save the file in the location of your choice.
Scanning a Document and Saving it as a PDF
Scanning and saving a document as a PDF is very simple. First, you will need a scanning app on your device. If you have an Android device, you can use Google Drive for this task. To scan a document and save it as a PDF:
1. Install and open the Drive app.
2. Tap New Scan to begin scanning your document.
3. When you’re done scanning, tap OK to save the file.
4. (Optional) To scan multiple pages, tap Bulk add and then tap OK to continue.
5. Tap Save to store the file in Google Drive.
6. Enter a name for the file, choose a Drive account to save the file to, and select a Drive folder where you’d like to store it, then tap Save again to finalize the process.
And that’s it! You’ve now successfully scanned and saved your document as a PDF on your Android device using Google Drive!
Scanning and Uploading Documents on a Mac
To scan a document and upload it on a Mac, you will need to first prepare the pages. If you have a document-feeding scanner, you can place the pages in the scanner’s document feeder. Then, open the Preview app on your Mac and choose File > Import from Scanner > [scanner]. In the Import dialog, you will be able to set scanning options for your document. Once all of your settings are configured, click ‘Scan’ to begin scanning your document. When the process is complete, you will be able to save the file and upload it wherever needed.
Locating a Scanned Document on Mac
If you are unable to locate your scanned document on your Mac, there are a few potential reasons why:
1. You may not have saved the scanned document after the scan was complete. By default, scanned documents are saved to the Pictures folder on your Mac, but you can also specify a different location in the Save Settings.
2. If you did save the document, it is possible that you may have saved it to a different folder than the default Pictures folder. Check all folders on your Mac for the document in case you inadvertently saved it elsewhere.
3. It is also possible that you may have accidentally deleted or moved the file from its original location without realizing it. In this case, try searching for the file name in Spotlight (command + space bar) and check the Recents tab of Finder for any recently modified files that could be your missing document.
If none of these solutions seem to help locate your missing file, try using a data recovery tool such as Disk Drill to search for any deleted files on your Mac’s hard drive that may have been mistakenly removed or corrupted.
Saving a Scan as a JPEG
To save a scan as a JPEG, open the document and tap the export icon in the top-right corner. Then, select ‘Format’ and choose JPEG as the desired export format. Once you’ve selected this option, tap ‘Export’ to save your scan as a JPEG.


