Windows 7 is a popular operating system used by millions of people around the world. However, like any other software, it is not immune to issues and errors. One common problem that Windows 7 users may encounter is corrupted files. These corrupted files can cause various problems, such as system crashes, slow performance, and software malfunction.
Fortunately, there is a tool provided by Microsoft called DISM (Deployment Image Servicing and Management) that can help repair corrupted files in Windows 7. DISM is a command-line tool that allows users to service and prepare Windows images, including those used for deployment in a corporate environment or by OEMs.
To repair corrupted files using DISM in Windows 7, you need to follow a few simple steps. First, open an elevated Command Prompt by right-clicking on the Command Prompt shortcut and selecting “Run as administrator.” This will give you the necessary permissions to execute the DISM commands.
Once you have the elevated Command Prompt open, type the following command: DISM /online /cleanup-image /restorehealth. Press Enter to execute the command. This command will initiate a scan of your system and attempt to restore any corrupted files it finds.
During the scan, your system will automatically connect to the Windows Update service to download and replace the corrupt files with the latest versions. This ensures that you have the most up-to-date and secure files on your system.
If the scan fails to repair the corrupted files, you can try running it again in Safe Mode. Safe Mode starts Windows with a minimal set of drivers and services, which can help isolate and troubleshoot issues.
It’s worth noting that the DISM command mentioned above may not work on Windows 7 by default. In such cases, Microsoft has provided an alternative solution called the System Update Readiness Tool. This tool can be installed as a Windows update (KB947821) and can help repair corrupted files on Windows 7.
To use the System Update Readiness Tool, you need to download and install the Windows Assessment and Deployment Kit (Windows ADK) for Windows 8.1 Update. This kit includes the necessary components to run the System Update Readiness Tool on Windows 7.
Once you have the Windows ADK installed, you can run the System Update Readiness Tool to scan and repair corrupted files on your Windows 7 system.
Windows 7 users may encounter corrupted files that can cause various issues with their system. Fortunately, tools like DISM and the System Update Readiness Tool can help repair these corrupted files and restore the stability and performance of the operating system. By following the steps outlined above, you can easily fix corrupted files on your Windows 7 system and enjoy a smoother computing experience.
How Do You Run DISM on Windows 7?
To run DISM (Deployment Image Servicing and Management) on Windows 7, you can follow these steps:
1. Open an elevated Command Prompt: Right-click on the Command Prompt shortcut and select “Run as administrator.” If you can’t find the shortcut, you can search for “Command Prompt” in the Start menu, right-click on it, and choose “Run as administrator.”
2. In the Command Prompt window, type the following command and press Enter: DISM /online /cleanup-image /restorehealth
3. DISM will now scan your system for any corrupted files and attempt to repair them. This process may take some time, so be patient and let it complete.
4. Once the scan is finished, your system will automatically connect to the Windows Update service to download and replace any corrupt files that were detected. Make sure you have a stable internet connection for this step.
If the scan fails to repair the corrupted files, you can try running DISM in Safe Mode. Here’s how:
1. Restart your computer and continuously press the F8 key before the Windows logo appears.
2. In the Advanced Boot Options menu, select “Safe Mode” and press Enter.
3. After Windows starts in Safe Mode, open an elevated Command Prompt as explained earlier.
4. Type the same DISM command (DISM /online /cleanup-image /restorehealth) and press Enter to run the scan again.
Running DISM in Safe Mode may provide a more stable environment for repairing the corrupted files.
Remember, DISM is a powerful tool, and it’s always a good idea to create a backup of your important files before making any system changes.

What is the Alternative to DISM in Windows 7?
The alternative to DISM in Windows 7 is the “System Update Readiness Tool,” which can be installed as a Windows update (KB947821). This tool is designed to check for and fix inconsistencies in the Windows servicing store, which can prevent the installation of updates, service packs, and software. It is especially useful when encountering issues with Windows updates.
Here are some key points about the System Update Readiness Tool:
1. Purpose: The main purpose of the tool is to scan your computer for inconsistencies in the Windows servicing store, which is a repository of files and data related to the Windows Update process.
2. Compatibility: The System Update Readiness Tool is specifically designed for Windows 7 and Windows Server 2008 R2 operating systems. It is not intended for use on other versions of Windows.
3. Installation: The tool can be installed through the Windows Update service. Once installed, it runs automatically in the background and scans your system for any issues. It does not require any user intervention during the scanning process.
4. Scanning Process: The tool scans your system for inconsistencies in the servicing store by comparing the current state of your system with the known good configuration files. It identifies any missing or corrupted files and attempts to repair them.
5. Repair Process: If the tool detects any inconsistencies, it will attempt to repair them automatically. This may involve replacing missing or corrupted files with the correct versions. The repair process can take some time, depending on the extent of the issues found.
6. Reporting: After the scanning and repair process is complete, the tool generates a report that details the actions taken and any issues that were found and resolved. This report can be useful for troubleshooting and further analysis if needed.
The System Update Readiness Tool is the alternative to DISM in Windows 7 for checking and fixing inconsistencies in the Windows servicing store. It can be installed as a Windows update and runs automatically in the background to scan and repair any issues that may be preventing the installation of updates and software.
What Version of DISM is Windows 7?
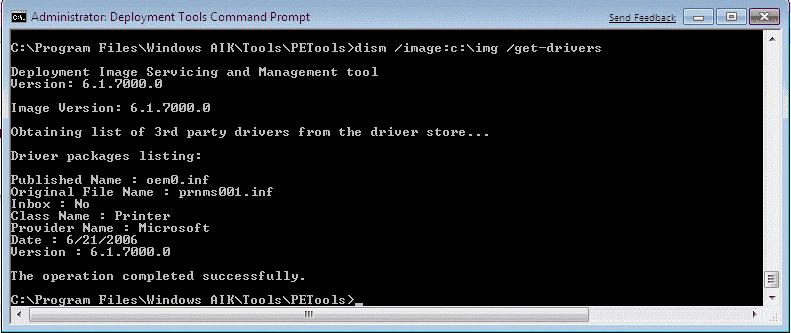
The version of DISM (Deployment Image Servicing and Management) that comes pre-installed with Windows 7 is 6.1.7600.16385. This version is the default for a fresh installation of Windows 7.
To update DISM to a newer version, you can download and install the Windows Assessment and Deployment Kit (Windows ADK) for Windows 8.1 Update. This kit includes an updated version of DISM.
Here are the steps to update DISM on Windows 7:
1. Go to the Microsoft website and search for “Windows ADK for Windows 8.1 Update” or use this direct download link: [insert link here].
2. Download the Windows ADK installer and run it on your Windows 7 computer.
3. Follow the installation wizard and choose the components you want to install. You can select “Deployment Tools” and “Windows Preinstallation Environment (Windows PE)” if you only want to update DISM.
4. Once the installation is complete, you will have the updated version of DISM on your Windows 7 system.
It’s worth noting that updating DISM is not necessary for most users unless you specifically require the features or improvements offered by the newer version.
How Do You Run DISM Command?
To run the DISM (Deployment Image Servicing and Management) command, follow these steps:
1. Open the Start menu by clicking the Windows icon located at the bottom left corner of your screen.
2. In the search bar, type “Command Prompt”. Right-click on the Command Prompt app that appears in the search results.
3. From the context menu, select the “Run as administrator” option. This will open the Command Prompt window with administrative privileges.
4. With the Command Prompt window open, you can now enter the DISM command. Type the following command exactly as it appears: “DISM /Online /Cleanup-Image /ScanHealth”.
5. Press the Enter key on your keyboard to execute the command. The DISM tool will begin scanning your system for any corruption or issues with the Windows image.
6. Wait for the scan to complete. This may take some time depending on the size and complexity of your system.
7. Once the scan is finished, the Command Prompt window will display the results. If any issues are found, DISM may attempt to repair them automatically. However, in some cases, manual intervention may be required.
8. If necessary, you can also use other DISM commands, such as “/RestoreHealth” to repair any detected corruption, or “/CheckHealth” to quickly check for any issues without performing a full scan.
Please note that running the DISM command requires administrative privileges, so it’s important to run Command Prompt as an administrator. Additionally, it’s always a good idea to create a system restore point or backup your data before making any changes to your system using advanced commands like DISM.
Conclusion
When it comes to repairing corrupted files in Windows 7, the DISM command may not be available as it is in later versions of Windows. However, Microsoft has provided an alternative solution in the form of the System Update Readiness Tool. This tool can be installed as a Windows update (KB947821) and is specifically designed to address issues with corrupted files in Windows 7.
If you are using a version of Windows 7 that does have the DISM command available, you can use it with the /ScanHealth option to perform an advanced scan of your system. This scan will examine your system files and check for any corruption or issues.
It’s important to note that running the DISM command or using the System Update Readiness Tool should only be done if you are experiencing issues with corrupted files. These tools are not necessary for regular maintenance and should not be used without proper guidance or troubleshooting.
Ultimately, the DISM command and the System Update Readiness Tool are valuable resources for repairing corrupted files in Windows 7. Whether you use the DISM command or the System Update Readiness Tool, these tools can help you restore your system’s files and ensure that your Windows 7 installation is running smoothly.


