BitLocker is a powerful encryption feature in Windows that helps protect your data from unauthorized access. However, there may be times when you need to suspend BitLocker temporarily, such as during a software update or when making changes to your computer. In this article, we will explore how to suspend BitLocker and ensure the safety of your data.
There are two methods to suspend BitLocker: through the Manage BitLocker window or through the Windows GUI mode. Let’s start with the first method.
Method 1: Suspend BitLocker through the Manage BitLocker window
1. Start your computer and boot into the Windows operating system.
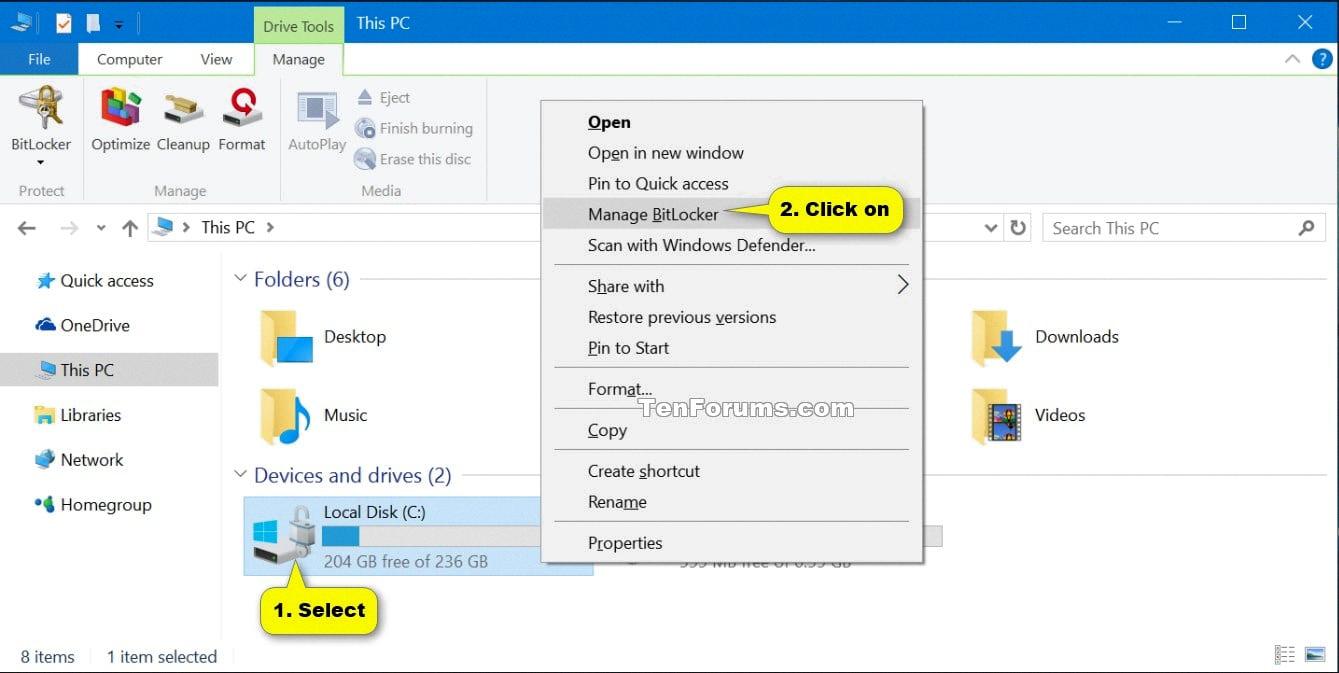
2. Open the Manage BitLocker window using one of the following methods:
– Click on the Start button, type “BitLocker” in the search bar, and select “Manage BitLocker.”
– Go to Control Panel, click on System and Security, and then click on “BitLocker Drive Encryption.”
3. In the Manage BitLocker window, you will see a list of drives that are encrypted with BitLocker. Select the drive for which you want to suspend protection.
4. Click on the “Suspend Protection” option for the selected drive.
5. A warning prompt will appear, informing you that suspending BitLocker will temporarily decrypt the drive, and any data you add during the suspension will still be encrypted. Click “Yes” to proceed.
6. BitLocker will suspend protection for the selected drive, and you can now make changes or perform updates on your computer. Remember that your data is temporarily decrypted during this period, so it’s important to take necessary precautions to protect your system.
Method 2: Disable BitLocker through Windows GUI mode
1. Press and hold the Windows button on your keyboard, then press “R” to open the Run dialog box.
2. Type “cmd” in the Run dialog box and press Enter. This will open the Command Prompt.
3. Right-click on the Command Prompt and select “Run as Administrator” to open an elevated Command Prompt.
4. In the Command Prompt window, type “manage-bde -status” and press Enter. This command will display the status of BitLocker on the drives in your computer.
5. Look for the drive for which you want to turn off BitLocker and note its volume number.
6. To turn off BitLocker for the selected drive, type the following command in the Command Prompt window:
“manage-bde -off
Replace “
“manage-bde -off C:”
7. Press Enter to execute the command and disable BitLocker for the selected drive.
Remember that disabling BitLocker completely decrypts your data, unlike suspending it. So, if you want to resume encryption after making changes to your PC, you can do so by going back to the Control Panel and enabling BitLocker for the desired drives.
Suspending or disabling BitLocker can be necessary in certain situations when you need to make changes or updates to your computer. By following the steps mentioned above, you can easily suspend or disable BitLocker and ensure the security of your data during these periods.
How Do I Temporarily Suspend BitLocker?
To temporarily suspend BitLocker, follow these steps:
1. Start your computer and boot into the Windows operating system.
2. Open the “Manage BitLocker” window using one of the following methods:
– Click on the Start menu, search for “BitLocker,” and select “Manage BitLocker” from the results.
– Go to the Control Panel, click on “System and Security,” and then click on “BitLocker Drive Encryption.”
3. In the Manage BitLocker window, you will see a list of drives that are protected by BitLocker. Locate the drive for which you want to suspend protection.
4. Click on the “Suspend Protection” option for the desired drive.
5. A warning prompt will appear, informing you that suspending BitLocker protection may make your data vulnerable to unauthorized access. Review the warning and make sure you understand the risks involved.
6. Click “Yes” to confirm and suspend BitLocker for the selected drive.
By following these steps, you will be able to temporarily suspend BitLocker protection on the desired drive. It’s important to note that when BitLocker is active during an update, all stored keys on the TPM (Trusted Platform Module) will be lost. Therefore, it’s crucial to suspend BitLocker before performing any system updates or changes.

Is It Possible To Disable BitLocker?
It is possible to disable BitLocker, a drive encryption feature in Windows, through the GUI (Graphical User Interface) mode. Here are the steps to disable BitLocker using the Windows GUI:
1. Click on the Start button in the bottom left corner of your screen.
2. From the Start menu, click on Control Panel.
3. In the Control Panel window, find and click on the System and Security option.
4. Within the System and Security section, locate and click on the BitLocker Drive Encryption option.
To make the process more explicit, here is a step-by-step breakdown with bullet points:
– Click on the Start button.
– Select Control Panel from the Start menu.
– In the Control Panel window, find and click on the System and Security option.
– Within the System and Security section, locate and click on the BitLocker Drive Encryption option.
After following the steps above, you will be presented with a list of drives on your computer where BitLocker is enabled.
– Look for the drive on which you want to turn off BitLocker.
– Click on the Turn Off BitLocker option next to the drive.
Once you click on Turn Off BitLocker, a confirmation prompt may appear asking if you’re sure you want to turn off BitLocker for the selected drive.
– Confirm your decision by clicking on Yes or OK, depending on the prompt.
Please note that the ability to disable BitLocker may require administrative privileges on your computer. This process will effectively disable BitLocker and remove the drive encryption from the selected drive.
It’s important to keep in mind that disabling BitLocker will make the data on the drive accessible without requiring any encryption keys or passwords. Therefore, it is crucial to consider the security implications before disabling BitLocker.
How To Suspend BitLocker In Windows 10 Using Cmd?
To suspend BitLocker in Windows 10 using Command Prompt (cmd), follow these steps:
1. Press and hold the Windows button on your keyboard and then press the R key. This will open the Run dialog box.
2. Type “cmd” into the Run dialog box and press Enter or click OK. This will open the Command Prompt window.
3. Right-click on the Command Prompt icon in the taskbar and select “Run as Administrator” from the context menu. This will open an elevated Command Prompt with administrative privileges.
Now, to suspend BitLocker using cmd, you can use the “manage-bde” command with the “-protectors” option followed by the drive letter of the encrypted drive. Here’s the step-by-step process:
1. In the Command Prompt window, type the following command and press Enter:
`manage-bde -status`
This command will display the status of BitLocker on all the drives in your computer.
2. Find the drive that you want to suspend BitLocker on and make note of its drive letter.
3. To suspend BitLocker on the specific drive, type the following command and press Enter:
`manage-bde -protectors -disable :`
Replace “ with the actual drive letter of the drive you want to suspend BitLocker on.
For example, if you want to suspend BitLocker on drive C, the command would be:
`manage-bde -protectors -disable C:`
4. After executing the command, BitLocker will be temporarily suspended on the specified drive.
It’s important to note that you need administrative privileges to suspend BitLocker using Command Prompt. Also, make sure you know the drive letter of the drive you want to suspend BitLocker on, as it will be required in the command.
By following these steps, you can easily suspend BitLocker on a specific drive in Windows 10 using Command Prompt.
What Is The Difference Between Suspend And Disable BitLocker?
When it comes to BitLocker, there are two options you can choose: suspend or disable. Both options have distinct effects on your encrypted data. Here’s a detailed explanation of the difference between suspending and disabling BitLocker:
1. Suspending BitLocker:
– When you suspend BitLocker, it temporarily pauses the encryption process and allows you to make changes to your PC without decrypting the data on your drives.
– The existing data on your drives remains encrypted during the suspension.
– Any new data you add to the drives while BitLocker is suspended will also be encrypted.
– Suspending BitLocker is useful when you need to perform actions that could potentially interfere with the encryption process, such as updating the BIOS or making hardware changes.
– It’s important to note that suspending BitLocker doesn’t provide any protection from unauthorized access during the suspension period.
2. Disabling BitLocker:
– Disabling BitLocker, on the other hand, permanently turns off the encryption and decrypts the data on your drives.
– Once disabled, you can freely access and modify the data on your drives without any encryption.
– Disabling BitLocker is typically done when you no longer require the encryption or if you want to remove it from your system entirely.
– It’s crucial to understand that disabling BitLocker removes the protection it provides, making your data vulnerable to unauthorized access.
To summarize, suspending BitLocker temporarily halts the encryption process while keeping the data encrypted, allowing you to make changes to your PC. Disabling BitLocker permanently turns off the encryption, decrypting the data and removing the protection it provides.
Conclusion
To conclude, suspending BitLocker is a crucial step when you want to update your computer or make changes to your PC. By suspending BitLocker, you are temporarily disabling its encryption protection and allowing your system to make necessary modifications without any hindrance.
There are two main methods to suspend BitLocker. The first method involves using the Manage BitLocker window. You can access this window by clicking on the BitLocker icon in the system tray, by right-clicking on the drive you want to suspend protection for, or by opening the Control Panel and navigating to System and Security > BitLocker Drive Encryption. Once you’re in the Manage BitLocker window, simply click on the “Suspend Protection” option for the desired drive and confirm your action when prompted.
The second method involves using the command prompt. To do this, press and hold the Windows button on your keyboard and simultaneously press “R” to open the Run dialog box. Type “cmd” and press Enter to open the command prompt. Make sure to run the command prompt as an administrator by right-clicking on the Command Prompt and selecting “Run as Administrator.” In the command prompt, type “manage-bde -status” and press Enter to view the status of BitLocker on your drives. Locate the drive you want to suspend protection for and take note of its numerical identifier. Then, type “manage-bde -protectors -disable [drive letter]” (replace [drive letter] with the appropriate letter of the drive) and press Enter to suspend BitLocker on that drive.
It’s important to remember that suspending BitLocker doesn’t decrypt the data on your drives. The encryption remains intact, and any new data you add during the suspension will still be encrypted. Once you’ve completed your updates or modifications, you can go back to the Manage BitLocker window or the command prompt and resume encryption to re-enable BitLocker’s protection on your drives.
By following these steps, you can safely suspend BitLocker, make necessary changes to your PC, and then resume encryption to ensure the security of your data.


