Wireless certificates play a crucial role in securing our connections to Wi-Fi networks. These certificates authenticate the identity of the network and ensure that our data remains secure during transmission. In this article, we will explore the process of exporting a wireless certificate from Windows 10, allowing you to easily transfer it to other devices or share it with others.
To export a wireless certificate, we need to access the Microsoft Management Console (MMC). Here’s a step-by-step guide to help you through the process:
1. Open the MMC by clicking on the Start menu, typing “MMC” in the search bar, and selecting the MMC app.
2. Once the MMC is open, go to the File menu and select “Add/Remove Snap In.”
3. Double click on “Certificates” to add it to the MMC.
4. Choose the option for “Computer Account” and then select “Local Computer.” Click “Finish” and then “OK” to exit the Snap-In window.
Now that we have added the Certificates snap-in to the MMC, we can proceed with exporting the wireless certificate:
1. In the MMC console tree, navigate to the logical store that contains the certificate you want to export. This could be under “Personal” or “Trusted Root Certification Authorities,” depending on where the certificate is stored.
2. In the details pane, locate and select the specific certificate you wish to export.
3. Right-click on the certificate and select “All Tasks” and then “Export” from the context menu.
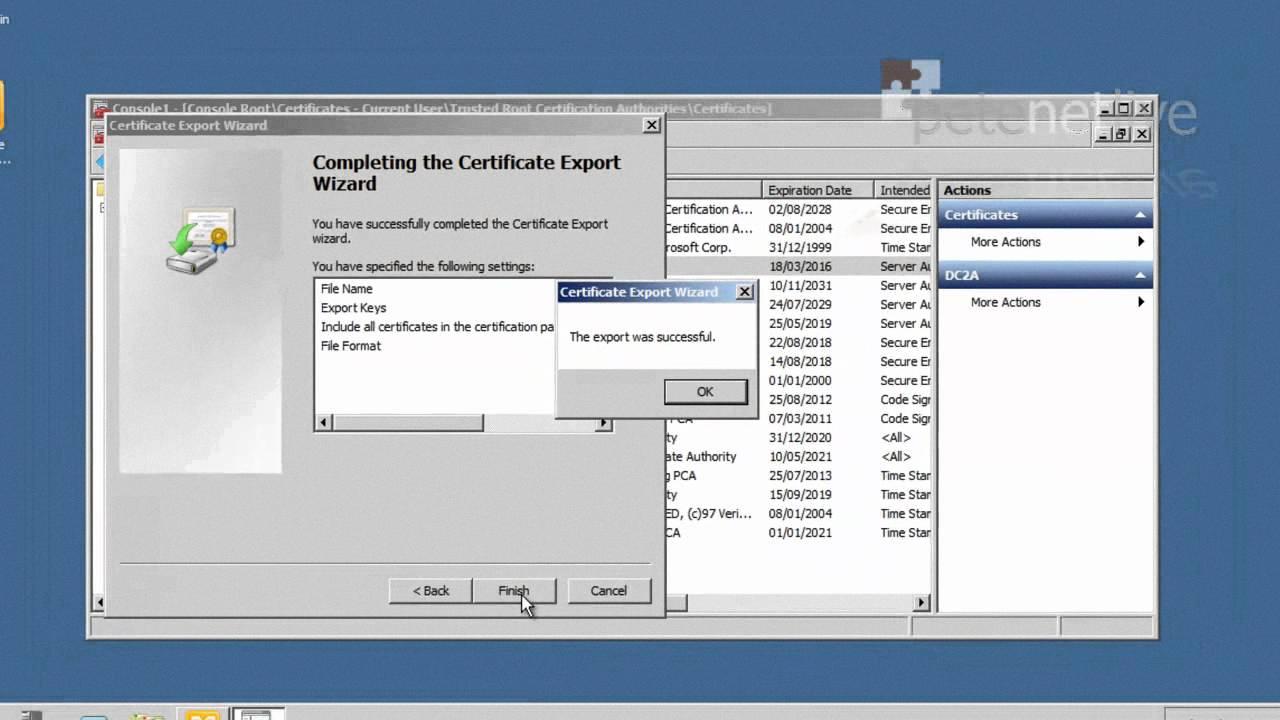
4. The Certificate Export Wizard will now guide you through the export process. Follow the prompts and select the appropriate options based on your requirements.
5. Choose a file name and location for the exported certificate. Make sure to select a secure location where you can easily access it later.
6. click “Finish” to complete the export process.
Congratulations! You have successfully exported a wireless certificate from Windows 10. Now, you can transfer it to other devices or share it with others as needed.
It’s worth noting that the process of exporting certificates may vary slightly depending on the specific wireless network and certificate authorities involved. However, the general steps outlined above should provide a good starting point for most scenarios.
Remember, wireless certificates are essential for ensuring the security of our Wi-Fi connections. By understanding how to export these certificates, you can easily manage and share them as necessary, providing a safer and more secure wireless experience.
Exporting a wireless certificate from Windows 10 is a straightforward process that can be done using the Microsoft Management Console. By following the step-by-step guide provided in this article, you can easily export your wireless certificate and ensure the security of your Wi-Fi connections.
How Do You Export Your WiFi Certificate in Windows 10?
To export your Wi-Fi certificate in Windows 10, you need to access it through the Microsoft Management Console (MMC). Here are the steps to follow:
1. Press the Windows key on your keyboard and type “MMC” in the search bar. Then, click on the “MMC” app that appears in the search results.
2. Once the MMC opens, go to the “File” menu at the top-left corner and select “Add/Remove Snap-in.”
3. In the “Add or Remove Snap-ins” window, double-click on “Certificates” in the list of available snap-ins.
4. In the “Certificates” window, select “Computer account” and click on the “Next” button.
5. Select “Local computer” and click on the “Finish” button.
6. Click on the “OK” button to exit the “Add or Remove Snap-ins” window.
7. Now, you should see the “Certificates (Local Computer)” snap-in in the MMC.
8. Expand the “Certificates (Local Computer)” node by clicking on the arrow next to it.
9. Expand the “Personal” folder and then click on the “Certificates” folder.
10. In the right-hand pane, you will see a list of certificates. Locate and select the Wi-Fi certificate that you want to export.
11. Right-click on the selected certificate and choose “All Tasks,” then click on “Export…” in the context menu.
12. The Certificate Export Wizard will open. Click on the “Next” button to proceed.
13. Select the option “export the private key” and click on the “Next” button.
14. Leave the default settings selected on the next screen and click “Next.”
15. Enter a password to protect the exported certificate and private key. Make sure to remember this password as you will need it to import the certificate on another device.
16. Choose a location on your computer to save the exported certificate file and provide a name for the file. Then, click on the “Next” button.
17. Review the summary of your selections and click on the “Finish” button to complete the export process.
18. You should see a confirmation message indicating that the export was successful. Click on the “OK” button to close the wizard.
You have now successfully exported your Wi-Fi certificate in Windows 10. The exported certificate file can be imported on another device or used for backup purposes.

How Do You Export a Certificate From Windows 10?
To export a certificate from Windows 10, follow these steps:
1. Open the Certificates snap-in by pressing the Windows key + R on your keyboard, then typing “certlm.msc” and pressing Enter. This will open the Certificate Manager for the local machine.
2. In the left-hand pane of the Certificate Manager, expand the folders to find the certificate you want to export. Certificates are usually located under the Personal or Trusted Root Certification Authorities folders.
3. Once you’ve located the certificate, click on it in the details pane to select it.
4. Next, click on the “Action” menu at the top of the Certificate Manager window.
5. From the drop-down menu, point to “All Tasks” and then click on “Export”.
6. This will open the Certificate Export Wizard. Click “Next” to proceed.
7. In the next window, you’ll be asked to choose whether to export the private key along with the certificate. If you want to export the private key, select the option “export the private key”. If you don’t want to export the private key, choose “do not export the private key”. Click “Next” to continue.
8. In the following window, you can choose the format for the exported certificate. The most common format is “Personal Information Exchange – PKCS #12 (.PFX)”. Select this option and click “Next”.
9. You’ll then be prompted to enter a password to protect the exported certificate. Enter a strong password and confirm it. This password will be required when importing the certificate.
10. Choose a file location to save the exported certificate and provide a file name. Click “Next” to proceed.
11. Review the summary of your selections and click “Finish” to complete the export process.
The certificate will now be exported to the specified location. You can use this exported certificate to import it onto another computer or for other purposes as needed.
Note: It’s important to keep the exported certificate and its associated private key secure, as they can be used to impersonate your identity or decrypt encrypted data.
Where are Wireless Certificates Stored Windows 10?
Wireless certificates on a Windows 10 computer are stored in the local machine certificate store. This store is a repository that holds various types of certificates, including wireless certificates, for the entire computer system.
To locate the wireless certificates on Windows 10, you can use the Certificate Manager, which is a built-in certificate management tool. Here’s how you can access it:
1. Press the Windows key + R on your keyboard to open the Run dialog box.
2. Type “certmgr.msc” (without quotes) in the Run dialog box and press Enter. This will open the Certificate Manager.
3. In the Certificate Manager window, you will see a hierarchical structure on the left-hand side. Expand the “Trusted Root Certification Authorities” folder.
4. Within the “Trusted Root Certification Authorities” folder, you will find the “Certificates” subfolder. Expand this subfolder.
5. Look for a certificate related to wireless connections. These certificates are typically issued by trusted certification authorities for secure authentication and encryption purposes.
6. You can double-click on a certificate to view its details, such as the issuer, expiration date, and intended purpose.
Alternatively, you can also search for wireless certificates using the Windows search feature. Simply type “Certificate Manager” or “certmgr.msc” in the search bar, and click on the appropriate search result to open the Certificate Manager.
Wireless certificates on Windows 10 are stored in the local machine certificate store, which can be accessed and managed using the Certificate Manager tool.
Conclusion
A wireless certificate is a crucial component in ensuring secure and encrypted communication between devices on a wireless network. It is used to authenticate and verify the identity of the network and establish a secure connection.
To export a wireless certificate, you need to access it from the Microsoft Management Console (MMC) and follow the necessary steps. By opening the Certificates snap-in in the MMC, you can locate the certificate you want to export, and then use the export option under the All Tasks menu. This allows you to save the certificate in a desired location for future use.
In addition, Windows 10 provides a certificate management tool called Certificate Manager. This tool allows users to manage both computer and user certificates stored in the local machine certificate store. By accessing the Wi-Fi settings on your device and installing the downloaded certificate, you can ensure secure connectivity to the network.
Wireless certificates play a vital role in securing wireless networks and protecting sensitive information. By following the necessary steps to export and manage these certificates, users can ensure the integrity and confidentiality of their wireless connections.


