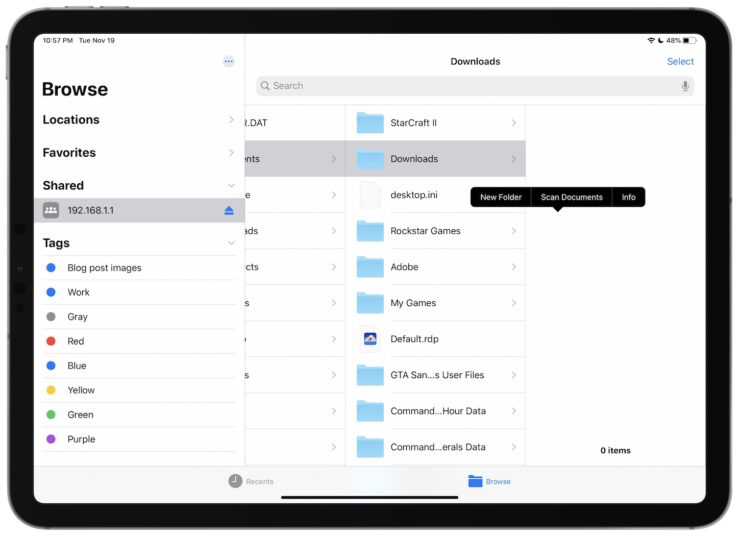
Windows 10 is a widely used operating system that offers a range of features and functionalities. One such feature is the ability to share folders, which allows users to easily collaborate and access files from different devices. In this article, we will explore how to access a Windows 10 shared folder from an iPad.
To begin, you will need to ensure that both your Windows 10 PC and iPad are connected to the same network. This is crucial for establishing a connection between the devices and accessing the shared folder.
Next, on your iPad, open the Files app. This app comes pre-installed on most iPads and allows you to manage and access files from various sources. Once the Files app is open, you will notice a sidebar on the left-hand side. At the top of this sidebar, tap on “Connect to Server.”
A dialogue box will appear, prompting you to enter the hostname or network address of the Windows 10 PC. If you are unsure about the hostname or network address, you can find this information on your Windows 10 PC by opening the Command Prompt and typing “ipconfig.” Look for the “IPv4 Address” or “Default Gateway” and use that as the network address.
After entering the hostname or network address, tap on “Connect.” You will then be asked to select the type of connection. Since we are accessing a Windows 10 shared folder, select “Guest” and tap on “Next.”
The Files app will now establish a connection to the Windows 10 PC. Once connected, you will see a list of shared folders on the screen. Tap on the folder you wish to access, and the Files app will display the files and subfolders within that shared folder.
From here, you can easily view, edit, or download files from the shared folder on your iPad. The Files app provides a user-friendly interface, making it easy to navigate and manage files.
It’s worth noting that while accessing a Windows 10 shared folder from an iPad provides convenience and flexibility, there may be limitations depending on the permissions set on the shared folder. If you encounter any issues accessing or manipulating files, it is recommended to check the sharing settings on the Windows 10 PC.
Accessing a Windows 10 shared folder from an iPad is a straightforward process that can be accomplished using the Files app. By following the steps outlined in this article, you can easily connect to a Windows 10 PC and access shared folders, allowing for seamless file management and collaboration across devices.

How Do You Access A Shared Folder On Your iPad?
To access a shared folder on your iPad, you can follow these steps:
1. Open the Files app on your iPad. This app comes pre-installed on most iPads, but if you don’t have it, you can download it from the App Store.
2. Once you have the Files app open, tap on the “Browse” tab at the bottom of the screen.
3. In the Browse tab, you will see a section called “Locations” on the left side of the screen. Scroll down until you find the section labeled “Shared” and tap on it.
4. Under the “Shared” section, you should see a list of folders that have been shared with you. Tap on the folder that you want to access.
5. After tapping on the shared folder, you will be able to view its contents. You can open files, copy or move them, or perform other actions depending on the permissions granted to you by the folder owner.
It’s important to note that you will only be able to access shared folders that you have been given permission to access. If you don’t see any shared folders in the Files app, it means that no one has shared any folders with you.
By following these steps, you should be able to easily access and view shared folders on your iPad using the Files app.
Can You Access Files On Your PC From Your iPad?
It is possible to access files on your PC from your iPad. To do this, you can use the Files app on your iPad to connect to the server on your PC. Here’s how you can do it:
1. On your iPad, open the Files app.
2. Look for the sidebar at the top of the app and tap on “Connect to Server.”
3. In the text field that appears, enter the hostname or network address of your PC.
4. Tap on “Connect” to proceed.
5. From the options that appear, select “Guest” and then tap on “Next.”
At this point, you will be able to connect your iPad to your PC’s file server. However, it’s important to note that you need to have your Mac or Windows PC connected to the file server, unless your computer is the file server itself.
By following these steps, you will be able to access and view files stored on your PC directly from your iPad. This can be useful for situations where you need to access certain files while on the go or when your PC is not readily available.
How Do You Share Files Between iPads and Windows 10?
To share files between your iPad and Windows 10, you can use the iTunes app along with a USB cable. Follow these steps:
1. Connect your iPhone or iPad to your Windows 10 PC using a USB cable.
2. Open the iTunes app on your PC. If you don’t have iTunes installed, you can download it from the Apple website.
3. In iTunes, click on the iPhone or iPad button located near the top-left corner of the iTunes window. This button will be labeled with the name of your device.
4. Once you click on the device button, you will see various options on the left sidebar of iTunes.
5. Look for the “File Sharing” option in the sidebar and click on it. This will open a list of apps and their associated files.
6. Scroll through the list of apps to find the one you want to share files with. For example, if you want to share files with the Files app on your iPad, look for the “Files” option in the list.
7. Click on the app name to see the files associated with it. You may see a list of documents, media files, or other types of files.
8. To share files from your Windows 10 PC to your iPad, click on the “Add File” or “Add…” button in the file sharing section. This will open a file browser window on your PC.
9. Browse to the location of the file you want to share, select it, and click “Open” or “OK” to add it to the app’s file list in iTunes.
10. The file will now be available in the selected app on your iPad.
11. To transfer files from your iPad to your Windows 10 PC, select the file you want to transfer from the app’s file list in iTunes.
12. Click on the “Save To” or “Save…” button in the file sharing section, and choose a location on your PC where you want to save the file.
13. Click “Save” or “OK” to start the file transfer. The file will be saved to the specified location on your Windows 10 PC.
Remember to safely disconnect your iPad from your PC when you’re done transferring files. You can do this by clicking on the “Eject” button next to your device name in the top-left corner of iTunes.


