Finder is a powerful tool that allows users to navigate and manage files on their Mac computers. While it provides a user-friendly interface, there are certain hidden files and folders that are not visible by default. However, with a simple command, you can reveal these hidden files and gain access to them.
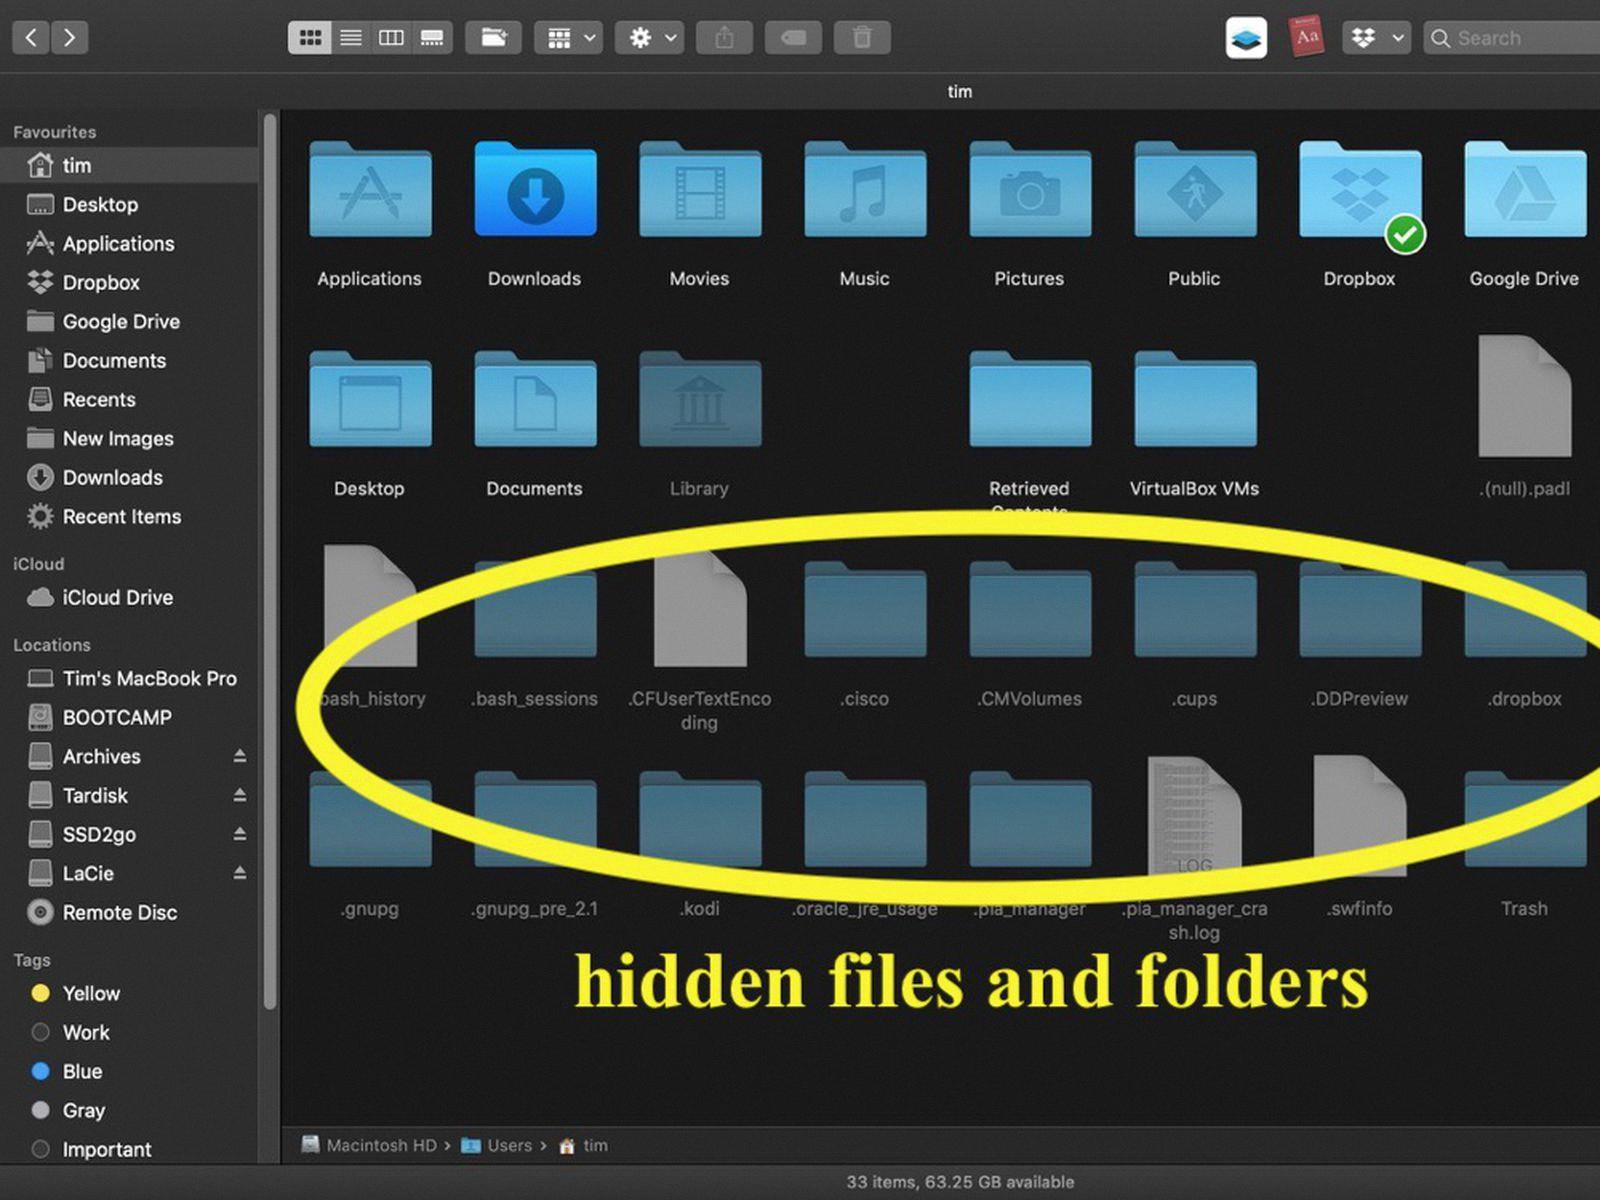
One way to show hidden files on a Mac is by using the Finder itself. All you need to do is open the Finder and press Command + Shift + . (period) keys simultaneously. This action will make the hidden files appear translucent within the folder. If you want to hide them again, you can repeat the same key combination of Command + Shift + ..
Another method to reveal hidden files is by using the Terminal application. Terminal allows you to interact with your Mac’s operating system through a command-line interface. To access Terminal, you can search for it using Spotlight or navigate to Applications > Utilities > Terminal.
Once you have Terminal open, you can use the “defaults write” command followed by the appropriate parameter to modify the Finder’s settings. In this case, you would use the command “defaults write com.apple.finder AppleShowAllFiles -bool true” without the quotes. After running this command, you will need to restart the Finder for the changes to take effect. You can do this by typing “killall Finder” into the Terminal and hitting enter.
By executing this command, you permanently enable the display of hidden files in the Finder. This means that even after restarting your computer, the hidden files will remain visible. It’s important to note that modifying system settings can have unintended consequences, so it’s always a good idea to exercise caution and make sure you understand the potential risks involved.
To reverse the changes and hide the hidden files again, you can use the same Terminal command with a slight modification. Instead of setting the parameter to “true,” you would set it to “false.” The command would then be “defaults write com.apple.finder AppleShowAllFiles -bool false.” Again, you will need to restart the Finder for the changes to take effect.
Whether you prefer using the Finder or the Terminal, there are multiple ways to show hidden files on a Mac. By following the steps outlined above, you can easily access and manage these files to suit your needs. Just remember to exercise caution when modifying system settings and always be aware of the potential risks involved.
How Do You See Hidden Files in Finder?
To view hidden files in Finder, you can utilize the following methods:
1. Keyboard shortcut: Press Command + Shift + . (full stop/period). This will toggle the visibility of hidden files within the active Finder window.
2. Terminal command: Open Terminal (found in the Utilities folder within the Applications folder) and enter the following command: “defaults write com.apple.finder AppleShowAllFiles -bool true; killall Finder”. This command will reveal all hidden files in Finder. To hide them again, use the same command but replace “true” with “false”.
3. Third-party software: Various third-party applications are available that provide a graphical user interface (GUI) to show hidden files in Finder. Examples include “Funter”, “Hidden Files Toggle”, and “Show Hidden Files”. These applications allow you to easily switch the visibility of hidden files on and off.
Remember, hidden files are usually hidden for a reason, as they are often system files or files that users don’t typically need to access. Exercise caution when modifying or deleting hidden files, as it can affect the functionality of your operating system or applications.

How Do You Show Hidden Files On Mac?
To show hidden files on a Mac using the Finder, follow these steps:
1. Open a Finder window by clicking on the Finder icon in the Dock or by pressing “Command” + “N” on your keyboard.
2. Navigate to the folder where you want to show hidden files.
3. Press the “Command” + “Shift” + “.” (period) keys simultaneously. This keyboard shortcut tells Finder to display hidden files.
4. As a result, the hidden files within the folder will become visible and appear translucent.
5. To hide the files again, simply repeat the same keyboard shortcut: “Command” + “Shift” + “.” (period).
By using this method, you can easily toggle the visibility of hidden files in any folder on your Mac.
How Do You Find Hidden Folders On Mac?
To find hidden folders on a Mac, you can follow these steps:
1. Open the Finder application by clicking on the Finder icon in the Dock or by selecting “Finder” from the top menu.
2. In the top menu, click on “Go” and then select “Go to Folder” from the dropdown menu. Alternatively, you can use the keyboard shortcut Command + Shift + G.
3. A small window will appear where you can type in the path to the hidden folder you want to access. To find hidden folders, you need to know the exact path or location of the folder. For example, if you want to access a hidden folder named “MyHiddenFolder” located in your user directory, you would enter “~/MyHiddenFolder” (without quotes) in the text field. The “~” symbol represents your user directory.
4. Once you have entered the path to the hidden folder, click on the “Go” button or press the Enter key.
5. If the hidden folder exists and you have entered the correct path, the Finder will open the hidden folder and display its contents.
6. To hide the hidden files and folders again, you can simply close the Finder window or press Command + Shift + . (dot) again. This will toggle the visibility of hidden files and folders in the Finder.
Remember, hidden folders are typically hidden for a reason, as they often contain system files or sensitive data. Be cautious when modifying or deleting files within hidden folders, as it can affect the functionality of your system or applications.
How Do You Permanently Unhide Files On Mac?
To permanently unhide files on a Mac, you can follow these steps:
1. Open Terminal: You can find Terminal in the Utilities folder, which is inside the Applications folder. Alternatively, you can use Spotlight search (Cmd + Space) and type “Terminal” to locate and open it.
2. Type the command: Once Terminal is open, type “killall Finder” (without quotes) and hit enter. This command will shut down and restart the Finder application on your Mac.
3. Identify the file path: Locate the hidden file that you want to unhide. You can do this by navigating to its location using Finder or by using the “cd” command in Terminal. For example, if your file is located in the Documents folder, you can type “cd Documents” in Terminal to navigate to that folder.
4. Show the file path: With the file selected, click and drag it into the Terminal window. This action will automatically add the file path to the Terminal command line.
5. Unhide the file: To unhide the file permanently, type “sudo chflags nohidden” (without quotes) in Terminal, followed by a space.
6. Paste the file path: Now, right-click in the Terminal window and select “Paste” to paste the file path you dragged in step 4. Press enter to execute the command.
By following these steps, the hidden status of the file will be permanently removed, and it will be visible in Finder from now on.
Conclusion
Finder provides a convenient and user-friendly way to navigate and manage files on a Mac. It offers a range of features and options, including the ability to show and hide hidden files with just a few simple keystrokes. By pressing Command + Shift + ., users can easily reveal hidden files within a folder, allowing for quick access and modification. Similarly, pressing the same key combination again will hide these files, maintaining a clean and organized view. Additionally, Terminal provides an alternative method for permanently unhiding files, ensuring that they remain visible even after system restarts. Finder is a powerful tool that enables users to efficiently manage their files, whether they are hidden or not.


