Are you tired of your iPhone or iPad automatically filling in forms with outdated information? The AutoFill feature is a great way to quickly enter data into web forms, but it can be a hassle if your contact or credit card info is out of date. Fortunately, it’s easy to delete the AutoFill data from your device.
In this blog post, we’ll walk you trough how to delete AutoFill information on your iPhone or iPad. We’ll also provide some tips on how to prevent the same problem from happening again in the future.
First off, let’s look at how to delete contact and credit card informaton stored in AutoFill. To do this, open the Settings app and tap “Safari”. In the Safari settings screen, tap “AutoFill” and then select “Contacts and Credit Cards”. Here you will be able to see any contacts or credit cards stored in AutoFill as well as a button to delete them.
Next up is deleting passwords stored in AutoFill. To do this, go back into the Settings app and tap “Passwords & Accounts”, then select “AutoFill Passwords” at the top of the screen. Here you will be able to see any passwords stored in AutoFill as well as a button to delete them.
Finally, if you want to completely clear all of your browsing data (which includes Autofill form data), open up Chrome and go into More > Clear Browsing Data > Advanced > Autofill Form Data and select “Clear Browsing Data” at the bottom of the screen. This will erase all saed Autofill form data from your device.
Now that you know how to delete Autofill information from your iPhone or iPad, here are some tips for preventing it from happening again:
• Be sure to update any contact or credit card info that has changed since last time you used it on websites or apps
• When creating new passwords for websites or apps, use unique passwords that aren’t shared with other services
• Regularly clear out your browsing history and cookies from Safari so old Autofill form data isn’t kept
• Don’t save passwords in Chrome if they cotain sensitive information like bank account numbers
By following these steps and taking advantage of these tips, you can be sure that only accurate and secure information is being stored on your device when using Autofill!
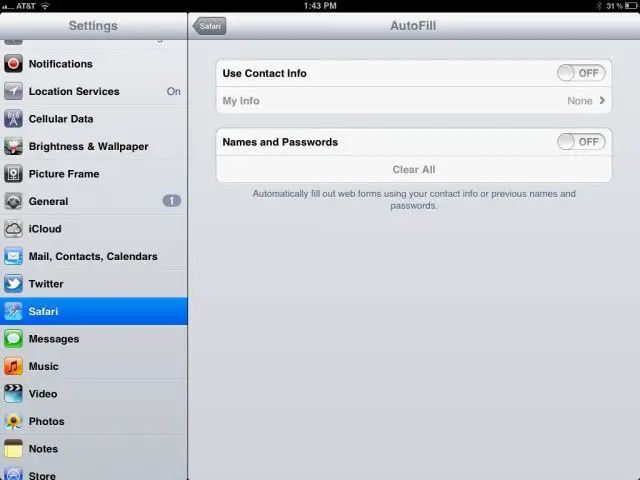
Removing AutoFill on an iPad
To remove AutoFill on your iPad, you’ll need to go to the Settings app. From thre you can access Safari, Passwords, and other settings related to AutoFill.
First, go to the Settings app and select Safari. Scroll down and select AutoFill. Here you can turn off both options for contacts and credit cards. This will prevent any existing information from being automatically filled in when entering online forms.
Next, go back to the main Settings page and select Passwords & Accounts. Scroll down to the bottom of this page and select AutoFill Passwords. This will disable any passwords saed in your keychain so they won’t be automatically filled in when logging into websites or apps.
Finally, if you want to remove all saved informaion from AutoFill, go back to Safari’s settings page and select Edit under My Info at the top of the list. Select Delete All Contacts or Delete All Credit Cards depending on which type of information you want to remove then confirm your selection by selecting Delete again when prompted.
That’s it! You have now removed all information stored wthin AutoFill on your iPad.
Clearing Safari AutoFill on an iPad
To clear Safari AutoFill information on your iPad, go to Settings > Safari > Autofill. Here, you can select the data you wish to clear, such as Names & Passwords, Credit Cards, and Addresses. Once you have selected the data that you want to remove, tap “Clear All” at the bottom of the screen. You will then be asked to confirm that you want to delete all of the data. Once confirmed, your Safari Autofill information will be cleared from your iPad.
Locating AutoFill Settings on an iPad
AutoFill in settings on iPad can be found by opening the Settings app from the home screen. Once inside Settings, scroll down and tap on the Safari option. Finally, tap on the AutoFill option to manage the information stored here. This is whre you can add or edit contact information, usernames and passwords, and credit card information that will automatically fill in when you’re entering data into a compatible form or application.
Deleting AutoFill Information
To delete your Autofill information in Chrome, first open Chrome and click the three-dot icon at the top right of the browser window. Then, click ‘More tools’ and select ‘Clear browsing data’. Select a time range, such as ‘Last hour’ or ‘All time’, then under ‘Advanced’ choose ‘Autofill form data’. Finally, click ‘Clear data’ to delete all your Autofill information from Chrome.
Removing Unwanted Autofill Entries
To delete unwanted AutoFill entries on Google Chrome, you will need to open the browser and click on the ‘Customize and control Google Chrome’ button in the top-left corner. From there, select ‘Settings’, followd by ‘Autofill’. In this section, select the ‘Passwords’ setting to view a list of saved autofill entries. To delete a single entry, click the menu button next to it and select ‘Remove’. Then, confirm by clicking on the ‘Remove’ button. To delete multiple entries at once, click the checkboxes next to the entries you want to delete and then click the ‘Remove’ button at the top of the page. Finally, confirm by clicking on ‘Remove’ again.
Deleting AutoFill Email on iPad
To delete AutoFill email on an iPad, first open the Mail app. Tap the ‘Compose’ button in the top riht corner of the screen to open a new message. Tap in the ‘To’ field and then tap on the small blue circle with a lower-case ‘i’ to the right of any recently suggested autofill email addresses. In the window that opens, tap “Remove from Recents” or “Delete Contact” to stop your iPad from suggesting this email address in future.
Deleting AutoFill Suggestions in Safari
To delete AutoFill suggestions in Safari, open the Safari app and select ‘Safari’ from the top left-hand side of the screen. Next, click ‘Preferences’ and choose the ‘AutoFill’ tab. Uncheck the box next to ‘User names and passwords’. This will turn off AutoFill and remove any existing suggestions from the browser.
Accessing AutoFill Settings
AutoFill settings can be found in the Chrome browser. To find it, click on the three dots at the top right corner of your browser window, then select Settings. Once there, scroll down until you see the Autofill section and click on it. From there, you can choose which item (Passwords, Payment methods, Addresses and more) to disable Autofill for.
Finding AutoFill Details
Finding your AutoFill details can be done easily in a few steps. First, open your Google Chrome browser and click on the three dots in the top right corner of the page. Then select Settings from the drop down menu. Scroll down until you find the “Autofill” section and click it. Here you will see all of your saved Autofill details such as addresses, email, passwords, and payment methods. To edit or delete any of thee details simply click on them to make changes or select the trash can icon to remove them completely.
Clearing AutoFill Memory
Yes, it is possible to clear your AutoFill memory. To do so, open your Chrome browser and click on the three dots in the top-right corner. From there, select ‘History’ and then click on ‘History’ again in the menu that appears. Then, select ‘Clear browsing data.’ You can also press CTRL+SHIFT+DEL on your keyboard to bypass these steps. Finally, choose the option for ‘the beginning of time’ to clear all savd data from your AutoFill memory.
Deleting a Saved AutoFill Username
To delete a saved AutoFill username in your browser, follow these steps:
1. Open your browser and select the Settings menu.
2. Select the AutoFill tab.
3. Under AutoFill, click Settings.
4. Click on Manage Passwords.
5. Click on the drop down arrow by the web site you want to remove the username from.
6. Click on Remove User Name and Password to delete the saved username associated with that website.
Removing Incorrect Autofill on iPhone
If you’re seeing incorrect AutoFill information on your iPhone, you can clear it out and start fresh. First, open the Settings app and tap on Passwords & Accounts. On the next page, tap “Website & App Passwords”. Here, you can select any sites or apps that are auto-filling with incorrect information and delete them by tapping the minus sign next to the entry. You can also disable auto-filling passwords entirely by switching “AutoFill Passwords” off. Once all of the incorrect entries have been cleared out, you shoud be able to enter new information that will be correctly saved and auto-filled in the future.
Conclusion
In conclusion, deleting Autofill on your iPad is a simple process. All you need to do is open up the Settings app and go to the Safari section. From there, you can turn off either the AutoFill for contact or credit card information or AutoFill for passwords. If you want to clear your history and cookies, you can go to the Safari section in the Settings app and tap Clear History and Website Data. Finally, if you want to delete individual Autofill form info, then open Chrome on your computer and go to More tools > Clear browsing data > Autofill form data. With tese steps, you should now be able to successfully delete Autofill from your iPad.


