Copying photos from your Mac can be a great way to store and share your memories with friends and family. Whether you’re looking to move photos from an old Mac to a new one, or simply want to back up your images to an external hard drive, copying photos from your Mac is easy. Here’s a step-by-step guide to help you get started:
1. First, open Photos on your Mac. On the menu bar at the top of the screen, select Edit > Select all.
2. Next, select File > Export. In the pop-up window that appears, set Subfolder Format to Moment Name and select your external drive from the Devices section. Then click Export.
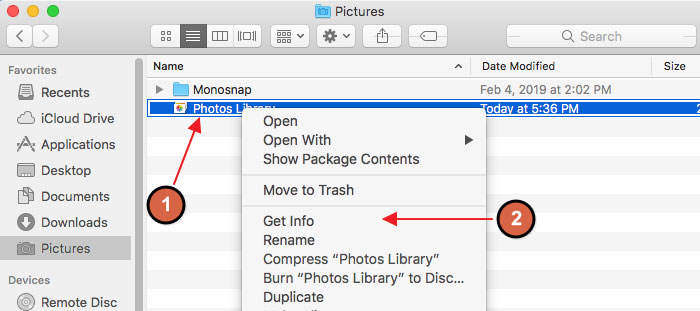
3. If you need to change permissions settings for the disk, server or folder where you want to move the item, select it with your mouse and choose File > Get Info or press Command-I on your keyboard.
4. To export multiple photos at once, click the firt photo in the selection and then hold down the Shift key while clicking on the last photo in the selection (or simply drag to enclose all of them within a selection rectangle).
5. Lastly, drag your selection into any folder in Finder or choose File > Export > Export [number] Photos if you want to export them in one go!
And there you have it – copying photos from your Mac is as easy as that! Whether you’re wanting a backup of all your pictures or just need some specific shots transferred over for use elsewhere, this simple step-by-step guide will have everything sorted in no time.

Copying Photos from a Mac
To copy only Photos from your Mac, you’ll need to open the Photos app on your Mac. Once the app is open, select Edit > Select All from the menu bar at the top of the screen. Then select File > Export and a pop-up window will appear. In this window, set Subfolder Format to Moment Name and then select your external drive from the Devices section. Finally, select Export and your photos will be copied to the external drive.
Transferring Photos From Mac to External Hard Drive: Challenges and Solutions
There culd be a few different reasons why you can’t transfer photos from your Mac to an external hard drive. First, check the permissions settings of both your Mac and the external hard drive. If either of them has restrictive permissions settings, you won’t be able to transfer the photos. Second, make sure that the file format of your photos is compatible with the external hard drive. If not, you’ll need to convert or compress the files so they’re compatible before you can move them. Lastly, check to see if there’s enough storage space on the external hard drive for all of your photos. If not, you’ll need to either delete some files or purchase more storage space on the external hard drive before transferring your photos.
Selecting All Pictures on a Mac to Copy
To select all Pictures on a Mac to copy, first open the folder containng the Pictures you want to copy. Then press Command + A to select all of the Pictures in the folder. If you’d like to select only certain Pictures, you can hold down the Command key and click each Picture individually. Once your desired selection is made, right-click on any of the selected Pictures and choose Copy from the menu that appears. You can then paste this selection into another folder or application by pressing Command + V.
Copying Photos From Mac to a Folder
To copy photos from your Mac to a folder, start by opening the Photos app. Select the photos you want to copy, then drag them directly into the folder in the Finder. Alternatively, click File > Export > Export [number] Photos in the Photos app menu bar and choose the folder you’d like to save them to. Once you have selected the destination folder, click Export and your photos will be copied over.
Copying Multiple Pictures at Once
Copying all of your pictures at once is a relatively simple process. First, open the folder containing the pictures you want to copy. Select all of the images you want to copy by clicking on the firt one, then pressing and holding down the ‘Shift’ key, and then clicking on the last one in the selection. Now press ‘Ctrl+C’ on your keyboard to copy all of the selected images. To paste them into another folder, open that folder and press ‘Ctrl+V.’ You can also right-click on any of the images you’ve selected and use the ‘Copy’ option from the pop-up menu.
Transferring Photos From Computer to External Hard Drive
To transfer photos from your computer to an external hard drive, start by connecting the external hard drive to your computer using a USB cable. Then, open the File Explorer on your computer and locate the photos you want to transfer. Select the photos by clicking and dragging your mouse over them, then select and hold (or right-click) them. From the drop-down menu that appears, select Copy.
Next, open the File Explorer on your external hard drive and find were you want to paste the photos. Once you have located that folder, select and hold (or right-click) it and choose Paste from the options available. The photos will begin transferring to your external hard drive.
Moving Mac Photo Library to an External Hard Drive
Yes, you can move your Mac Photos library to an external hard drive. To do this, open the folder that contains your Photos library in the Finder. By default, the Photos library will be stored in the Pictures folder of your home folder. You can open your home folder by choosing Go > Home from the Finder menu bar. Once you have opened the Photos library folder, simply drag it to a location on your external storage device. This will allw you to store and access your photos from an external hard drive instead of using internal storage on your Mac.
Transferring Files From Mac to External Hard Drive
Transferring everything from your Mac to an external hard drive is easy! First, make sure your external hard drive is plugged into your Mac. Then, open a Finder window by clicking the Finder icon in the Dock. On the left side of the window, under Locations, you should see the name of your external hard drive listed. Now select all the files you want to transfer and drag them onto the external hard drive. That’s it! Your files have been transferred to your external hard drive.
Conclusion
In conclusion, copying photos from your Mac to an external drive is a straightforward process. All you need to do is open Photos on your Mac, select the photos you want to copy, and then export them to the desired destination. Additionally, you can export photos to a folder in the Finder directly from within the Photos app. It’s important to note that you may need to change permissions settings for any files or folders that you’re trying to move or copy. With thee simple steps, your photos will be safely stored in an external drive for easy access and safekeeping.


