Ripping CDs with Windows Media Player is a convenient way to transfer your favorite music onto your computer or portable device. Whether you want to create a digital music library or simply make backup copies of your CDs, Windows Media Player has got you covered.
To get started, open Windows Media Player on your Windows 10 computer. Insert the audio CD you want to rip into your PC’s CD drive. Once the CD is recognized, you will see the album and track information displayed in the player.
Next, look for the “Rip CD” button, usually located near the top of the player. Click on it to begin the ripping process. Windows Media Player will automatically start extracting the audio tracks from the CD and saving them onto your computer.
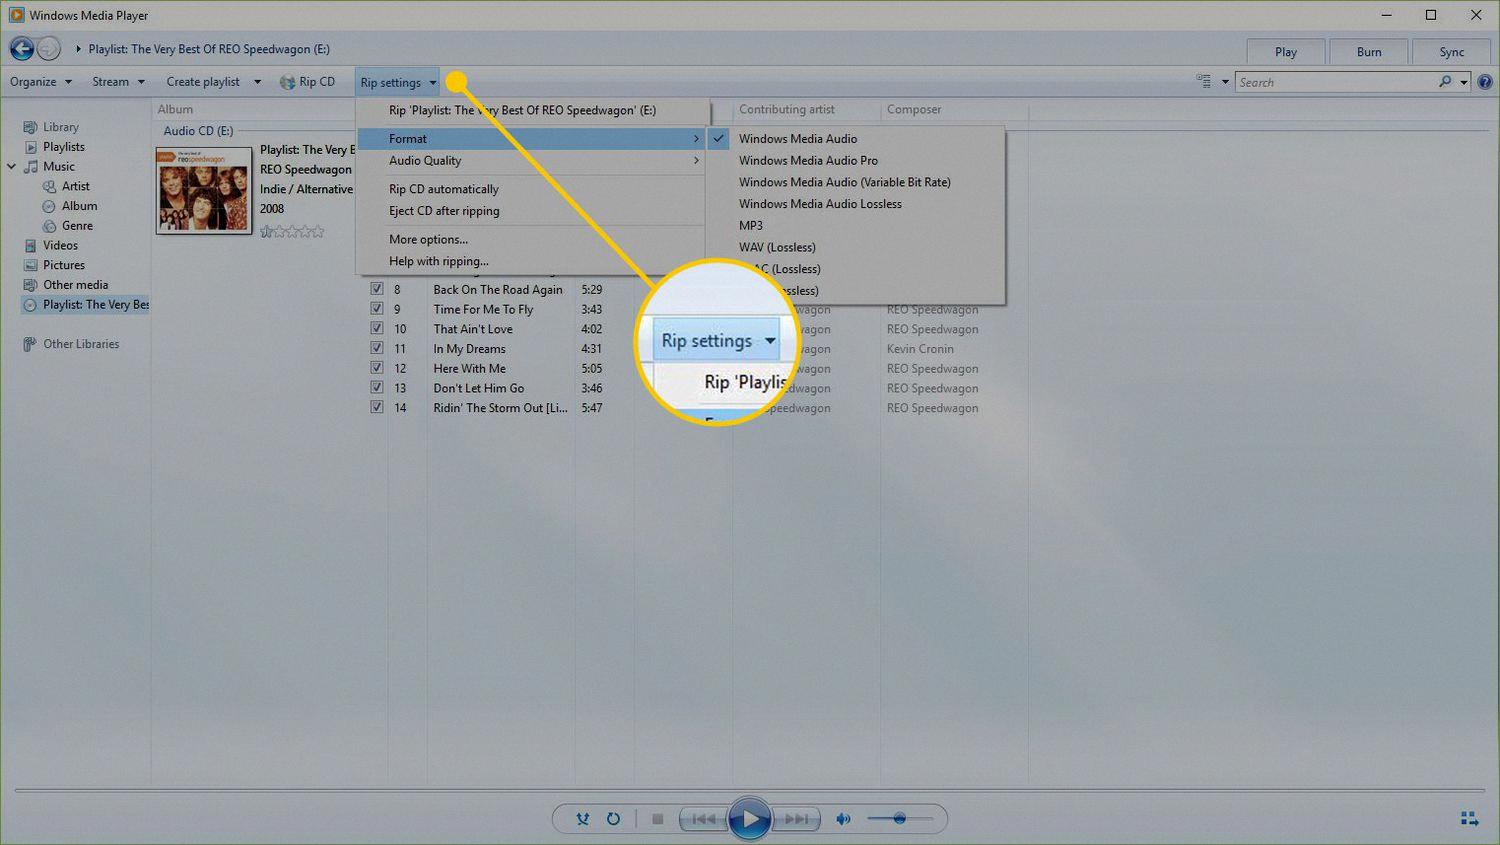
By default, Windows Media Player uses the MP3 format and a bit rate of 128 kbps for ripping CDs. However, you can customize these settings according to your preferences. To do this, click on the “Rip settings” menu, usually located next to the “Rip CD” button. From there, you can choose a different format, such as WAV or WMA, and adjust the audio quality to your liking.
If you only want to rip specific songs from the CD, you can deselect the check boxes next to the songs you don’t want in the player library before clicking the “Rip CD” button. This way, you can save storage space on your computer by only ripping the tracks you actually want.
It’s worth noting that when you rip music from a CD, you are essentially making a digital copy of the original content. This means that if the material being ripped is not in the public domain and you don’t have the copyright owner’s permission, it may be considered copyright infringement. So, it’s important to respect copyright laws and only rip CDs that you own or have the necessary rights to.
Windows Media Player offers a user-friendly and efficient way to rip CDs on Windows 10. With just a few clicks, you can transfer your favorite music onto your computer or portable device for easy listening. Just remember to customize the ripping settings to suit your preferences and respect copyright laws when making digital copies of copyrighted material.
Where Is The Rip Button In Windows Media Player?
In Windows Media Player, the “rip” button can be found in the toolbar at the top of the program window. To locate it, follow these steps:
1. Open Windows Media Player by clicking on the Start button and searching for “Windows Media Player” in the search bar. Click on the program to open it.
2. Once Windows Media Player is open, you will see a toolbar at the top of the program window. Look for the tab labeled “Rip” and click on it.
3. After clicking on the “Rip” tab, you will see a list of options related to ripping CDs. This is where you can adjust settings such as the format and quality of the ripped music files.
4. To start ripping a CD, insert the CD into your computer’s CD/DVD drive. Windows Media Player will automatically detect the CD and display its tracklist.
5. Select the songs or tracks you want to rip from the CD by checking the boxes next to their names. Alternatively, you can choose to rip the entire CD by not selecting any specific tracks.
6. Once you have chosen the desired tracks, click on the “Start Rip” button, which is located in the top right corner of the program window. Windows Media Player will then begin the ripping process and convert the selected tracks into digital files on your computer.
Note: If you do not see the “Rip” tab or the “Start Rip” button in Windows Media Player, it is possible that your version of the program may be different or that the feature has been disabled. In such cases, you may need to explore other options or consult the program’s documentation or support resources for further assistance.

How Do I Copy Music From A CD To My Laptop?
To copy music from a CD to your laptop, you can follow these steps using Windows Media Player:
1. Open Windows Media Player: Launch the program on your laptop. You can usually find it in the Start menu or by searching for it in the search bar.
2. Insert the CD: Once the program is open, insert the audio CD into your laptop’s CD drive. The drive should automatically recognize the CD.
3. Rip the CD: In Windows Media Player, locate and click on the “Rip CD” button. This button is usually found at the top of the program interface.
4. Choose ripping settings (optional): If you want to adjust the ripping settings, such as the file format or the quality of the audio, you can do so by clicking on the “More options” button next to the “Rip CD” button. However, the default settings are usually sufficient for most users.
5. Start the ripping process: After you have confirmed or adjusted the ripping settings, click on the “Rip CD” button. Windows Media Player will begin copying the music tracks from the CD to your laptop’s hard drive.
6. Wait for the process to complete: The time it takes to rip the CD will depend on the speed of your CD drive and the number of tracks on the CD. You can monitor the progress of the ripping process in the “Rip” tab of Windows Media Player.
7. Access the ripped music: Once the ripping process is finished, Windows Media Player will automatically save the copied music tracks to your laptop’s designated music folder. By default, this folder is usually located in the “Music” directory of your user profile.
8. Enjoy your music: You can now access and play the ripped music files on your laptop using Windows Media Player or any other music player software of your choice. Simply locate the music files in the designated music folder and open them with your preferred player.
Note: It is important to remember that the process described above is specific to Windows Media Player. Different methods may be required if you are using a different media player or operating system.
Why Is Ripping A CD Illegal?
Ripping a CD without the permission of the copyright owner is generally considered illegal due to copyright infringement laws. Here are the main reasons why ripping a CD can be illegal:
1. Copyright Protection: When you purchase a CD, you are essentially buying the physical copy of the music or audio content, not the rights to reproduce or distribute it. Copyright law grants exclusive rights to the creator or copyright owner to control how their work is used and distributed. By ripping a CD, you are making an unauthorized copy of the copyrighted material, which infringes upon the rights of the copyright owner.
2. Distribution and Reproduction Rights: Copyright owners have the exclusive right to reproduce and distribute their work. By ripping a CD, you are creating a digital copy that can be easily shared or distributed, which goes against these exclusive rights. Even if you do not intend to share or distribute the ripped files, the act of making unauthorized copies is still considered copyright infringement.
3. Digital Millennium Copyright Act (DMCA): The DMCA is a U.S. copyright law that criminalizes the act of circumventing digital rights management (DRM) technologies, which are often used to protect copyrighted content on CDs. Ripping a CD may involve bypassing or breaking these DRM technologies, making it a violation of the DMCA.
4. Licensing and Fair Use: In some cases, copyright owners may grant licenses or permissions for specific uses of their content, such as personal use or educational purposes. However, these licenses are typically limited and may not cover ripping CDs for personal use. Fair use, which allows limited use of copyrighted material without permission, is often debated in the context of ripping CDs. While fair use may apply in certain situations, it is generally considered a narrow exception and may not justify unauthorized ripping.
It is important to note that copyright laws vary from country to country, so the legality of ripping a CD may differ depending on your jurisdiction. However, in most cases, without proper authorization or a legitimate reason such as fair use, ripping a CD without the permission of the copyright owner is likely to be considered illegal.
Can I Rip A CD With Windows Media Player?
You can rip a CD with Windows Media Player. To do this, follow these steps:
1. Insert the audio CD into the CD drive of your computer.
2. Open Windows Media Player on your computer.
3. In the Player Library, you should see the name of the CD listed under the “Album” category.
4. Click on the CD name to select it.
5. If you want to choose a different format or bit rate for the ripped songs, click on the “Rip settings” menu located at the top of the window.
6. From the “Rip settings” menu, you can select the desired format (such as MP3, WMA, or WAV) and adjust the audio quality settings.
7. Once you have selected the desired format and audio quality, you can proceed to rip the songs from the CD.
8. By default, all the songs on the CD will be selected for ripping. If you don’t want to rip every song, you can clear the check boxes next to the songs you don’t want.
9. After selecting the songs, click on the “Rip CD” button located at the top of the window.
10. Windows Media Player will start ripping the selected songs from the CD and save them to your computer’s designated music folder.
That’s it! You have successfully ripped a CD using Windows Media Player.
Conclusion
Windows Media Player provides a convenient and user-friendly way to rip CDs on Windows 10. By simply inserting an audio CD into the CD drive and selecting the Rip CD button, users can easily convert their physical CDs into digital audio files.
Windows Media Player also offers customizable settings for ripping music, allowing users to choose different formats or bit rates according to their preferences. This flexibility ensures that users can optimize the quality and file size of their ripped audio files.
However, it is important to note that copyright laws should be respected when ripping CDs. If the material being ripped is not in the public domain and the person making the rip does not have the copyright owner’s permission, it may be considered copyright infringement.
Windows Media Player’s CD ripping feature is a convenient and efficient way to convert physical CDs into digital audio files. With its user-friendly interface and customizable settings, it provides a seamless experience for Windows 10 users.


