Have you ever wanted to customize the look and feel of your GNOME desktop? With the User themes extension, you can easily change the shell theme to suit your preferences. However, sometimes you may encounter an issue where the extension is not enabled by default. In this article, we will guide you through the process of enabling the User themes extension and selecting a shell theme.
To get started, open the GNOME Tweaks tool. If you don’t have it installed, you can find it in your distribution’s software center or package manager. Once you have it open, navigate to the Extensions section.
In the Extensions section, search for “User themes” and click on the slider to enable it. This extension allows you to choose and apply shell themes to personalize your desktop. Now that you have enabled the extension, you can proceed to the next step.
To enable the Shell theme selection box, you will need to install the official browser extension. This extension allows your browser to communicate with the GNOME Shell desktop. Depending on your browser, you can find and install the extension from the respective browser’s add-on or extension store.
After installing the browser extension, open the GNOME Tweaks tool again. This time, click on the “Activities” button on the top bar of your desktop. In the search bar, type “Extensions” and open the Extension manager application.
In the Extension manager, navigate to the “Browser” tab. Here, you should see the User themes extension listed. Click on the “Enable” button to activate it.
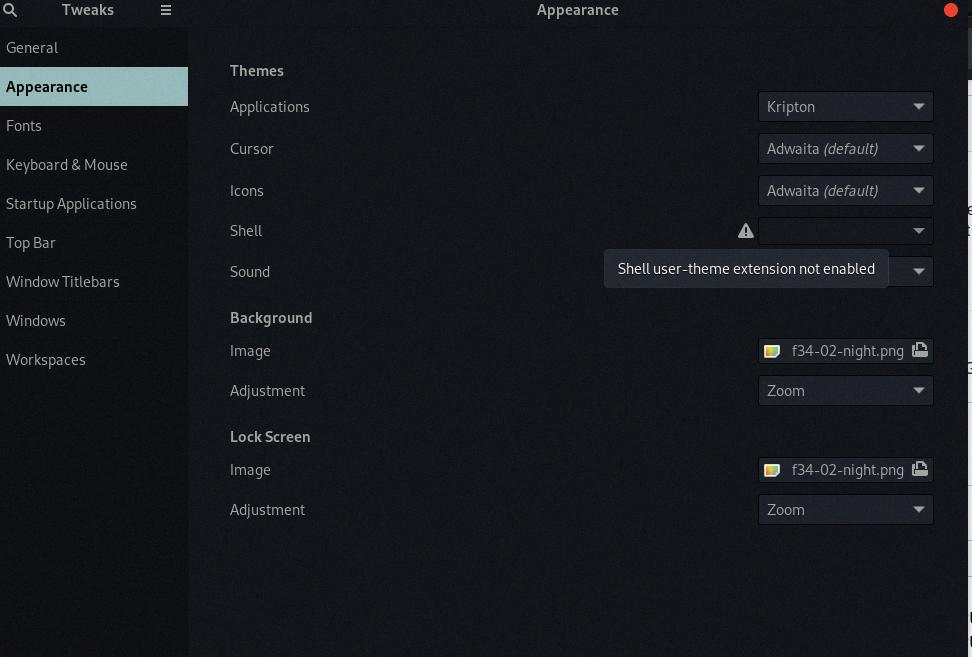
Now that you have successfully enabled the User themes extension, you can proceed to select your desired shell theme. To do this, go back to the GNOME Tweaks tool and navigate to the “Appearance” category.
In the Appearance category, you will find a section for Shell. Click on the drop-down menu next to Shell and select your preferred theme from the list of available options. The selected theme will be applied to your GNOME Shell immediately, allowing you to enjoy a personalized desktop experience.
If you don’t have any shell themes installed, you can download them from trusted sources and place them in either the /usr/share/themes/ or ~/.themes/ directory. Once the themes are installed, they will appear in the shell theme selection box in GNOME Tweaks.
Enabling the User themes extension and selecting a shell theme in GNOME is a straightforward process. By following the steps outlined in this article, you can easily customize the look and feel of your GNOME desktop. Enjoy exploring different themes and making your desktop truly yours!
How Do I Enable User Theme Extension?
To enable the user themes extension, please follow these steps:
1. Launch the Tweaks application on your computer.
2. In the Tweaks window, you will find a section called “Extensions.” Click on it.
3. Look for an option named “User themes” within the Extensions section.
4. Once you locate “User themes,” you will see a slider next to it. Click on the slider to enable the user themes extension.
That’s it! You have now successfully enabled the user themes extension on your system.

How To Enable Shell User Theme Extension In Ubuntu 22?
To enable the Shell user theme extension in Ubuntu 22, you need to follow these steps:
1. Open the Activities menu by clicking on the Activities button located at the top bar of your screen.
2. In the search bar, type “Tweaks” and open the “GNOME Tweaks” application.
3. If you don’t have the GNOME Tweaks application installed, you can install it from the Ubuntu Software Center or by running the following command in the terminal:
“`
Sudo apt install gnome-tweaks
“`
4. Once you have opened GNOME Tweaks, click on the “Extensions” tab on the left sidebar.
5. In the Extensions tab, scroll down and find the “User Themes” extension. If it is not installed, click on the “Get more extensions” link at the bottom or search for “User Themes” in the search bar.
6. Click on the toggle button next to the “User Themes” extension to enable it.
7. Close the GNOME Tweaks application.
Now, you have successfully enabled the Shell user theme extension in Ubuntu 22. You can now customize your GNOME Shell theme by selecting different themes using the GNOME Tweaks application.
How To Enable Shell Extension In Ubuntu?
To enable shell extensions in Ubuntu, follow these steps:
1. Install the official browser extension: Begin by installing the official browser extension for GNOME Shell. This extension allows you to manage and enable various shell extensions from your browser.
2. Install the ‘Chrome GNOME Shell’ package: Next, you need to install the ‘Chrome GNOME Shell’ package, which acts as a native connector between the browser extension and the GNOME Shell desktop environment. This package allows the browser extension to communicate with the GNOME Shell.
3. Install Extensions: Once the browser extension and the native connector package are installed, you can start installing shell extensions. Visit the GNOME Shell Extensions website or use the GNOME Extensions app to browse and install the extensions you want.
Here is a step-by-step breakdown:
– Step 1: Install the official browser extension.
– Step 2: Install the ‘Chrome GNOME Shell’ package.
– Step 3: Install the desired shell extensions from the GNOME Shell Extensions website or using the GNOME Extensions app.
Following these steps will enable shell extensions in Ubuntu, allowing you to enhance and customize your GNOME Shell desktop environment.
Where Do I Put Gnome-shell Themes?
To install a gnome-shell theme, you can follow these steps:
1. Choose your desired gnome-shell theme and download it. Make sure the theme is compatible with your version of GNOME.
2. Once the theme is downloaded, you need to find the appropriate directory to place it. There are two possible locations where you can install gnome-shell themes:
A. System-wide installation: For all users on your system, you can place the theme in the “/usr/share/themes/” directory. To do this, open a terminal and run the following command:
“`
Sudo cp -r /path/to/theme /usr/share/themes/
“`
Replace “/path/to/theme” with the actual path to the downloaded theme.
B. User-specific installation: If you only want to install the theme for your user account, you can place it in the “~/.themes/” directory. To do this, open a terminal and run the following command:
“`
Cp -r /path/to/theme ~/.themes/
“`
Replace “/path/to/theme” with the actual path to the downloaded theme.
3. After placing the theme in the appropriate directory, you need to enable it using the User Themes extension. If you don’t have this extension installed, you can find and install it from the GNOME Extensions website (extensions.gnome.org).
4. Once the User Themes extension is installed, open the GNOME Tweaks tool. If you don’t have it installed, you can install it from your distribution’s software repository.
5. In the GNOME Tweaks tool, go to the “Appearance” category and click on the “Shell” dropdown menu. Here, you should see the installed gnome-shell themes listed.
6. Select your desired theme from the list. The shell theme will be applied immediately.
By following these steps, you can successfully install and apply gnome-shell themes in either the system-wide or user-specific directories, depending on your preference.
Conclusion
The User themes extension is a powerful tool that allows users to customize the appearance of their GNOME Shell desktop. By enabling this extension, users can easily apply custom shell themes to give their desktop a unique and personalized look. The extension works seamlessly with the GNOME Tweaks tool, making it easy to browse and install new themes. Whether you prefer a minimalist design or a vibrant and colorful interface, the User themes extension provides the flexibility to transform your GNOME Shell desktop according to your preferences. With a wide range of themes available for installation, users can easily find and apply a theme that suits their style. the User themes extension is a fantastic addition to GNOME Shell, offering users the ability to truly make their desktop their own.


