The Macbook is a powerful and sleek device that is loved by many users around the world. However, like any other electronic device, it is not immune to issues and glitches. One common problem that Macbook users may encounter is the inability to adjust the volume.
If you find yourself in a situation where your Macbook won’t let you adjust the volume, there are a few potential solutions that you can try before seeking professional help.
Firstly, check if the Sound control is present in the menu bar. If it is not visible, you can enable it by going to Apple menu > System Settings > Control Center. From there, click on Sound in the sidebar and choose whether to show it in the menu bar all the time or only when it’s active.
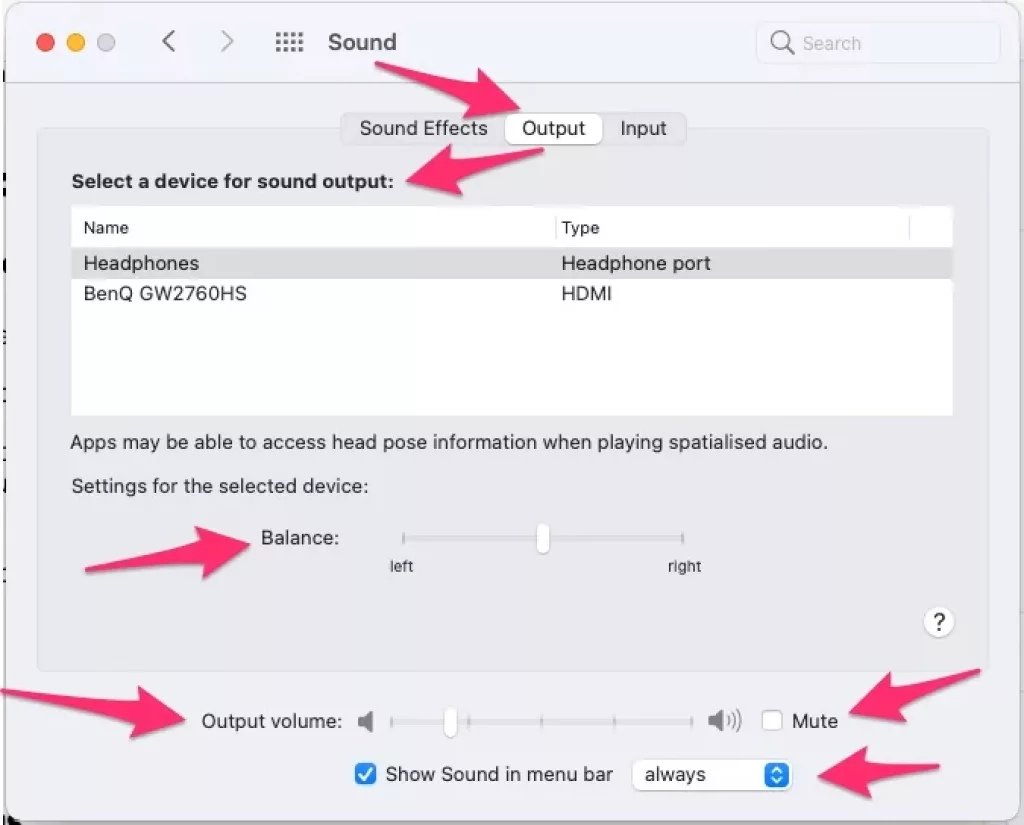
Next, navigate to System Preferences and select the Sound option. Under the Output tab, ensure that the ‘Internal Speakers’ option is selected. If you see ‘Digital Out’ selected instead, it may be the reason why you can’t control the volume. Try plugging in headphones and see if the volume control becomes accessible.
If these steps don’t resolve the issue, try restarting your Macbook. Sometimes, a simple reboot can fix minor software glitches that may be causing the volume control problem.
Another troubleshooting step you can take is to clean the headphone jack. Dust and debris can accumulate over time, which may interfere with the audio output. Use a cotton swab or compressed air to gently clean the jack, and then see if the volume control starts working.
If none of the above solutions work, you can try creating a new user account on your Macbook. Sometimes, issues with the user profile can affect certain functionalities. By creating a new account, you can determine if the problem lies with your user settings or if it is a system-wide issue.
In more severe cases, you can try resetting CoreAudio, which is the audio software on your Macbook. You can do this by opening the Terminal and entering the command ‘sudo killall coreaudiod’. This will restart the CoreAudio process and may resolve any underlying issues.
If all else fails, it may be necessary to update your macOS. Apple frequently releases updates that include bug fixes and improvements. Updating your operating system can potentially fix the volume control problem.
If your Macbook is not allowing you to adjust the volume, there are several troubleshooting steps you can take. From enabling the Sound control in the menu bar to cleaning the headphone jack, these solutions can help resolve common issues. If the problem persists, creating a new user account or resetting CoreAudio may be necessary. Ultimately, keeping your macOS up to date is always recommended to ensure optimal performance and functionality.

Why Won’t Your Mac Let You Adjust The Volume?
There could be several reasons why you may be experiencing difficulties adjusting the volume on your Mac. Here are some possible explanations:
1. Software issue: It is possible that there is a software glitch causing the volume control to malfunction. In this case, restarting your Mac may resolve the issue. Simply go to the Apple menu and choose Restart to reboot your computer.
2. Audio settings: Check your audio settings to ensure that the volume is not muted or set to a very low level. Go to the Apple menu and select System Preferences. Then, click on Sound and make sure the output volume is turned up and not muted.
3. External devices: If you have external speakers or headphones connected to your Mac, check that they are properly connected and functioning correctly. Faulty or improperly connected devices can prevent you from adjusting the volume on your Mac.
4. Keyboard shortcuts: Macs have keyboard shortcuts to adjust volume. Make sure you are using the correct key combinations. The default shortcuts are the F11 key to decrease volume and the F12 key to increase volume. If you are using a Mac with a Touch Bar, you can also adjust the volume using the Touch Bar controls.
5. Third-party apps or system extensions: Sometimes, third-party apps or system extensions can interfere with the volume control on your Mac. Try quitting any recently installed apps or disabling system extensions to see if that resolves the issue.
If none of these solutions work, it could indicate a more serious hardware problem. In that case, it is advisable to contact Apple Support or visit an authorized service provider for further assistance.
Why is Your Volume Locked On Your MacBook?
The volume on your MacBook may be locked or restricted for several reasons. Here are some possible explanations:
1. External Audio Device: If you have connected an external audio device, such as headphones or speakers, to your MacBook, the volume control may be locked to prevent accidental changes. Check your audio settings to ensure the correct output device is selected and the volume is not muted.
2. System Preferences: It is possible that the volume control is locked due to settings in the System Preferences. To check this, go to the Apple menu and select “System Preferences.” Then, click on the “Sound” icon and go to the “Output” tab. Make sure the correct output device (e.g., Internal Speakers) is selected and the volume slider is not at the minimum level or muted.
3. Software or Application Issue: Certain software or applications may have their own volume controls that can override the system settings. Check the volume controls within the specific software or application you are using to ensure it is not set to a low volume or muted.
4. Operating System Update: Occasionally, after a macOS update, some settings may get changed or reset. If you recently updated your macOS, it is worth checking the sound settings to ensure they are configured correctly.
5. Audio Hardware Issue: In some cases, the volume control may be locked due to a hardware issue. Try restarting your MacBook and see if that resolves the problem. If not, you may need to contact Apple Support or visit an authorized service provider for further assistance.
Remember to check all the possible reasons mentioned above to troubleshoot and resolve the issue with your locked volume on your MacBook.
How to Fix Greyed Out Volume Control On Mac?
To fix the issue of the greyed out volume control on your Mac, you can try the following solutions:
1. Reset Output Source to Speakers: Go to the Apple menu, select “System Preferences,” and then click on “Sound.” Under the “Output” tab, choose “Internal Speakers” or “Built-in Output” as the output device.
2. Clean Headphone Jack: If you frequently use headphones or external speakers, the headphone jack may accumulate dust or debris, causing the volume control to grey out. Use compressed air or a cotton swab to clean the jack.
3. Restart Your Mac: A simple restart can often resolve software glitches. Click on the Apple menu and select “Restart” to reboot your Mac.
4. Create New User Account: Sometimes, the issue may be specific to your user account. Creating a new user account can help determine if the problem is related to your settings. Go to “System Preferences,” choose “Users & Groups,” and click the “+” button to create a new user account. Log in to the new account and check if the volume control works.
5. Reset CoreAudio: CoreAudio is the audio subsystem in macOS. Resetting it can fix various audio-related issues. Open the Terminal app (found in the Utilities folder) and enter the command “sudo killall coreaudiod.” You will be prompted to enter your admin password. After that, check if the volume control is no longer greyed out.
6. Boot Your Mac in Safe Mode: Starting your Mac in Safe Mode can help identify and fix issues with certain system files. Restart your Mac and hold down the Shift key until the Apple logo appears. Release the key and let your Mac boot up. Check if the volume control is now accessible.
7. Update macOS: Ensure that your macOS is up to date. Go to the Apple menu, select “System Preferences,” and click on “Software Update.” Install any available updates for your Mac.
By trying these solutions, you should be able to resolve the issue of the greyed out volume control on your Mac.
Conclusion
The Macbook is a powerful and versatile device that offers a range of features and functionalities to enhance productivity and entertainment. Its sleek design, high-quality display, and efficient performance make it a popular choice among professionals, students, and creative individuals alike.
One of the standout features of the Macbook is its operating system, macOS, which offers a seamless and intuitive user experience. The system is known for its stability, security, and smooth performance, ensuring that users can work and play without any interruptions.
The Macbook also boasts exceptional audio capabilities, with built-in speakers that deliver crisp and clear sound. However, if you encounter any issues with the sound controls, such as the icon appearing greyed out or volume keys not working, there are several troubleshooting steps you can take to resolve the problem. These include resetting the output source to speakers, cleaning the headphone jack, restarting your Mac, creating a new user account, resetting CoreAudio, booting your Mac in safe mode, and updating macOS.
The Macbook provides a seamless and enjoyable user experience, combining powerful hardware with a user-friendly operating system. Whether you’re a professional in need of a reliable work companion or a student seeking a versatile device for both study and entertainment, the Macbook is a top choice that will meet your needs and exceed your expectations.


