The printer queue is a crucial aspect of any printing process. It refers to the list of print jobs that are waiting to be printed by a printer. Whether you’re using a Windows 10 or Mac operating system, being able to view and manage the printer queue is essential to ensure smooth printing operations.
In this article, we will focus specifically on how to view the printer queue in a Mac system. Mac provides a user-friendly interface to access and manage the printer queue. Here’s how you can do it:
1. Open the Apple menu: To access the printer queue on your Mac, start by clicking on the Apple menu located at the top-left corner of your screen.
2. Go to “System Preferences”: From the drop-down menu, select “System Preferences.” This will open a new window with various system settings.
3. Choose “Printers”: Within the System Preferences window, locate and choose the “Printers & Scanners” option. This will display a list of printers connected to your Mac.
4. Open the print queue: Select the printer that you want to view the print queue for. Once selected, you will see a button labeled “Open Print Queue.” Click on this button to access the printer queue for the selected printer.
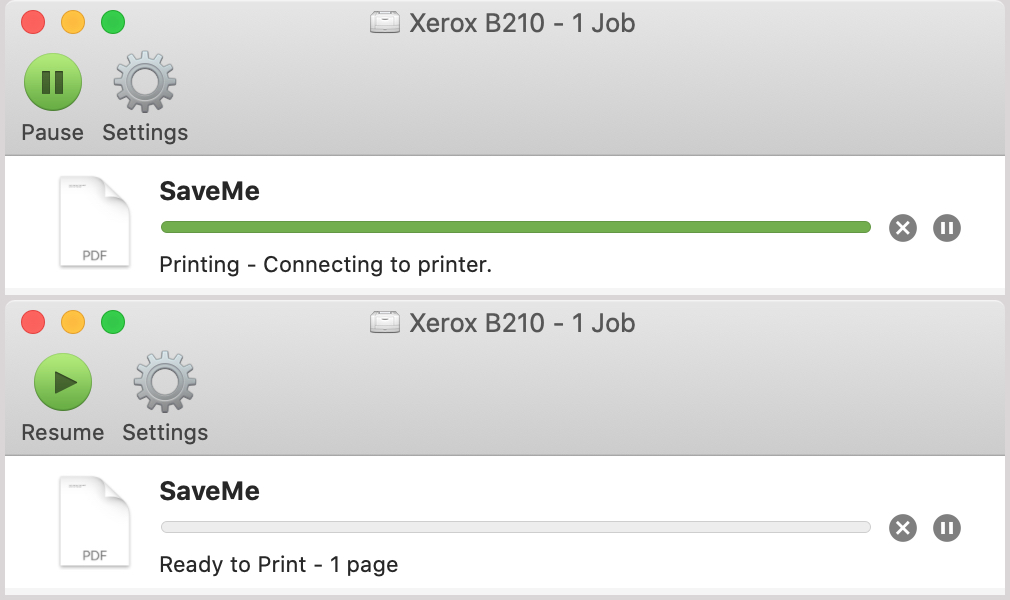
5. Review print jobs: The printer queue window will now open, displaying all the print jobs that are currently waiting to be printed. You will see details such as the document name, status, and any other relevant information about each print job.
6. Cancel or prioritize print jobs: From the printer queue window, you have the ability to manage the print jobs. If you want to cancel a specific print job, select it and click on the “Cancel” button. This will remove the print job from the queue. You can also change the order of the print jobs by dragging and dropping them in the desired sequence.
7. Monitor printing progress: As you print documents, you can keep an eye on the printing progress from the printer queue window. It will show the status of each print job, whether it is currently printing, paused, or waiting in the queue.
By following these steps, you can easily view and manage the printer queue on your Mac system. This allows you to stay organized, prioritize print jobs, and troubleshoot any issues that may arise during the printing process.
Remember, having control over the printer queue is essential for efficient printing operations. It ensures that your documents are printed in the desired order and helps you avoid any unnecessary delays or errors. So, make sure to familiarize yourself with the printer queue functionality on your Mac to optimize your printing experience.
How Do You Clear Your Print Queue On a Mac?
To clear your print queue on a Mac, follow these steps:
1. Click on the Apple menu in the top-left corner of your screen.
2. From the drop-down menu, select “System Preferences.”
3. In the System Preferences window, click on the “Printers & Scanners” icon.
4. A list of printers connected to your Mac will appear on the left side of the window. Select the active printer that you want to clear the print queue for.
5. After selecting the printer, click on the “Open Print Queue” button located below the printer list.
6. The Print Queue window will open, displaying all the print jobs that are currently in the queue for the selected printer.
7. To cancel a specific print job, select it from the list and click on the “X” button next to it. This will remove the print job from the queue.
8. If you want to cancel all the print jobs in the queue, you can click on the “Printer” menu at the top of the screen and choose “Cancel All Documents.”
9. Confirm the cancellation by clicking on the “Delete” or “Cancel” option when prompted.
10. Once you have canceled the desired print job(s), close the Print Queue window.
By following these steps, you will be able to clear your print queue on a Mac and remove any unwanted or pending print jobs from the queue.
How Can You Display All The Printer Queues On The System?
To display the status of all printer queues on the system, you can use the “lpstat” command in the command-line interface. The “lpstat” command is commonly used in Unix/Linux systems to retrieve information about print queues and print jobs.
Here are a few ways to use the “lpstat” command to display printer queue information:
1. Display the status of all print queues:
– Open the terminal or command prompt.
– Type “lpstat” and press Enter.
– This will show the status of all printer queues on the system, including the printer names, job IDs, job statuses, and other details.
2. Display the long status for all printers:
– Open the terminal or command prompt.
– Type “lpstat -t” and press Enter.
– This will provide a more detailed and comprehensive status of all printers, including information about the printer devices, printer destinations, and printer options.
3. Display the status of specific print queues:
– Open the terminal or command prompt.
– Type “lpstat -p queue_name” and press Enter.
– Replace “queue_name” with the actual name of the print queue you want to check.
– This will display the status of the specified print queue, including the printer name, printer status, and any active print jobs in the queue.
4. Display the status of multiple print queues:
– Open the terminal or command prompt.
– Type “lpstat -p queue1 queue2 queue3” and press Enter.
– Replace “queue1”, “queue2”, “queue3” with the names of the print queues you want to check.
– This will show the status of multiple print queues simultaneously, providing information about each queue separately.
5. Display the status of all print queues in wide format:
– Open the terminal or command prompt.
– Type “lpstat -W” and press Enter.
– This will display the status of all print queues in a wide format, allowing for better readability and easier analysis of the printer queue information.
Remember, the exact options and syntax of the “lpstat” command may vary slightly depending on the operating system and the specific printing system being used. It’s always a good idea to consult the documentation or man pages for more detailed information on using the “lpstat” command in your particular system.
Conclusion
The printer queue is a crucial feature that allows users to manage and monitor their printing tasks effectively. It provides a centralized location where users can view and control the print jobs waiting to be processed by their printers.
Whether you are using Windows 10 or macOS, accessing the printer queue is a simple process that can be done through the settings or preferences menu. Once you open the print queue, you can see a list of all the print jobs in the order they are scheduled to be printed.
Having access to the printer queue gives you the ability to cancel or prioritize certain print jobs according to your needs. This can be particularly helpful when you have a long list of print jobs and want to rearrange them or remove any unnecessary ones.
Furthermore, the printer queue provides status updates on each print job, allowing you to track the progress and identify any potential issues. This ensures that you have full visibility into the printing process, enabling you to address any problems promptly.
The printer queue is a valuable tool that enhances efficiency and control over printing tasks. It empowers users to manage their print jobs effectively, saving time, and minimizing errors. Whether you are a home user or in a professional setting, understanding how to access and utilize the printer queue is essential for optimizing your printing experience.


