Recording your iPhone screen can be a great way to capture and share important moments, or create tutorials for family, friends, or work colleagues. Knowing how to effectively record your iPhone’s screen is essential for ayone looking to create content on their device. Fortunately, it’s not a difficult process!
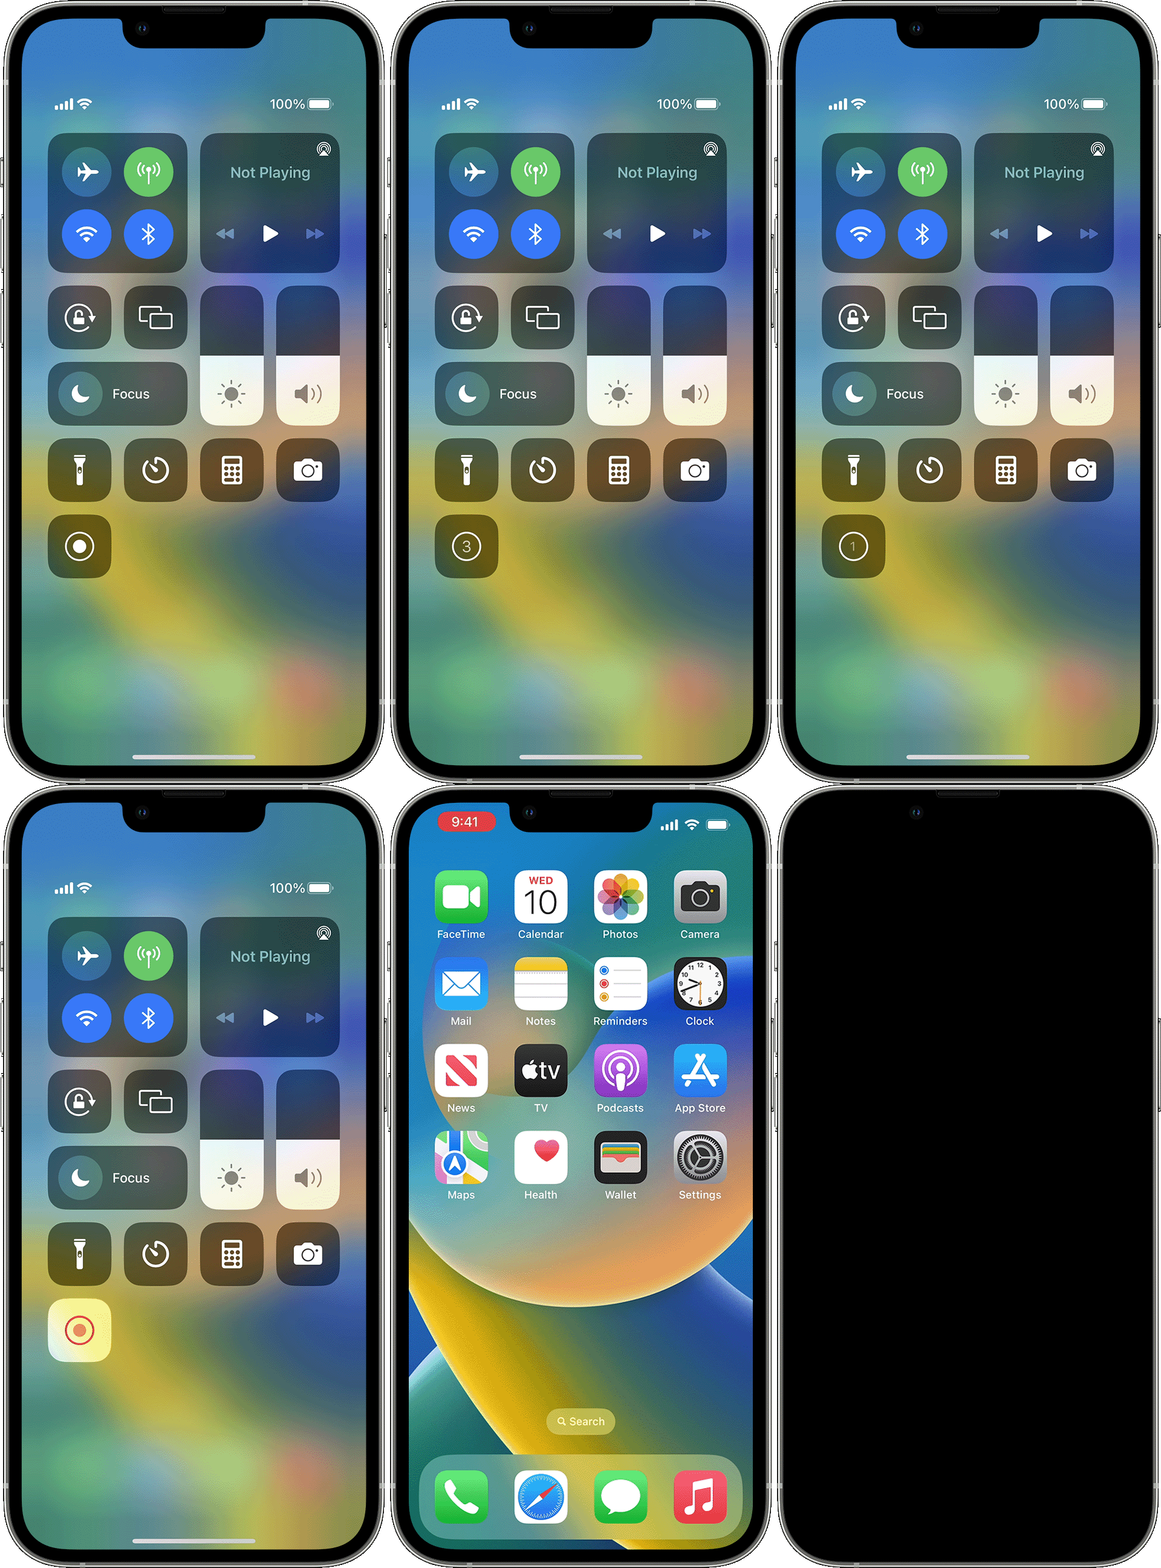
iPhone users running iOS 11 or later can easily record their screen in just a few steps. First, make sure you enable Screen Recording in the Control Center. To do this, open the Settings app on your iPhone, tap Control Center and then Customize Controls. Scroll down and select Screen Recording to add it to the list of controls. Once added, you can open up the Control Center from any app by swiping down from the upper-right corner of the display. Tap the recording icon and hit Start Recording – that’s all there is to it!
If you want to capture audio with your screen recording, simply press deeply or press firmly (depending on your iPhone model) on the Screen Recording icon in Control Center before tapping Start Recording. You will then see an additional Microphone Audio toggle appear – turn it on and you’ll be able to record both video and audio at the same time. When you’re done recording, simply open up Control Center again and tap Stop Recording. Your video will save automatically in Photos app > Videos folder were you can access it anytime – or share it with anyone you wish!
Whether you want to capture memories or create tutorials for others using your iPhone’s display, recording your device’s screen is easy enough for anyone to do! With just a few simple steps outlined above, you’ll be able to quickly make quality recordings without having any technical know-how at all!
Does the iPhone Have a Screen Recording Feature?
Yes, iPhones have a built-in screen recording feature. You can find it in Settings > Control Center. Once you add Screen Recording to your Control Center, you can tap the microphone button to start recording your screen. You’ll hear a three-second countdown before the recording starts.
Recording Your Screen
To record your phone screen, fist swipe down twice from the top of your screen. Then, tap Screen Record and you may need to swipe right to find it. After tapping Screen Record, you will be able to choose what you want to record and then tap Start. The recording will begin after the countdown. To stop recording, simply swipe down from the top of the screen and tap the Screen Recorder notification. That’s all there is to it!
The Disappearance of the Screen Recording Button
The screen recording button may have been moved or hidden in your device’s settings. To find it, open the Settings app and navigate to Advanced Settings. Scroll down until you see a setting titled Screen Shots & Screen Recorder. Tap on that setting and you shuld see a toggle switch for enabling or disabling the screen recorder. If the switch is turned off, simply tap on it to turn it back on and your screen recording button should reappear.
Where Did My iPhone Screen Recording Go?
Your screen recordings are stored in the Photos app on your iPhone or iPad. Once you have enabled the recording feature, you can access your recordings by opening the Photos app and selecting Albums. Your screen recordings will be saved in an album called “Screen Recording,” which will appear at the bottom of the Albums list. From there, you can view, edit, or share your recordings as needed.
Screen Recording on iPhone 11
To screen record on an iPhone 11, you’ll need to add the Screen Recording feature to your device’s Control Center. To do this, open Settings and swipe down to Control Center. Scroll down to MORE CONTROLS and tap the green plus button next to Screen Recording. Now, when you open Control Center, you’ll see a Record button that you can tap to start recording your screen. To end the recording, just tap on the Record button aain or open Control Center and hit Stop Recording.
Does the iPhone 12 Have Screen Recording Capabilities?
Yes, the iPhone 12 does have a Screen Recording feature. It can be accessed by swiping down from the top riht corner of the screen near the battery icon to open Control Center, then tapping the Screen Recording button (a circle within another circle). You can tap this button once to record your screen without audio.
Recording Screen with Sound
To record your screen with sound, you’ll need to use a screen recording software. There are many free options available, such as OBS Studio, Apowersoft Free Online Screen Recorder and Screencast-O-Matic. With these tools, you can easily record your screen with audio.
In OBS Studio, for example, you can select the display or window that you want to record and click the “Start Recording” button. You can also adjust the audio settings by clicking on the “Audio Mixer” tab and selecting a microphone or sound device as an audio source. When you’re done recording, simply click the “Stop Recording” button to save your video with sound.
Why iPhone Does Not Allow Screen Recording
It is possible that you cnnot record your screen on your iPhone because the screen recording feature has been disabled in the settings. To check if this is the case, go to Settings and then navigate to Screen Time > Content & Privacy Restrictions > Content Restrictions > Screen Recording. If the setting is disabled, simply toggle it to enable screen recording and you should be able to start recording your screen. Additionally, you may need to update your iPhone’s operating system in order for the feature to become available.
Troubleshooting the Missing Screen Record Button
It is possible that your device does not have the Screen Record option enabled by default. The Screen Record feature may be disabled in the device settings, and you may need to enable it before you can view it in the Quick Settings panel. To enable it, go to your device’s Settings menu and look for an option called “Screen Recording”. Turn this option on and then open the Quick Settings panel to view the Screen Record button.
Troubleshooting Screen Recording Issues on Mobile Devices
The ability to screen record on an Android phone is dependent on the device’s software. Some phones may not have this feature enabled as part of their default settings. If this is the case, you will need to check your device’s settings and check if you can enable it manually. Additionally, some third-party apps may offer the ability to screen record, but they may require additional permissions or a paid subscription in order to use them. If you are unable to screen record using the built-in features of your phone, it wold be worth researching any available third-party solutions.
Where Does Screen Recording Save?
When you record your screen on your device, the recordings are saved in a folder called ‘Screen Recordings’ which is located within the ‘DCIM’ folder in the Internal Storage of your device. To access this, open the My Files app and then tap on ‘Internal Storage’. In there you will find the ‘DCIM’ folder and then tap on it to get to the ‘Screen Recordings’ folder. All of your screen recordings will be saved here.
Appearance of the Screen Record Button
The screen record button looks like a dot with a circle around it. It is usually located in the Control Center, whch can be accessed by swiping up from the bottom of your device’s screen.
Does the iPhone 12 Pro Max Have Screen Recording Capability?
Yes, the iPhone 12 Pro Max does have a screen recording feature. To access it, swipe down from the top of the screen to open the Control Center and tap on the Screen Recording icon. This will start recording your iPhone screen and save it as a video file for you to share or view later.
Recording on an iPhone 13
To record on your iPhone 13, first open the Camera app. Then select Cinematic mode. You can then tap the 1x button to zoom in before recording (this is available only on iPhone 13 Pro and iPhone 13 Pro Max). Finally, tap the Record button or press eiher volume button to start and stop recording.
Recording iPhone Screen with Sound
To record your iPhone screen with sound, you’ll need to have iOS 14 or later. First, go to Settings > Control Center and tap the Add button next to Screen Recording. Then open Control Center on your iPhone or iPod touch, or on your iPad and tap the Microphone icon. Tap Start Recording, then wait for the three-second countdown. Once you press Record, your recording will begin and any audio captured by the microphone will be included in the recording. When you’re done recording, open Control Center again and tap Stop Recording. Your video will be automatically savd to your device’s Photos app.
Recording an iPhone Screen with Audio
To record your iPhone screen with audio, you will need to install an app called Screen Recorder + on your iPhone. Once you have the app installed, launch it and click “Start Recording”. A window will appear. Make sure that the microphone icon is turned on in the lower left corner of the window to enable audio recording. Once you are ready to stop recording, click the red box in the corner whee the time shows and tap “Stop Broadcast” to end the recording. Your video will be saved automatically in your phone’s library.
Does iPhone Screen Record Include Sound?
Yes, screen recording on an iPhone, iPad, or iPod touch with iOS 11 and above does include sound. To capture sound during a screen recording, go to Settings > Control Center > Customize Controls and select “Screen Recording” from the list of available controls. Then you can use the 3D Touch or Haptic Touch action to open the control center from the home screen and tap on the Screen Recording button. The microphone icon should be orange indicating that sound will be recorded. Tap Start Recording and your device will begin capturing both video and audio of whateer is happening on your device’s display.
Conclusion
The iPhone is arguably one of the most revolutionary and successful products of the 21st century. It has revolutionized how we communicate, share information, and access entertainment. Not only that, but it has beome a symbol of innovation and cutting-edge technology. With its intuitive user interface, powerful processor, and vast array of features, it’s easy to understand why the iPhone has become so popular. Whether you’re an avid Apple fan or just looking for a new device to keep up with the times, the iPhone is sure to provide you with a rich user experience that can’t be found anywhere else.

