Android devices have become an integral part of our lives, serving as our personal assistants, entertainment hubs, and much more. With the vast amount of information we access on our Android devices, it’s important to know how to manage our browsing history and clear it when needed. In this article, we will explore the process of deleting browsing history on Android, specifically focusing on Google Chrome.
Step 1: Open Chrome and access settings
To begin, open the Google Chrome browser on your Android device. Tap on the three vertical dots in the top right corner to access the options menu. From the dropdown menu, select “Settings.”
Step 2: Navigate to privacy and security settings
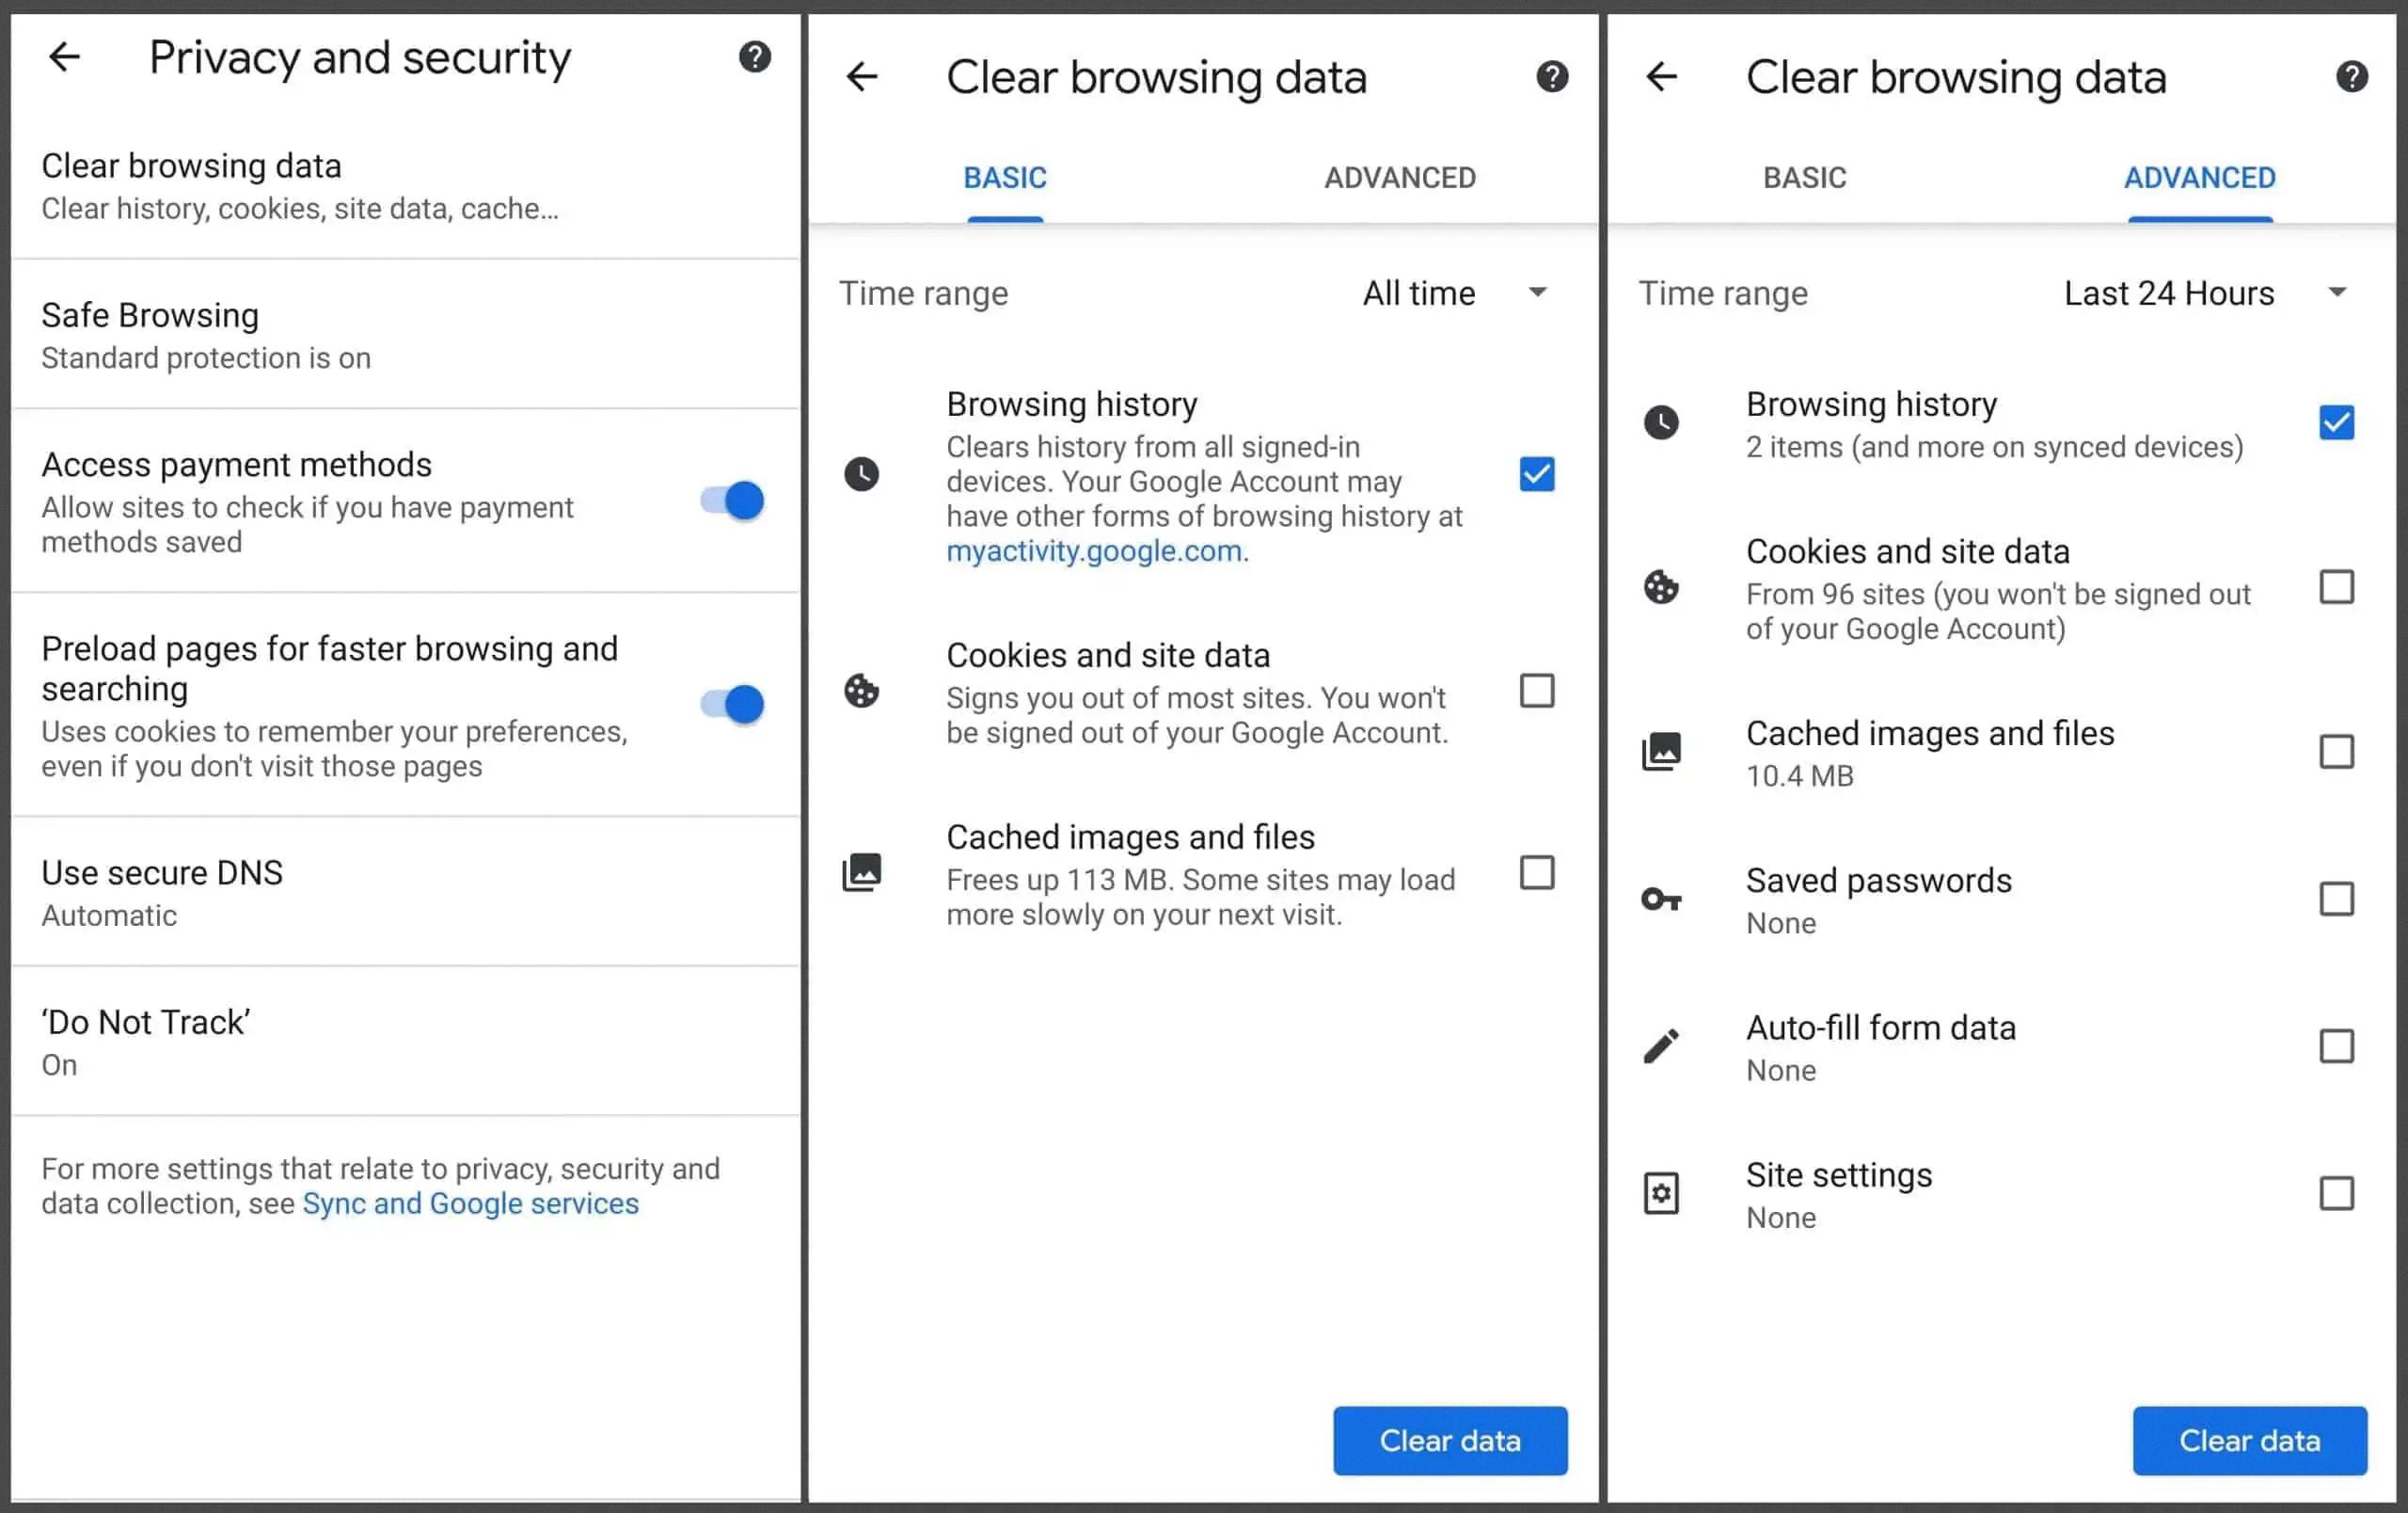
Within the settings menu, scroll down and tap on “Privacy and security.” This section provides various options to manage your browsing data.
Step 3: Clear browsing data
Under the “Privacy and security” section, tap on “Clear browsing data.” This option allows you to remove specific types of information from your browsing history.
Step 4: Choose a time range
Upon selecting “Clear browsing data,” you will be presented with a list of options. Choose a time range for which you want to delete your browsing data. You can select options such as “Last hour,” “Last 24 hours,” “Last 7 days,” or “All time.” Pick the time range that suits your needs.
Step 5: Select types of information to remove
After selecting the time range, you will see a list of different types of information that can be deleted. These may include browsing history, cookies, cached images and files, site settings, and more. Tick the boxes next to the types of information you want to remove.
Step 6: Clear the data
Once you have selected the desired types of information, tap on the “Clear data” button. This will initiate the process of deleting your browsing history and other selected data from your Android device.
Additional Tips:
– Make sure your device and Google Chrome are up-to-date to ensure smooth operation.
– Ensure a stable internet connection or try switching to another network or Wi-Fi if you encounter any issues.
– If the problem persists, try reloading the page or restarting your device.
– If you have any antivirus software installed, temporarily disable it and try again.
By following these steps, you can easily delete your browsing history on your Android device using Google Chrome. Remember to regularly clear your browsing data to maintain privacy and optimize device performance.
How Do You Clear Browsing History on Android?
To clear your browsing history on an Android device, you can follow these steps:
1. Open the Chrome browser on your Android device.
2. Tap the “More” icon, which looks like three vertical dots, located at the top-right corner of the browser window.
3. From the drop-down menu, select “Settings”.
4. In the Settings menu, scroll down and tap on “Privacy and security”.
5. Under the Privacy and security section, tap on “Clear browsing data”.
6. You will be presented with various options to choose from. You can select the time range for which you want to clear the browsing data, such as the last hour, the last 24 hours, the last 7 days, or you can choose “All time” to clear all your browsing history.
7. Next, you can select the types of information you want to remove. These options may include browsing history, cookies and site data, cached images and files, saved passwords, and autofill data.
8. After selecting the desired options, tap on the “Clear data” button to proceed.
9. Chrome will then begin clearing your browsing data based on the selected options and time range.
10. Once the process is complete, your browsing history and selected data will be cleared from your Android device.
It’s important to note that clearing your browsing history will also sign you out of most websites and delete any saved preferences or settings associated with those websites. Additionally, clearing your browsing history does not delete your bookmarks or downloaded files.
By regularly clearing your browsing history, you can maintain your privacy and keep your device running smoothly.

How Do You Clear Your Android App History?
To clear your Android app history, follow these steps:
1. Go to the Settings app on your Android device. You can usually find it in your app drawer or by swiping down from the top of your screen and tapping the gear icon.
2. Scroll down and tap on “Apps” or “Applications”. This may be located under a different name depending on your device’s manufacturer or Android version.
3. You’ll see a list of all the apps installed on your device. Tap on the app for which you want to clear the history.
4. Once you’re on the app’s information page, look for the “Storage” or “Storage & cache” option. Tap on it.
5. On the next page, you’ll see options to clear the app’s data, cache, or both. Clearing the data will remove all the app’s settings, accounts, and saved information, while clearing the cache will delete temporary files and data that the app has stored.
6. To clear the app’s data or cache, tap on the respective option and confirm your choice when prompted. Keep in mind that clearing the data will reset the app to its default settings, so you may need to sign in again or reconfigure any personalized settings.
7. Repeat these steps for any other apps for which you want to clear the history.
Alternatively, you can also clear all app data or cache at once by going to Settings > Storage > Cached data. Tapping on this option will prompt you to confirm the deletion of all cached data on your device.
Remember that clearing app data or cache will remove any saved preferences or login information, so make sure you’re aware of the consequences before proceeding.
Why Can’t You Clear Your Search History?
There can be several reasons why you might be unable to clear your search history. Here are some possible explanations:
1. Outdated browser or device: Ensure that your web browser and device are up to date. Sometimes, older versions of browsers may have issues with clearing search history.
2. Internet connection issues: If your internet connection is unstable or slow, it may affect your ability to clear your search history. Try switching to a different network or Wi-Fi connection to see if that resolves the problem.
3. Browser cache: Clearing your search history may involve clearing your browser’s cache as well. Sometimes, a full cache can interfere with the clearing process. Try clearing your cache first and then attempt to clear your search history again.
4. Antivirus software: If you have antivirus software installed on your device, it may be blocking the clearing of your search history. Temporarily disable the antivirus software and try clearing your search history again to see if that helps.
5. Browser extensions or plugins: Certain browser extensions or plugins can interfere with the clearing of search history. Disable any extensions or plugins you have installed and try again.
6. Synced devices: If you have multiple devices connected to the same Google account, your search history may be synced across them. In this case, you need to clear the search history on all devices to completely remove it.
7. Signed-in account: If you are signed in to your Google account while browsing, your search history may be tied to that account. Ensure that you are signed out of your account and then attempt to clear your search history.
Remember, the specific steps to clear your search history may vary depending on the browser you are using. Refer to the browser’s documentation or support resources for detailed instructions.
Conclusion
Droid is a versatile and powerful operating system for Android devices. It offers a wide range of features and functionalities that cater to the needs of users. With regular updates and improvements, droid ensures a smooth and seamless user experience. Its ability to customize and personalize settings, along with a vast selection of apps from the Google Play Store, makes it a popular choice among users. Additionally, droid prioritizes security and privacy, providing users with peace of mind while using their devices. droid is a reliable and user-friendly operating system that continues to evolve and meet the demands of the ever-changing mobile landscape.


