We all love to capture memories on our iPhone. But sometimes, when we want to upload them online or share them with our friends, the large size of photos can get in the way. That’s why it’s important to know how to reduce photo size on your iPhone.
The good news is that there are several methods you can use to reduce photo size on your iPhone, depending on the type of photo and where you plan to share it. Let’s take a look at each of these methods:
1) Reduce Photo Size Directly From the Camera App: If you want to reduce the file size of a photo befre you even take it, you can do this directly from inside the camera app. To do so, open up the camera app and tap on “Settings” from within the app. Then find “Size” under “Photo & Video Settings” and select either “Medium” or “Small” from the options available. This will reduce both the resolution and file size of your photos before they are taken.
2) Resize Photos with an Image Editing App: If you already have a photo that was taken in high resolution, then you can still resize it using an image editing app like Adobe Photoshop Express or Pixelmator. These apps allow you to crop and resize images as well as compress them into smaller sizes more suitable for sharing online or via email.
3) Send Photos via iMessage: An easy way to quickly shrink photos before sharing them is by using iMessage. To do this, open up Messages and select a contact to send your pictures too. Then simply select your picture(s), tap “Send” and choose “Smaller Size” from within the options menu that appears next to your selected picture(s). This will automatically resize any photos you send via iMessage into smaller versions suitable for sharing over email or social media platforms like Facebook or Twitter without taking up too much space or bandwidth.
4) Share Photos via iCloud Photo Sharing: Another great option for reducing photo sizes is by using iCloud Photo Sharing – Apple’s built-in solution for easily sharing photos with friends and family without having to worry about file sizes getting too large or eating up data allowances when sending them over cellular networks. All you need to do is select a few photos from within your library, tap the share button in Photos (the icon loos like a box with an arrow pointing up), then choose which contacts/groups you want to share with and select “iCloud Photo Sharing” from within the list of sharing options provided. This will upload any selected pictures into iCloud where they can be accessed by anyone who has been invited into that shared album – regardless of their device type (iPhone users included).
These are just some of the ways in which you can reduce photo size on your iPhone – making it easier than ever bfore for those looking to share their memories with others without facing any issues related to large file sizes!

Reducing the File Size of an iPhone Photo
To reduce the file size of an iPhone photo, you can use the Image Size app. First, download the app from your App Store or from the internet. Once it’s installed, open it and tap on the Photo icon to select the image you want to resize. After that, you can choose from pixels, millimeters, centimeters, or inches for your image’s resize options. You can also adjust the quality of your image to further reduce its file size. Once you’re done adjusting all settings, click on ‘Save’ to save your chnges and reduce the file size of your photo.
Reducing the MB Size of a Photo
To reduce the MB size of a photo, start by saving a copy of the original image in order to keep the original resolution and quality intact. Then, use an image compression tool such as Photo Compress, available for Android users at Google Play. Launch the app and select the photos you want to compress. Adjust the size by choosing Resize Image and make sure to keep the aspect ratio on so that resizing doesn’t distort the height or width of your photo. You can also reduce file size further by choosing JPEG as your desired file format, whch typically has a smaller file size than other formats such as PNG or TIFF. Finally, adjust the quality setting to find a balance between image quality and file size that meets your needs – decreasing this setting will further reduce your file’s MB size without significantly changing its visual appearance.
Compressing Photos on an iPhone
Yes, you can compress photos on iPhone! To do this, start by tapping ‘Select Photos to Compress’ on the main screen, then select the pictures you want to compress and tap ‘Next’. You can then adjust the compression settings for quality and dimensions according to your preference. When you’re done, tap ‘Compress’ or go back and make adjustments before hitting the button. This will help save space on your device without sacrificing picture quality.
Reducing the Size of Photos on iPhone for Emailing
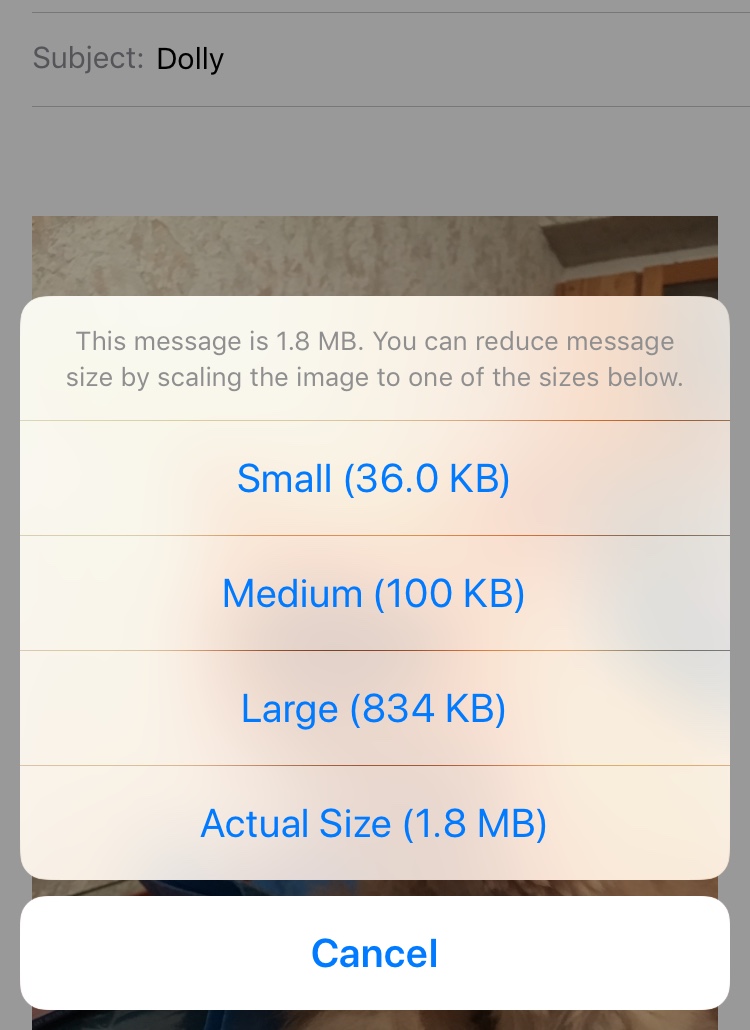
To reduce the size of a photo on your iPhone in order to email it, you can start by opening the Photos app and selecting the image you would like to email. Next, click the share icon at the bottom left of your screen and select Mail from the share menu. This will open up the mail app with your selected photo attached. At this point, you should see an option that says “Image” or “Image Size” whch you can click on to reduce the size of the photo before sending. Depending on how small you want your image to be, you can choose from a few suggested sizes or select a custom size and enter in your desired dimensions. Once you have finished adjusting the image size, click “Done” and then hit “Send” to finish sending your reduced-size photo via email!
Reducing the Size of an Image on a Mobile Device
There are a few ways to reduce the MB of a picture on your phone. The most effective way is to use an app specifically designed for reducing photo file size. Here are some of the best apps you can use:
1. Photo Compress 2.0 – This app not only resizes the photo for you, but it also compresses the photo to reduce its overall file size. It also gives you options to adjust the quality and resolution of your image.
2. Reduce Photo Size – This app allows you to quickly and easily resize your photos in order to reduce their file size. You can set the resolution and quality settings according to your needs, and then save your new smaller version of the image.
3. Photo & Picture Resizer – This app is great for quickly batch-resizing multiple images on your phone at once, making it easy to reduce their overll file size quickly and efficiently.
Using one of these apps should help you reduce the MB of any picture on your phone without sacrificing too much quality or detail in the image itself!
Reducing MB File Size
Reducing the file size of a document is relatively easy if you know the right steps. The first step is to remove any unnecessary images, formatting, and macros from the document. This can significantly reduce the file size by removing any redundant data that is taking up space. Once this has been done, save the file as a recent version of Word to ensure compatibility with most systems.
Next, it’s important to reduce the file size of any images that are included in the document before they are added. Most image editing programs offer tools to resize and compress images, which can reduce their MB size significantly. Additionally, saving files in certain formats such as JPEG or PNG instead of RAW or TIFF can also help reduce the MB size.
Finally, if after all these steps have been taken and the file is still too large for your needs, it can be saved as a PDF. PDFs can be compressed fairly significantly without compromising quality or readability, making them an ideal choice for reducing MB sizes.
Reducing the Size of a Photo for Emailing
Sending a large photo file can be tricky, but thee are a few ways to make it work.
1. Compress the photo: One way to send a large photo is to compress it. This will reduce the size of the file, making it easier to send via email. To do this, you can use an online service such as TinyPNG or compress the file yourself using software like Adobe Photoshop or GIMP.
2. Use Google Drive: Another option is to use Google Drive. This is a free cloud storage service that will allow you to upload your photo and share it with anyone with an email address. Once uploaded, simply provide the recipient with a link to the photo via email and they’ll be able to view and download it directly from Google Drive.
3. Send through WeTransfer: WeTransfer is another popular service for sending large files by email. It allows you to upload files up to 2GB in size and send them directly wihout having to sign up for an account first. You just need to provide the recipient’s email address and they’ll get an email with a download link for your file.
4. Use Dropbox: Signing up for a free Dropbox account will alow you to store photos online and share them easily with others via email or direct link. Files can be up to 2GB in size, so it’s great for larger images as well as other types of files such as documents and videos.
5. Use Amazon Drive: If you have an Amazon Prime account, then you already have access to Amazon Drive which offers 5GB of free storage space perfect for sending photos by email over the limit set by most providers (usually around 25MB). From there, simply upload your photo and share it with whoever needs access via their Amazon account or by sending them a direct link via email like other services mentioned here.
Reducing the Size of iPhone Photos to 1MB
There are a few ways you can reduce the file size of photos on your iPhone to make them 1mb or smaller. Firstly, you can use an app such as Compress Photos, which is availble for free from the App Store. When using this app, select the photos you want to compress and then adjust the level of compression to achieve the desired file size. You can also use an editing tool such as Adobe Photoshop Express to manually resize images and reduce their file size. Simply open each photo in the application, select Resize from the main menu and enter 1mb as your desired file size. Finally, you can use online tools such as CompressNow or TinyPNG that allow you to upload images and easily adjust their quality and resolution for optimal file size reduction.
Understanding Why Photos Take Up So Much Storage on an iPhone
Photos can take up a lot of storage on your iPhone for several reasons. First, if you have the iCloud Photos feature enabled, it stores your photos and videos in the cloud, but also keps them on your device. Additionally, certain types of Live Photos and videos recorded in 4K quality can take up more space than standard photos. Finally, if you have multiple versions of edited photos stored on your device, these can accumulate quickly as well. To reduce storage usage from photos, consider disabling iCloud Photos and deleting old or unimportant conversations and messages. You can also clear Recently Deleted in Photos regularly to ensure nothing is taking up space unnecessarily. Additionally, offloading any apps that are taking up a great amount of storage can help free up more space.
Conclusion
Reducing the size of photos on an iPhone is a useful feature which can help to save memory space and improve overall phone performance. It can be done quickly and easily by selecting the ‘Edit’ option in the Photos app, then selecting ‘Options’ and choosing a lower resolution from the availale options. This will reduce the file size of a photo without sacrificing image quality, allowing you to store more photos on your device for longer. Additionally, reducing photo size can help to make sharing images over email or social media easier, since smaller file sizes upload faster. All in all, reducing the size of photos on an iPhone is a great way to free up memory space and ensure your device runs smoothly.


