USB debugging is a feature in Android devices that allows you to establish a connection between your device and a computer via a USB cable. It enables you to access and control your phone’s internal system, making it useful for various tasks such as transferring data, installing custom ROMs, and troubleshooting issues. However, enabling USB debugging requires interaction with your phone’s screen, which can be challenging if the screen is broken or unresponsive.
If your Android device has support for USB On-The-Go (OTG), you can use this feature along with a computer mouse to navigate and interact with your phone, even if the screen is not functioning properly. Here’s how you can enable USB debugging using OTG:
1. First, you’ll need an OTG cable, which allows you to connect your phone to a USB device such as a computer mouse. If you don’t have one, you can easily find it online or at electronics stores.
2. Connect the OTG cable to your Android device’s charging port. Make sure the other end of the cable has a USB port where you can connect a computer mouse.
3. Once the mouse is connected to your Android device, you should see a cursor on the screen. Use the mouse to navigate through the phone’s interface.
4. Go to the “Settings” app on your Android device. You can usually find it in the app drawer or by swiping down from the top of the screen and tapping the gear icon.
5. In the Settings menu, scroll down and tap on “About “. The name may vary depending on the manufacturer and Android version.
6. Look for the “Build number” option and tap on it seven times. After tapping it multiple times, a message will appear, indicating that you are now a developer.
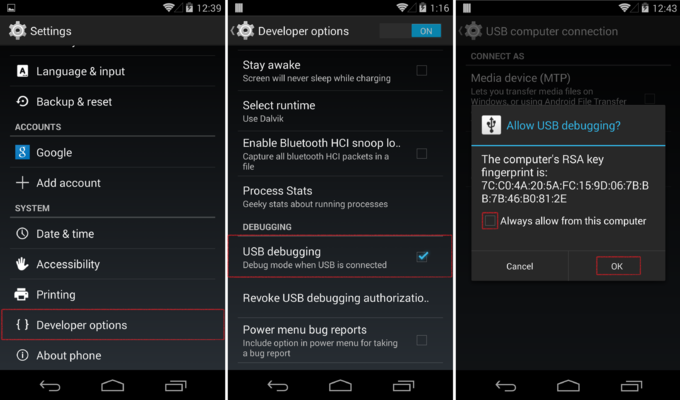
7. Go back to the main Settings menu and scroll down to find the newly enabled “Developer options”. Tap on it to open the developer settings.
8. In the Developer options, scroll down and find the “USB debugging” option. It may be located under the “Debugging” or “Developer tools” section.
9. Enable the USB debugging option by toggling the switch next to it. A confirmation dialog may appear; simply tap “OK” to proceed.
10. Congratulations! You have successfully enabled USB debugging on your Android device using OTG and a computer mouse. You can now connect your phone to a computer and access its internal system for various purposes.
It’s worth mentioning that enabling USB debugging alone may not solve all the issues caused by a broken screen. If you want to recover data from your device or perform advanced operations, you may need additional software or professional help.
USB debugging is a powerful feature that allows you to establish a connection between your Android device and a computer. Even if your phone’s screen is broken or unresponsive, you can enable USB debugging using an OTG cable and a computer mouse. By doing so, you can access and control your phone’s internal system, opening up a range of possibilities for data recovery, troubleshooting, and customization.
How Do You Enable USB Debugging If Your Screen is Broken?
To enable USB debugging on an Android device with a broken screen, you can utilize the USB On-The-Go (OTG) feature and a computer mouse. Here’s a step-by-step guide to help you through the process:
1. Check for OTG support: First, make sure your Android device supports USB OTG. You will need an OTG cable or adapter to connect the mouse to your phone. Most modern Android devices support OTG, but it’s always good to verify compatibility.
2. Gather the necessary tools: To proceed, you will need a computer mouse, an OTG cable or adapter, and a computer with the appropriate USB ports.
3. Connect the mouse: Connect the OTG cable or adapter to your Android device’s charging port. Then, connect the mouse to the other end of the OTG cable.
4. Enable USB debugging: Once the mouse is connected, it will act as a substitute for the touchscreen. Follow these steps to enable USB debugging using the mouse:
– Connect your Android device to the computer using a USB cable.
– On your computer, visit the official Android Developer website and download the ADB (Android Debug Bridge) tools for your operating system.
– Install the ADB tools on your computer.
– Open a command prompt or terminal window on your computer and navigate to the directory where the ADB tools are installed.
– In the command prompt or terminal, enter the following command to check if your device is connected and recognized: `adb devices`
– If your device is listed, proceed to the next step. If not, make sure you have USB debugging enabled on your device.
– Enter the following command to enable USB debugging: `adb shell settings put global settings_usb_debugging_enabled 1`
– Disconnect your device from the computer and restart it.
5. Verify USB debugging: After restarting your device, verify if USB debugging is enabled. You can connect your Android device to the computer again and enter the command `adb devices` in the command prompt or terminal. If your device is listed, USB debugging is successfully enabled.
Please note that this method requires some technical knowledge and may not work for all devices. Additionally, if your device has a pattern, PIN, or password lock, you may need to unlock it before proceeding with the steps mentioned above.
How Do You Force USB Debugging on Your Android Phone?
To force USB debugging on your Android phone, follow these steps:
1. Open the Settings app on your Android device.
2. Scroll down and tap on “About .” (The name may vary based on your device model.)
3. Locate the “Build number” option and tap on it seven times. This will enable the Developer options in the Settings menu.
4. Go back to the main Settings menu and you should now see a new option called “Developer options.”
5. Tap on “Developer options” to open the menu.
6. Look for the “USB Debugging” option and toggle it on. This will enable USB debugging on your device.
Note: If you’re prompted with a warning message, simply confirm your choice to enable USB debugging.
7. Additionally, you may want to enable the “Stay awake” option in the Developer options menu. This will prevent your Android device from sleeping while it is connected to the USB port.
That’s it! You have successfully forced USB debugging on your Android phone. This will allow you to connect your device to a computer and access advanced debugging features.
How to Enable MTP on Android with Broken Screen?
To enable MTP (Media Transfer Protocol) on an Android device with a broken screen, you can follow these steps:
1. Connect your Android device to a computer using a USB cable.
2. Make sure that your computer has the necessary USB drivers installed for your Android device. If not, you can download and install them from the manufacturer’s website.
3. Once connected, your computer may recognize the device as a storage device automatically. However, if it doesn’t, you’ll need to manually enable MTP mode.
4. To enable MTP mode, you’ll need to access the Developer options on your Android device. If you haven’t enabled Developer options before, go to “Settings” on your device, scroll down to “About phone” or “About device,” and tap on it.
5. Look for the “Build number” and tap on it seven times to enable Developer options. You’ll see a message saying, “You are now a developer.”
6. Go back to the main settings menu and scroll down to find “Developer options” (it might be located under “System” or “Advanced”).
7. Tap on “Developer options” and scroll down to find “USB configuration” or “Default USB configuration.”
8. Tap on “USB configuration” and select “MTP” (Media Transfer Protocol) from the available options.
9. Once you have selected MTP, your Android device should now be recognized as a storage device on your computer.
10. You can now access and transfer files between your Android device and computer by navigating to the storage device on your computer’s file explorer.
It’s important to note that the specific steps may vary slightly depending on the Android device and its version of the operating system. However, the general process should be similar across most Android devices.
Please keep in mind that enabling MTP mode alone will not fix a broken screen. If your device’s screen is unresponsive or completely shattered, it may be necessary to replace the screen or seek professional assistance.
How Can You Access Your Phone with a Broken Screen Without USB Debugging?
To access your phone with a broken screen and retrieve data without USB debugging, you can try the following method using Google Drive:
1. On another device or computer, go to the Google Drive website (drive.google.com) and sign in with the same Google account that is linked to your broken Android phone.
2. Once you are signed in, click on the “Settings” icon, usually represented by a gear or three vertical dots, and select “Settings” from the drop-down menu.
3. In the Settings menu, locate the “Backup and Sync” section and make sure the toggle switch is turned on. This will ensure that your device is backing up its data to Google Drive.
4. Now, on the same device or computer, open the Google Drive app and sign in with the same Google account again.
5. In the Google Drive app, navigate to the “Backups” or “Backup” section. This may vary depending on your device and app version.
6. Here, you should see a list of all the devices that are linked to your Google account and have backed up their data to Google Drive.
7. Identify your broken Android phone from the list and select it. You should now see a list of all the data that has been backed up from that device.
8. Depending on what data you want to restore, you can select individual files or folders and download them to your computer or another device. Alternatively, you can choose to restore everything by selecting the “Restore all” option.
9. Once the download or restore process is complete, you can access the restored data on your computer or another device.
It’s important to note that this method relies on your device being set up to back up its data to Google Drive automatically. If you didn’t have this feature enabled before the screen broke, or if your device wasn’t connected to the internet, this method may not work. In such cases, you may need to consider alternative methods or seek professional help to recover your data.
Conclusion
USB debugging is an essential feature for Android devices that allows users to establish a connection between their device and a computer for various purposes, such as file transfer, software development, and data recovery.
Enabling USB debugging is usually a straightforward process, requiring users to tap on the Build number in the About section of the device’s Settings multiple times to unlock the Developer options. From there, users can navigate to the Developer options and enable USB debugging.
However, if the device’s screen is broken or unresponsive, enabling USB debugging can be challenging. In such cases, using an OTG (On-The-Go) cable along with a computer mouse can be a helpful solution. By connecting the mouse to the device using the OTG cable, users can navigate through the device’s settings and enable USB debugging, even if the screen is not functioning properly.
Once USB debugging is enabled, users can perform various tasks, such as accessing the device’s file system, installing custom ROMs, and using debugging tools for app development. It is worth noting that enabling USB debugging also allows for data recovery in situations where the device’s screen is broken or unresponsive.
Additionally, for users who have lost data from a broken Android device and do not have USB debugging enabled, there is still a possibility to restore lost data through Google Drive. By going to the device’s Settings app and accessing the Backup & Reset option, users can restore data from their Google Drive backup, provided that the Automatic restore option is turned on.
USB debugging is a crucial feature for Android devices that enables various functionalities and troubleshooting options. If the device’s screen is broken or unresponsive, using an OTG cable and a computer mouse can help enable USB debugging. However, even without USB debugging, users can still restore lost data through Google Drive if the Automatic restore option is enabled.


