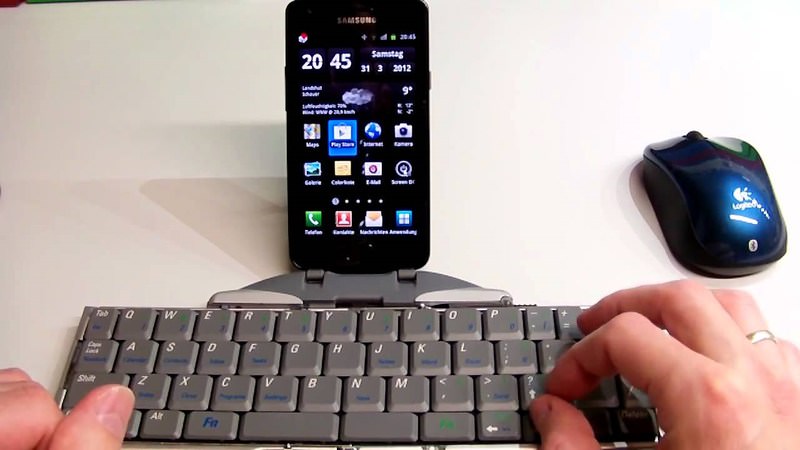
In today’s digital world, smartphones have become an integral part of our lives. From communication to productivity, these devices offer countless features that make our lives easier. However, typing on a small touchscreen keyboard can sometimes be a hassle, especially when you need to type lengthy emails or documents. Luckily, there’s a solution – connecting a keyboard to your phone. In this article, we will explore how to connect a keyboard to your phone without using an OTG cable.
Method 1: Bluetooth Connectivity
One of the easiest ways to connect a keyboard to your phone is through Bluetooth connectivity. Most modern keyboards come with built-in Bluetooth capabilities, allowing you to pair them with your phone wirelessly. Here’s how to do it:
1. Turn on your keyboard: Ensure that your keyboard has fresh batteries and turn it on.
2. Activate pairing mode: Look for a “connect” or “pair” button on your keyboard. Press and hold it until the Bluetooth indicator starts flashing, indicating that the keyboard is in pairing mode.
3. Enable Bluetooth on your phone: Open the settings menu on your phone and navigate to the Bluetooth settings. Turn on Bluetooth and wait for your phone to scan for available devices.
4. Pair your keyboard: Once your phone detects the keyboard, tap on its name to initiate the pairing process. Follow any on-screen prompts to complete the pairing.
5. Test the connection: Open any app that requires typing, such as a notes app or messaging app, and start typing on your keyboard. If everything is working correctly, you should see the input appearing on your phone’s screen.
Method 2: Wi-Fi Keyboard Apps
If your keyboard doesn’t have Bluetooth capabilities, another option is to use a Wi-Fi keyboard app. These apps allow you to use your laptop or computer’s keyboard to input text on your phone. Here’s how to set it up:
1. Install a Wi-Fi keyboard app: Search for a Wi-Fi keyboard app on your phone’s app store. There are several options available, such as “Wi-Fi Keyboard” or “Remote Mouse.”
2. Connect your phone and computer to the same Wi-Fi network: Ensure that both your phone and computer are connected to the same Wi-Fi network.
3. Open the Wi-Fi keyboard app: Launch the Wi-Fi keyboard app on your phone. You will see three URLs displayed.
4. Open the URL on your computer: On your computer’s web browser, enter one of the URLs displayed on your phone. This will establish a connection between your phone and computer.
5. Start typing on your computer keyboard: Once the connection is established, you can start typing on your computer’s keyboard, and the input will appear on your phone’s screen. You can use this method to type on any app or document on your phone.
Connecting a keyboard to your phone can significantly enhance your productivity and make typing a breeze. Whether you choose to connect via Bluetooth or use a Wi-Fi keyboard app, both methods provide convenient alternatives to typing on a small touchscreen. So go ahead and try these methods to connect your keyboard to your phone without the need for an OTG cable. Happy typing!

How to Connect a Keyboard to a Mobile Phone?
To connect a keyboard to a mobile phone, you can follow these steps:
1. Check the compatibility: Ensure that your mobile phone supports USB OTG (On-The-Go) functionality. This feature allows the phone to act as a USB host and connect to external devices like keyboards.
2. Get the right adapter: If your phone doesn’t have a USB Type-A port, you will need an OTG adapter that converts the port on your phone to a USB Type-A port. These adapters are readily available online or at electronics stores.
3. Connect the keyboard: Plug the USB end of the keyboard into the USB Type-A port on the OTG adapter. If you have a wireless keyboard, make sure it is in pairing mode and follow the manufacturer’s instructions to connect it to your phone via Bluetooth.
4. Enable OTG support: Some phones may require you to enable OTG support in the settings. Go to your phone’s settings menu, search for “OTG” or “USB OTG,” and enable the feature if necessary.
5. Start typing: Once the keyboard is connected, you should be able to start using it immediately. Open any app that requires text input, and you should be able to type using the keyboard.
6. Adjust keyboard settings (optional): You can customize the keyboard settings by going to the language and input settings on your phone. Here, you can change the language, layout, or other preferences to suit your needs.
It’s important to note that not all mobile phones support USB OTG functionality, so make sure to check your phone’s specifications or consult the manufacturer’s website to confirm compatibility. Additionally, some keyboards may require additional drivers or software to work with specific mobile operating systems, so it’s worth checking the manufacturer’s instructions or website for any specific requirements.
Remember, this guide assumes you are using a physical keyboard. If you want to use a virtual keyboard on your computer to control your mobile phone, you can explore software solutions like Vysor or scrcpy, which allow you to mirror your phone’s screen on your computer and control it using your computer’s keyboard and mouse.
Can You Use Your Android as a USB Keyboard?
It is possible to use your Android device as a USB keyboard. By connecting your phone to another device via USB, it can be recognized as a standard keyboard. This allows you to send keystrokes from your phone to the connected device.
To use your Android phone as a USB keyboard, follow these steps:
1. Connect your Android phone to the device you want to control using a USB cable.
2. Ensure that the phone is in USB debugging mode. You can enable this option in the developer settings of your Android device. If developer settings are not visible, go to the “About phone” section in the settings menu, tap on “Build number” multiple times until you see a message indicating that developer options have been enabled.
3. Once the phone is connected and USB debugging is enabled, it should be recognized as a standard keyboard by the connected device.
4. Open a command line or any application that accepts keyboard input on the connected device.
5. From the command line or application, tap any key on your Android phone, and then press “enter” to send the keystroke. The connected device will receive the input as if it were coming from a physical keyboard.
6. You can also use special keys such as “enter” or “f2” by tapping on the corresponding buttons or keys on the Android keyboard.
Using your Android phone as a USB keyboard can be useful in various scenarios, such as controlling a computer from a distance, inputting text on a smart TV, or remotely operating other devices that accept keyboard input.
Please note that the specific steps and options may vary slightly depending on the Android device model and the operating system version you are using.
How Do You Connect Your Laptop Keyboard to Your Phone Wirelessly?
To connect your laptop keyboard to your phone wirelessly, you can use a Wi-Fi keyboard app. These apps allow you to use your laptop’s keyboard as an input device for your phone. Here are the steps to connect them:
1. Install a Wi-Fi keyboard app: Search for a Wi-Fi keyboard app on your phone’s app store. Some popular options include Wifi Keyboard, Remote Mouse, and Unified Remote. Install the app that suits your requirements.
2. Connect your laptop and phone to the same Wi-Fi network: Ensure that both your laptop and phone are connected to the same Wi-Fi network. This is essential for them to communicate with each other wirelessly.
3. Open the Wi-Fi keyboard app on your phone: Launch the Wi-Fi keyboard app that you installed on your phone. You may need to grant the necessary permissions for the app to work properly.
4. Note the provided URLs: Once the app is open, you will see three URLs displayed. You can use any of these URLs to establish a connection between your laptop and phone.
5. Open your laptop’s web browser: On your laptop, open any web browser of your choice, such as Chrome or Firefox.
6. Enter the provided URL: In the address bar of your laptop’s web browser, enter the URL provided by the Wi-Fi keyboard app. This will establish a connection between your laptop and phone.
7. Start using your laptop keyboard on your phone: Once the connection is established, you can start using your laptop’s keyboard on your phone. Any text or commands you input on your laptop’s keyboard will be reflected on your phone’s screen.
That’s it! You have successfully connected your laptop keyboard to your phone wirelessly using a Wi-Fi keyboard app. Enjoy the convenience of typing on a larger keyboard while using your phone.
Conclusion
Keyboards are essential input devices for computers and mobile phones. They allow users to input text and commands quickly and efficiently. There are various types of keyboards available, including wired, wireless, and virtual keyboards.
For computers, connecting a keyboard is relatively simple. For wired keyboards, you just need to plug the USB cable into the computer’s USB port. Wireless keyboards require pairing with the computer via Bluetooth or a USB receiver. Once connected, the keyboard can be used to type and navigate on the computer.
When it comes to mobile phones, connecting a keyboard can be done either through USB or using a Wi-Fi keyboard app. For USB connection, you need a USB OTG adapter to connect the keyboard to the phone’s USB port. The phone should recognize the keyboard as a standard keyboard, allowing you to type and control the device.
Alternatively, you can use a Wi-Fi keyboard app to connect your laptop’s keyboard to your mobile phone. This involves installing a Wi-Fi keyboard app on your phone and typing the provided URL on your laptop’s browser. This allows you to use your laptop’s keyboard to input text on your mobile phone.
Keyboards are versatile tools that enhance the user experience by providing a comfortable and efficient way to input text and commands. Whether you’re using a computer or a mobile phone, connecting a keyboard can greatly improve productivity and ease of use.


