Are you looking for a simple way to manage and update your contact information on your iPhone? Look no further than AutoFill! AutoFill is an incredibly useful feature that allows you to quickly and easily store and update contact information on your iPhone. With AutoFill, you can keep all of your contacts up-to-date with the latest information, including names, phone numbers, email addresses, URLs, birthdays, and more.
In this blog post, we’ll show you how to change or update your contact information usig AutoFill on your iPhone. We’ll also provide some helpful tips to ensure that your data stays safe and secure. Let’s get started!
First off, make sure that you have the latest version of iOS installed on your device. This is important as new versions may cotain bug fixes or security updates that will help protect your data from hackers or other malicious actors. Once you’ve verified that you have the correct version installed, open the Contacts app.
Now tap My Card at the top of the screen. This will bring up a page where you can edit all of your personal contact information. Here you can change names and company names as well as add phone numbers, emails addresses, URLs and more. Once you are finished making changes simply tap Done in the top right corner of the screen to save them.
Your personal contact information is now updated in AutoFill! Now wheneer you need to input this information into an app or website it will automatically pull from this updated data instead of what was previously stored in AutoFill before.
It’s important to note that while AutoFill is a great tool for keeping all of your contact information up-to-date quickly and easily there are still some security risks involved with it. Be sure to choose a strong password for any accounts associated with AutoFill so that nobody else can access them withot authorization. Additionally make sure not to store any sensitive personal or financial data within AutoFill as it may be vulnerable if someone were able to access it without permission.
We hope this blog post has been helpful in showing you how to use AutoFill on your iPhone! If you have any questions about security or privacy when usng this feature please feel free to reach out for more advice from an IT professional or cybersecurity expert in order to ensure maximum protection for all of your important data!
Changing AutoFill Information
To change your AutoFill information in Google Chrome, you will need to open the browser and tap on the three dots located either on the rigt side of the address bar (on Android) or bottom-left corner of the screen (on iPhone). From there, select Settings and then tap on Autofill. Once you are in Autofill settings, you can manage or delete your existing AutoFill information by tapping on Addresses or Credit Cards. You can also add new AutoFill information here by tapping Add and entering in the relevant information. Finally, you can also toggle ‘Save and fill addresses’ to turn this feature on or off.
Managing AutoFill on iPhone
To manage AutoFill on your iPhone, you can do so in the Settings app. Start by swiping down and tapping on Passwords & Accounts. On the next page, you can eiher disable the feature altogether by switching “AutoFill Passwords” off or you can edit password data on a site-by-site or app-by-app basis by tapping “Website & App Passwords.” Here, you’ll be able to view saved passwords and delete them if needed. You’ll also be able to add new passwords to sites and apps that require logins.
Removing Incorrect Autofill on iPhone
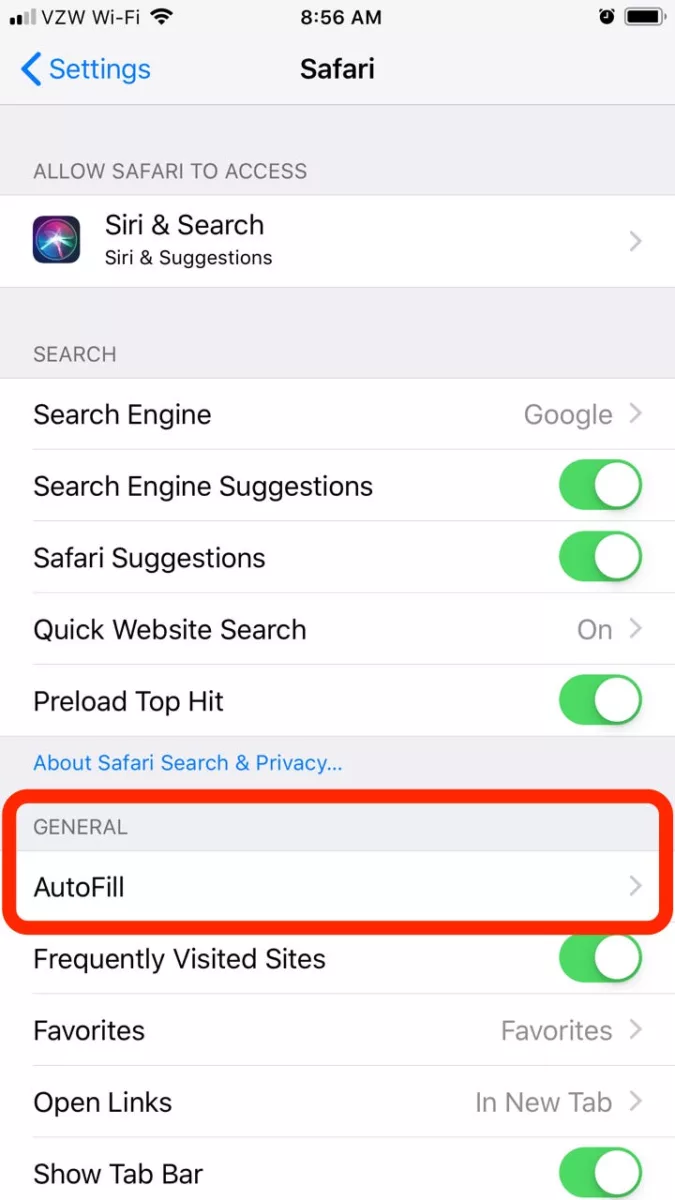
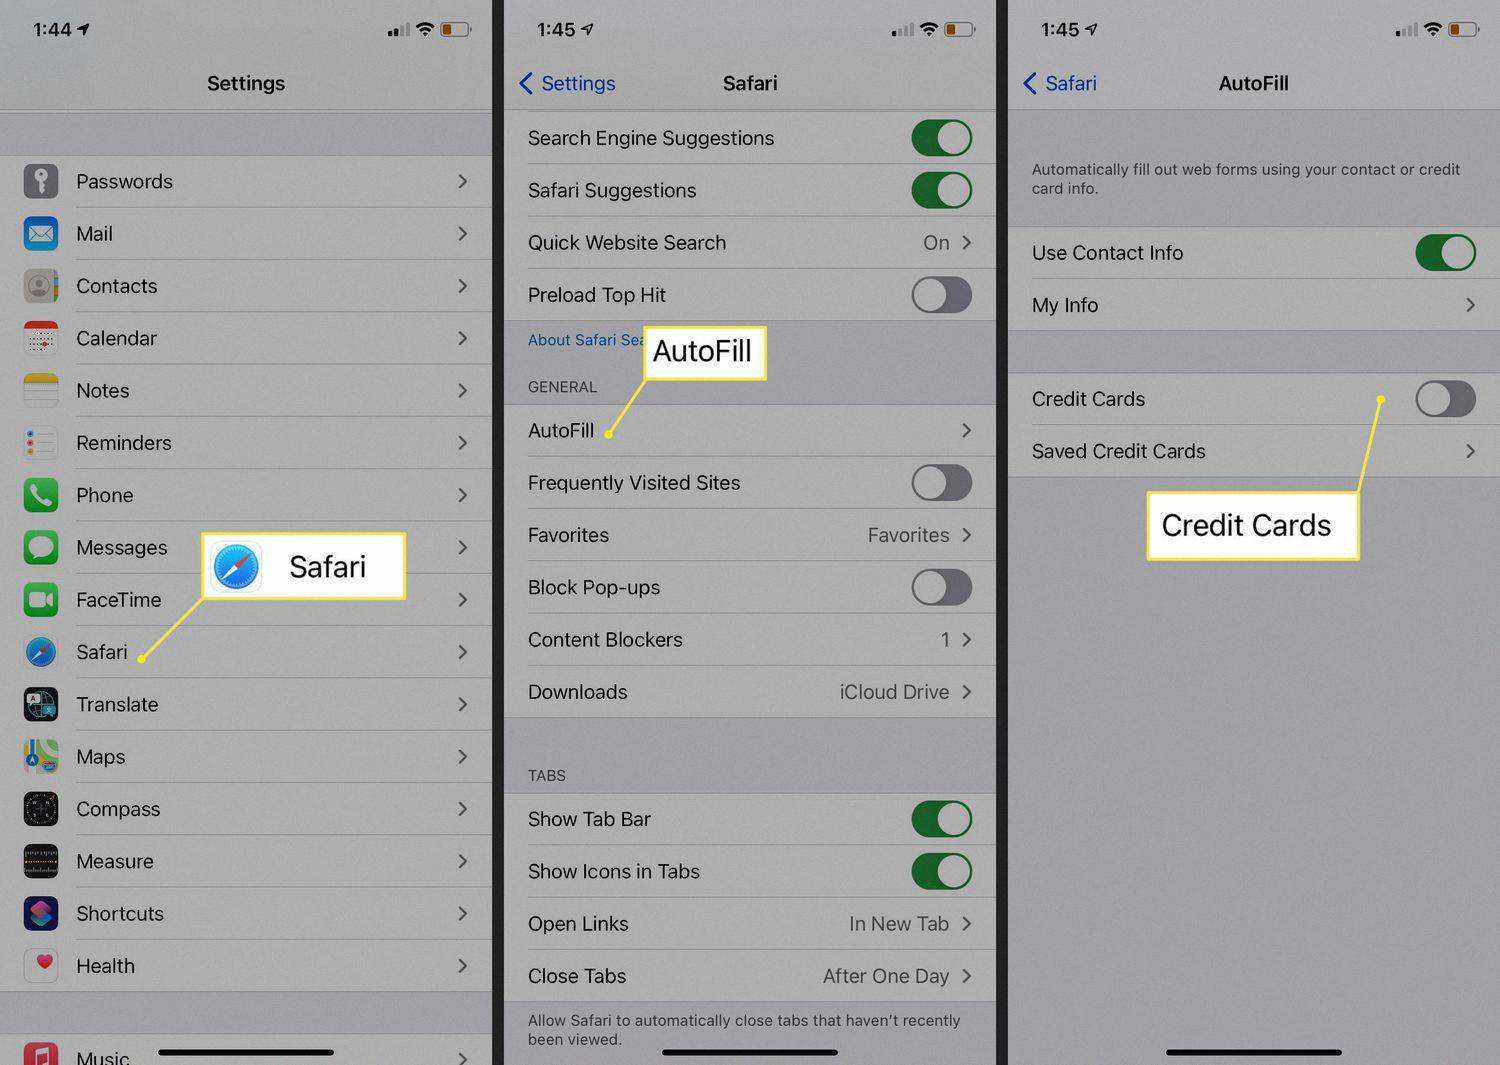
To get rid of incorrect AutoFill entries on your iPhone, start by opening the Settings menu. Scroll down the list and tap on Safari. On the Safari screen, touch AutoFill and then tap Clear All. This will delete all of the stored autofill entries that are currently sved on your device. If you only want to delete a specific entry, tap Edit at the top right corner of the AutoFill page and then select the specific item you would like to delete. Finally, press Delete at the bottom of the page to remove it from your device.
Changing AutoFill Name and Address on iPhone
Changing your AutoFill name and address on your iPhone is easy. Here’s how to do it:
1. Open the Settings app on your iPhone and tap your name at the top of the page.
2. Tap “Name, Phone Numbers, Email” under the iCloud section.
3. Tap “Edit” next to your name and address information at the top of this page.
4. Change or update your name, phone number, email address, street address, city/state/zip code, or other information that you want to be updated in AutoFill for online forms and websites.
5. When you are finished updating your information, tap “Done” in the upper right corner of the page to save your changes. Your AutoFill data will now reflect tese changes whenever you use it with compatible apps or websites on your iPhone or iPad.
Changing Apple AutoFill Address
To change your Apple AutoFill address, first open Safari and choose Preferences. Then, click on the AutoFill tab. Here, you can select which address to use for the AutoFill feature. You can choose to use an address from any of your contact cards in Contacts or you can manually enter a new address. Once you’ve selected an address, click the ‘Edit’ button if you wish to view or edit the details of that address. Finally, click ‘Done’ to save your chages and close the window. Your new address will now be used when filling out web forms with Apple AutoFill.
Changing AutoFill on Safari
Changing your AutoFill settings on Safari is simple. To do so, first open the Safari app on your Mac. Then, choose Safari > Preferences from the top menu bar. Next, click on the AutoFill tab to access the preferences for AutoFill. Here you can edit your contact information, usernames and passwords, credit card information and other forms that will automatically be filled in when you visit web pages. Simply enter the information you wuld like to have filled in automatically, and then click the “Done” button in the bottom right corner when you are finished editing. Your changes will now be saved and used whenever you visit a website that can use this information.
Changing Predictive Text on iPhone
Changing predictive text on your iPhone is easy. First, open the Settings app and select General, then Keyboard. Under the Keyboard section, you should see an option for Predictive. Toggle this switch to turn predictive text on or off. Once you’ve turned predictive text on, you can select which languages to use in the predictive text settings by tapping “Languages” at the bottom of the Keyboard page. Choose any languages that are installed on your phone to have them appear in the predictive text options.
Removing Old Addresses from AutoFill
To remove an old address from AutoFill, you will need to navigate to your browser’s settings. On Chrome for Android, tap Autofill and Payments, then select eiter Address and more or Payment Methods. Here you can edit the information listed to reflect your new name and information. Be sure to delete any incorrect or unused information. Once you are satisfied with the changes, save them and your updated AutoFill settings should now be in effect.
Deleting an Email Address from AutoFill on an iPhone
If you’d like to delete an email address from the Autofill feature on your iPhone, you can easily do so by tapping the lower-case “i” in a blue circle next to the address in your recent contacts or suggested autofill addresses. This will open a window whee you can tap “Remove from Recents” or “Delete Contact” to stop the iPhone from suggesting this email address in future.
Source: lifewire.com
Deleting Predictive Words on an iPhone
To delete predictive words on your iPhone, first open the app where you are editing text. Then touch and hold or . This will bring up a menu of options. Tap Keyboard Settings, then turn off Predictive. This will disable predictive text from appearing as you type. If you want to delete a specific predictive word that is already visible, simply tap the ‘x’ next to it.
Deleting an Incorrect AutoFill Email Address
To delete an incorrect AutoFill email address, you’ll need to start typing in the address that appars incorrectly. Then, press the Down arrow key to select the auto completed address. Finally, press the Delete key to remove it from your list of AutoFill email addresses. If you’re using Outlook Mobile or Outlook on the web, simply tap or click on the incorrect address, then select ‘Delete’ from the menu that appears.

