Are you looking for an easy way to connect your MacBook Pro to a projector? The good news is, it’s actually quite easy. All you need is the correct cable and you’ll be up and running in no time. Here is a step-by-step guide to get you connected.
First, determine whih type of cable you’ll need for your particular projector. Every projector is different, so check with the projector’s manufacturer or refer to the user manual to be sure. Common types of cables used include HDMI, Thunderbolt 3, USB-C, and Mini DisplayPort.
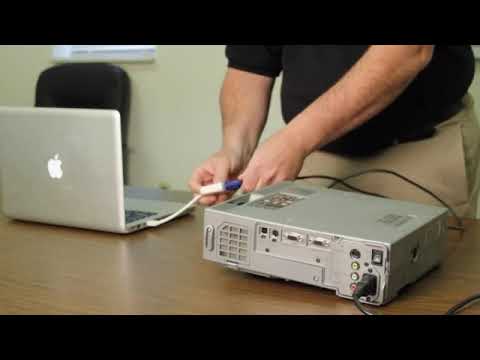
Next, plug the cable into the display output port on your Mac (the port will depend on which cable you’re using). Then plug the other end into either your projector directly or an adapter that converts the signal from your Mac to the correct input for the projector.
Once everything is connected properly, open System Preferences from the Apple menu on your Mac and select Displays from the list of options. This will give you access to Display Preferences where you can set resolution and oher display settings. On newer Macs, you can click & hold on the projector in the display arrangement to change modes. The most common mode is “Mirror” which projects exactly what is shown on your laptop screen. On older Macs, you can check the Mirror Displays box in the Arrangement tab.
If your Mac doesn’t recognize your HDTV, display, or other HDMI device after making all of these connections, try turning off both devices completely before unplugging them and plugging them back in again one at a time while leaving one turned off until after it has been re-connected with its counterpart device powered off as well.
And that should do it! Now that all of thse steps have been completed correctly, anything displayed on your laptop should now be mirrored onto the projection screen—no additional software needed! We hope this guide has been helpful in getting your MacBook Pro connected to a projector quickly and easily!
Troubleshooting Mac Connection Issues with Projectors
There are seeral potential reasons why your Mac might not be connecting to the projector. First, you may need to check that the projector is connected properly and that all cables are securely in place. Additionally, you may need to check if your Mac computer has the correct display settings for the projector. To do this, open System Preferences from the Apple menu and open the “Displays” preference pane. In the “Display” tab, you can adjust settings such as screen resolution and mirroring. If needed, you can also use the “Detect Displays” button to force your system to find the projector if it does not detect it automatically. Lastly, it is possible that there may be some compatibility issues between your Mac and the projector. If so, you may need to contact technical support for assistance with resolving any compatibility issues.
Connecting a Mac to a Projector Using USB
To connect your Mac to a projector with USB, you will need an adapter that converts the signal from your Mac to the correct input for the projector. First, plug one end of the adapter into the display output port on your Mac (Thunderbolt 3, USB-C, HDMI, or Mini DisplayPort). Then connect the other end of the adapter to your projector’s USB port. Once connected, you sould be able to mirror your Mac’s screen onto the projector.
Screen Mirroring from Mac to Projector
Yes, you can screen mirror from a Mac to a projector. To do this, go to the System Preferences and click on Displays. On newer Macs, you can click and hold on the projector in the Display Arrangement to change modes. Mirror is the most common mode and will project exactly what is shown on your laptop screen. On older Macs, you can check the Mirror Displays box in the Arrangement tab. Once you have chosen the correct display mode, your Mac sould be mirroring your laptop’s display onto the projector’s screen.
Troubleshooting HDMI Connectivity Issues on Mac
It’s possible that your Mac is not displaying through HDMI because the connection has not been properly established. To resolve this issue, please ensure that both your Mac and HDMI device are turned off beore plugging the HDMI cable into both devices. Once plugged in, turn on your Mac and then turn on the HDMI device. If the issue persists, try unplugging and replugging the HDMI cable or check to make sure the correct display settings are selected in System Preferences.
Troubleshooting Projector Screen Display Issues
There could be a few reasons why your screen is not showing on the projector. It’s important to make sure that all necessary cables are securely connected, the power is on for both the projector and connected video sources, and that the projector hasn’t gone into standby or sleep mode. If your HDMI cable is too long, it may be causing a signal interruption, so try using a shorter one. You can also try connecting the video source directly to the projector instead of through an external device. If none of thse solutions work, then you may need to contact a technician to check for further issues with your projector.
Source: appleinsider.com
Troubleshooting Issues with Projector Not Displaying Laptop Screen
There are several possible reasons why your projector is not displaying your laptop screen. The most common causes are:
1. The laptop and projector are not properly connected or the connections are loose. Make sure the cables between your laptop and projector are firmly secured, and that it is the correct type of cable for connecting the two devices.
2. The output display on the laptop needs to be changed in order to show its image through the projector. Check if you have selected a different display setting on your laptop (e.g., external monitor) and switch back to the one that displays on both screens.
3. Your projector may be malfunctioning or out of date; check if any of its settings need to be adjusted or updated, or if any part of it nees to be serviced or replaced.
4. There may be an issue with your laptop’s video card, such as a driver issue or outdated drivers; updating them may resolve this issue.
If none of these solutions address your problem, then you should contact a technical support representative for further assistance with troubleshooting this issue.
Using a USB Port on a Projector
The USB port on a projector is used for connecting various devices such as cameras, flash drives and other USB-compatible devices. You can use it to project images and other content from your device onto a larger display. The projector can also be used as an interface to control the device, such as taking photos or displaying video. Additionally, some projectors have special features that require a USB connection such as being able to connect to the internet.
Connecting a Computer to a Projector
First, you need to connect an HDMI or VGA cable from your laptop/tablet to the projector. Next, turn on the projector. Windows should automatically recognise it and display an image on the projector screen. If not, press and hold down the Fn key, then tap the Display Toggle key to select the type of display. Once you have done this, your computer should be displaying on the projector.
Format Requirements for Using a USB with a Projector
The USB drive needs to be formatted in eiher NTFS, FAT, or FAT32 in order for it to be compatible with the projector.
Source: zdnet.com
Casting a Screen to a Projector
To cast your screen to a projector, you will need either a streaming device such as Chromecast, Apple TV, or an HDMI cable.
First, connect the streaming device or HDMI cable to your projector. Then, connect the same device or cable to your laptop or phone. Finally, make sure that both your laptop or phone and the projector are connected to the same WiFi network.
Once this is set up, you can start streaming on your laptop or phone and select the appropriate icon (for Chromecast, Airplay, etc.) This will allow you to cast your screen to the projector.
Mirroring a Laptop to a Projector Using HDMI
To mirror your laptop to a projector using HDMI, you will need to start by ensuring that both the laptop and the projector are switched on. Then you need to connect one end of an HDMI cable to the laptop’s HDMI port, and then connect the other end of the cable to the projector. Once that is done, your laptop screen should be displayed on the projector and you will be ready to go!
Connecting a Macbook to a Projector Wirelessly
To connect your Macbook to a projector wirelessly, you first need to make sure that the projector has wireless capability. If it does, turn on the projector and press the Menu button on the remote control. Select the Management menu and make sure that the Wireless LAN Power setting is set to On. Press Esc, select the Network menu, and then press Enter.
Then, open System Preferences on your Macbook and go to Displays. Under AirPlay Display, select your projector from the list of available AirPlay displays. Your Macbook will now be connected wirelessly to the projector and you’ll be able to project your display onto a larger screen.
Connecting a MacBook Pro to a Projector with HDMI
To connect your MacBook Pro to a projector with HDMI, you’ll need to first make sure that the projector has an available HDMI port. Once you’ve confirmed this, you’ll need to get a Thunderbolt 3 (USB-C) or HDMI cable depending on what type of port the projector has. If the projector has a Thunderbolt 3 (USB-C) port, connect one end of the cable to the USB-C port on your MacBook Pro and the oher end to the projector’s USB-C port. For an HDMI connection, plug one end of the HDMI cable into your MacBook Pro’s HDMI port and plug the other end into the projector’s HDMI port. Lastly, select “HDMI” as your video source on the projector. Your MacBook Pro should now be connected to the projector!
Connecting a MacBook to an HDMI Device
To connect your MacBook to a TV using HDMI, you will need an adapter that has a USB-C port on one end and an HDMI port on the other. Once you have the adapter, plug one end of it into your laptop’s USB-C port and then plug the other end into your TV’s HDMI port. Finally, plug the other end of the HDMI cable into the USB-C to HDMI adapter. This should allw you to stream audio and video from your MacBook to your TV.

