Call history is a useful feature on our smartphones that allows us to keep track of our incoming, outgoing, and missed calls. It provides a convenient way to refer back to our communication history and retrieve important information. In this article, we will explore how to access and view our full call history on Android devices.
To begin, let’s take a look at how to access call history on Android devices. The process may vary slightly depending on the device model and operating system version, but the general steps should be similar.
1. Launch the Phone App: Locate and open the phone app on your Android device. This app is typically represented by a phone icon and is usually found on the home screen or app drawer.
2. Open the Call History: In the phone app, look for the “Recent” or “Call History” tab. This tab is usually located at the bottom of the screen and is represented by a clock or clock icon. Tap on it to access your call history.
3. Explore Incoming, Outgoing, and Missed Calls: Once you are in the call history section, you will see a list of your recent calls. The list will typically be categorized into incoming, outgoing, and missed calls. Scroll through the list to view your call history.
4. View More Details: If you want to view more information about a specific call, tap on the phone number or contact name associated with the call. This will usually open a detailed view where you can see additional details such as call duration, date, time, and even the contact’s photo.
It is important to note that the call history on Android devices usually stores a certain number of recent calls, typically the last 100 calls. If you need to access older call history beyond this limit, you may have to consult your cellular carrier’s detailed call log or billing statement.
In addition to Android devices, iPhone users can also view their call history. On iPhone, you can access your call history through the Phone app as well. However, if you want to view older call history, you may need to restore from an iCloud backup. It is crucial to remember that this process involves deleting existing data with a factory reset, so it is advisable to create a backup of your phone to avoid losing any new data.
Can You See Your Full Call History?
Android devices provide the option to view your full call history. To access your call history, follow these steps:
1. On your Android device, locate and open the Phone app.
2. Look for the menu or options button, which is usually represented by three dots or lines in the top-right corner of the screen.
3. Tap on the menu or options button to open a dropdown list.
4. From the dropdown options, tap on “History.” In some devices, this option may be labeled as “Call details” or represented by an “i” icon.
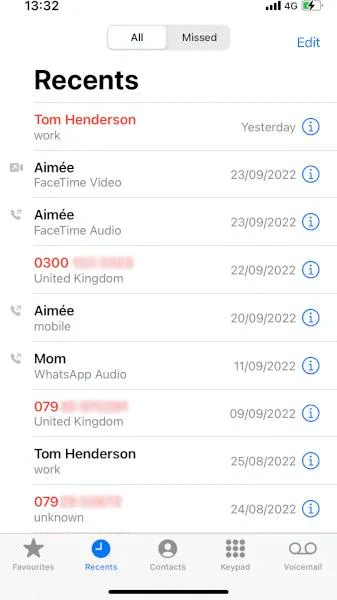
5. Upon selecting “History,” you will be presented with a chronological list of all your incoming, outgoing, and missed calls, along with the corresponding dates and times.
6. Scroll through the list to view your complete call history. You can usually see the caller’s name or number, call duration, and call type (incoming, outgoing, missed).
Additionally, Android devices often provide filter options to help you sort and search through your call history. These filters may include options such as All calls, Missed calls, Outgoing calls, and Incoming calls.
It’s worth noting that the availability and exact location of the call history feature may vary slightly depending on the Android device model and the version of the operating system it is running. However, the steps provided above should generally guide you to access your full call history on most Android devices.
How Can You Get Your Call History Detailed?
To access a detailed call history on your phone, follow these steps:
1. Open the app on your phone that handles your phone calls. This app is typically labeled as “Phone” or “Call” and is usually found on the home screen or in the app drawer.
2. Once you have opened the app, look for the “Recent” or “Call History” tab. This tab displays a list of all your incoming, outgoing, and missed phone calls.
3. Tap on the “Recent” or “Call History” tab to view the list of calls. The list will typically show the caller’s phone number or contact name, the date and time of the call, and the call duration.
4. To get more detailed information about a specific call, tap on the phone number or contact name in the list. This will take you to a separate screen where you can find additional details about that particular call.
5. On the separate screen, you may find options like “Call Details” or an icon resembling a clock or history. Tap on these options to access a more detailed call history for that specific call.
6. In the detailed call history, you can expect to see information such as the call duration, date and time of the call, the type of call (incoming, outgoing, missed), and any additional details specific to your phone’s call history feature.
7. Some call history options may also provide additional features such as the ability to add notes or tags to specific calls, block or unblock numbers, or access advanced call settings.
By following these steps, you should be able to access a detailed call history on your phone, allowing you to review and manage your past phone calls more effectively.
Can You Get Old Call History on Your iPhone?
It is possible to retrieve old call history on your iPhone by restoring from an iCloud backup. However, please note that this process requires deleting your existing data through a factory reset. It is important to create a new backup of your phone to ensure you don’t lose any new data.
Here are the steps to follow:
1. Go to the “Settings” app on your iPhone.
2. Scroll down and tap on “General.”
3. In the General settings, look for the option called “Transfer or Reset iPhone” or similar. Tap on it.
4. You will be presented with different options to reset your iPhone. Choose the option that allows you to erase all content and settings. This will delete all your current data, so make sure you have a recent backup.
5. After confirming the reset, your iPhone will restart and display the initial setup screen.
6. Follow the on-screen instructions to set up your iPhone until you reach the “Apps & Data” screen.
7. On the “Apps & Data” screen, select the option to “Restore from iCloud Backup.”
8. Sign in to your iCloud account using your Apple ID and password.
9. Choose the most recent iCloud backup that contains the old call history you want to retrieve.
10. The restore process will begin, and your iPhone will download the selected backup from iCloud.
11. Once the restore is complete, your iPhone will restart, and you should be able to access your old call history.
It’s important to note that this method will restore your entire iPhone from the selected iCloud backup, meaning all data and settings will be reverted to the state they were in when the backup was created. Therefore, it’s recommended to create a new backup of your iPhone before proceeding with the restore to avoid losing any new data.
Remember to carefully consider the consequences of deleting your current data before proceeding with the restore.
How Do You See Further Back on Your iPhone Call Log?
To view call history beyond the last 100 calls on your iPhone, you can refer to your detailed call log or billing statement provided by your cellular carrier. Unfortunately, there is no setting on the iPhone to modify the limited call history of 100 calls. Here’s a step-by-step guide to accessing your detailed call log/billing statement:
1. Contact your cellular carrier: Reach out to your cellular carrier’s customer service or visit their website for assistance with accessing your detailed call log or billing statement.
2. Provide necessary information: You may be required to provide your account details, such as your phone number, account name, or any other information they may need to locate your account.
3. Request call history: Inform the customer service representative or navigate to the appropriate section on the website to request your call history or billing statement.
4. Verify security measures: As a security measure, you may need to verify your identity by answering security questions or providing a PIN or password associated with your account.
5. Obtain the document: Once the necessary steps are completed, you should be able to access your detailed call log or billing statement, which will contain a more comprehensive history of your phone calls.
By following these steps and contacting your cellular carrier, you can access your call history beyond the limited 100 calls stored on your iPhone.
Conclusion
Accessing call history on Android devices can be done easily through the phone’s built-in app. By navigating to the “Recent” or “Call details” section, users can view a comprehensive list of incoming, outgoing, and missed phone calls. Tapping on a specific phone number allows for even more information to be viewed, such as the date and time of the call. However, it’s important to note that the call log typically only holds the last 100 calls, and there is no setting available to modify this limit. If you need to access older call history, it may be necessary to check your detailed call log or billing statement from your cellular carrier. Additionally, for iPhone users, older call history can be accessed by restoring from an iCloud backup, but this process requires deleting existing data with a factory reset. It is recommended to make a new backup of your phone before attempting this method to avoid losing any new data.

