Email is a crucial communication tool in our modern world. Whether it’s for work or personal use, staying connected through email is essential. However, there may be times when your email app on Android doesn’t sync properly, causing you to miss out on important messages. In this article, we will explore how to check and adjust your email sync settings on Android to ensure you stay up to date with your emails.
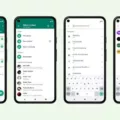
Let’s start by checking the sync settings for your Gmail account. Open the Gmail app on your Android device and tap on the menu button located on the left side. From the menu, select “Settings”. Next, choose your Gmail account from the list. Here, you need to make sure that the box next to “Sync Gmail” is checked. This ensures that your emails are automatically synced to your device. If it’s not checked, simply tap on the box to enable automatic syncing.
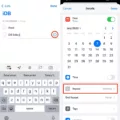
In some cases, you may want to manually sync your account to ensure you have the latest emails. To do this, go to your device’s Settings app. Look for the “About Google Account” option and tap on it. From there, select “Account sync”. If you have multiple accounts on your device, choose the one you want to sync. Then, tap on “More” and select “Sync now”. This will manually sync your email account and fetch any new emails that may not have been automatically synced.
It’s important to note that these instructions may vary slightly depending on the version of Android you’re using or the email app you have installed. However, the general idea remains the same – you need to access the email sync settings and ensure that automatic syncing is enabled.
By regularly checking and adjusting your email sync settings on Android, you can ensure that you never miss an important email. Whether it’s for work, personal, or any other purpose, staying connected through email is crucial in today’s fast-paced world. So take a few moments to review your email sync settings and make any necessary adjustments to keep your inbox up to date.
Why Is My Email Not Syncing On My Android?
There could be several reasons why your email is not syncing on your Android device. Here are some possible explanations:
1. Sync settings turned off: Check if the sync settings for your email application are turned off. Sometimes, users disable automatic email syncing to conserve battery or reduce data usage. To check this, follow these steps:
– Go to the Settings menu on your Android device.
– Scroll down and find the Accounts section.
– Tap on the email account that you are having trouble with.
– Look for the Sync settings option and make sure it is enabled.
2. Poor internet connection: Insufficient or unstable internet connectivity can prevent your email from syncing. Ensure that you have a stable internet connection, either through Wi-Fi or mobile data, and try syncing again.
3. Incorrect login credentials: Double-check that you have entered the correct username and password for your email account. Incorrect login details can prevent synchronization.
4. Exceeded storage limit: If your email account has exceeded its storage limit, it may not sync new emails until you free up some space. Delete unnecessary emails or attachments to make room for new messages.
5. App updates required: Ensure that your email application is up to date. Outdated versions may have compatibility issues with your Android device, leading to syncing problems. Check the Google Play Store for any available updates.
6. Battery optimization settings: Some Android devices have battery optimization settings that may restrict certain apps from running in the background, which can affect email syncing. To check and modify these settings:
– Go to the Settings menu on your Android device.
– Look for the Battery or Power management section.
– Find the option for App optimization or Battery optimization.
– Add your email application to the list of exceptions or disabled apps.
7. Third-party security apps: If you have installed any security or antivirus applications on your device, they might interfere with email syncing. Temporarily disable or configure these apps to allow email synchronization.
If none of these solutions work, you may need to contact your email service provider or the support team for your specific email application for further assistance.

How Do I Turn On Email Sync On Android?
To enable email sync on your Android device, follow these steps:
1. Open the Gmail app on your Android device.
2. On the left side of the app, tap on the Menu button.
3. In the menu that appears, scroll down and tap on “Settings”.
4. From the list of settings, tap on your email account.
5. Ensure that the checkbox next to “Sync Gmail” is checked. This option allows your emails to be synchronized or updated in real-time.
– If the checkbox is already checked, email sync is already enabled for your account.
– If the checkbox is not checked, tap on it to enable email sync for your account.
By enabling email sync, you ensure that your Gmail account on your Android device will automatically update and synchronize with the latest emails. This means you will receive new emails as soon as they arrive, and any actions you take on your device (such as deleting or archiving emails) will be reflected across all your devices connected to the same account.
Note: The steps provided may vary slightly depending on the version of the Gmail app or Android operating system you are using.
Where Is Sync Settings On Android?
To locate the sync settings on your Android device, follow these steps:
1. Open the Settings app on your device. You can usually find it by swiping down from the top of the screen and tapping the gear-shaped icon in the top-right corner, or by locating the app in your app drawer.
2. Scroll down the settings menu and tap on “Accounts” or “Users & accounts,” depending on your device’s version of Android.
3. If you have multiple accounts on your device, choose the account you want to sync. This step may not be necessary if you only have one account.
4. Look for the “Account sync” or “Sync” option and tap on it. This option may be located under a sub-menu called “More” or “Cloud and accounts” on some devices.
5. tap on “Sync now” to initiate an immediate sync of your selected account. This will update any changes or data between your device and the associated account.
To summarize, the sync settings on Android can be found in the Settings app under the Accounts or Users & accounts section. From there, select the desired account and navigate to the Account sync or Sync option, followed by tapping on Sync now to initiate a manual synchronization.
Conclusion
It is important to regularly check and adjust your email sync settings to ensure that your email application is syncing and notifying you of new emails. If you are experiencing issues with email syncing, it may be helpful to check the sync settings for your specific email application, such as Gmail. In the Gmail app, you can navigate to the settings menu and ensure that the “Sync Gmail” option is checked. Additionally, you can manually sync your account by accessing your device’s settings app, selecting your Google account, and tapping on the “Sync now” option. By taking these steps, you can ensure that your email is syncing properly and that you are receiving notifications for new messages.


