Video backgrounds have become increasingly popular in recent years, adding a dynamic and engaging element to videos. Whether you’re creating a professional presentation, a promotional video, or simply want to jazz up your home videos, having an appealing background can make a significant difference in the overall quality of your video.
One popular method of changing video backgrounds is by using a green screen, also known as chroma keying. This technique involves filming the subject in front of a green or blue backdrop and then replacing that color with a different image or video during post-production. However, not everyone has access to a green screen setup or the necessary editing software.
If you’re an iMovie user, you’re in luck! iMovie offers a convenient solution for changing video backgrounds without the need for a green screen. Here’s how you can do it:
1. Open iMovie on your device and create a new project or open an existing one that you want to work with.
2. Import the video clip that you want to change the background of by clicking on the “Import Media” button and selecting the desired file from your computer or device.
3. Once the video clip is imported, drag and drop it onto the timeline at the bottom of the iMovie interface.
4. Next, find a suitable background image or video that you want to replace the original background with. You can either use the built-in iMovie backgrounds or import your own by clicking on the “Import Media” button again.
5. Drag and drop the background clip onto the timeline above the video clip. Ensure that the background clip is longer than the video clip to avoid any gaps in the final result.
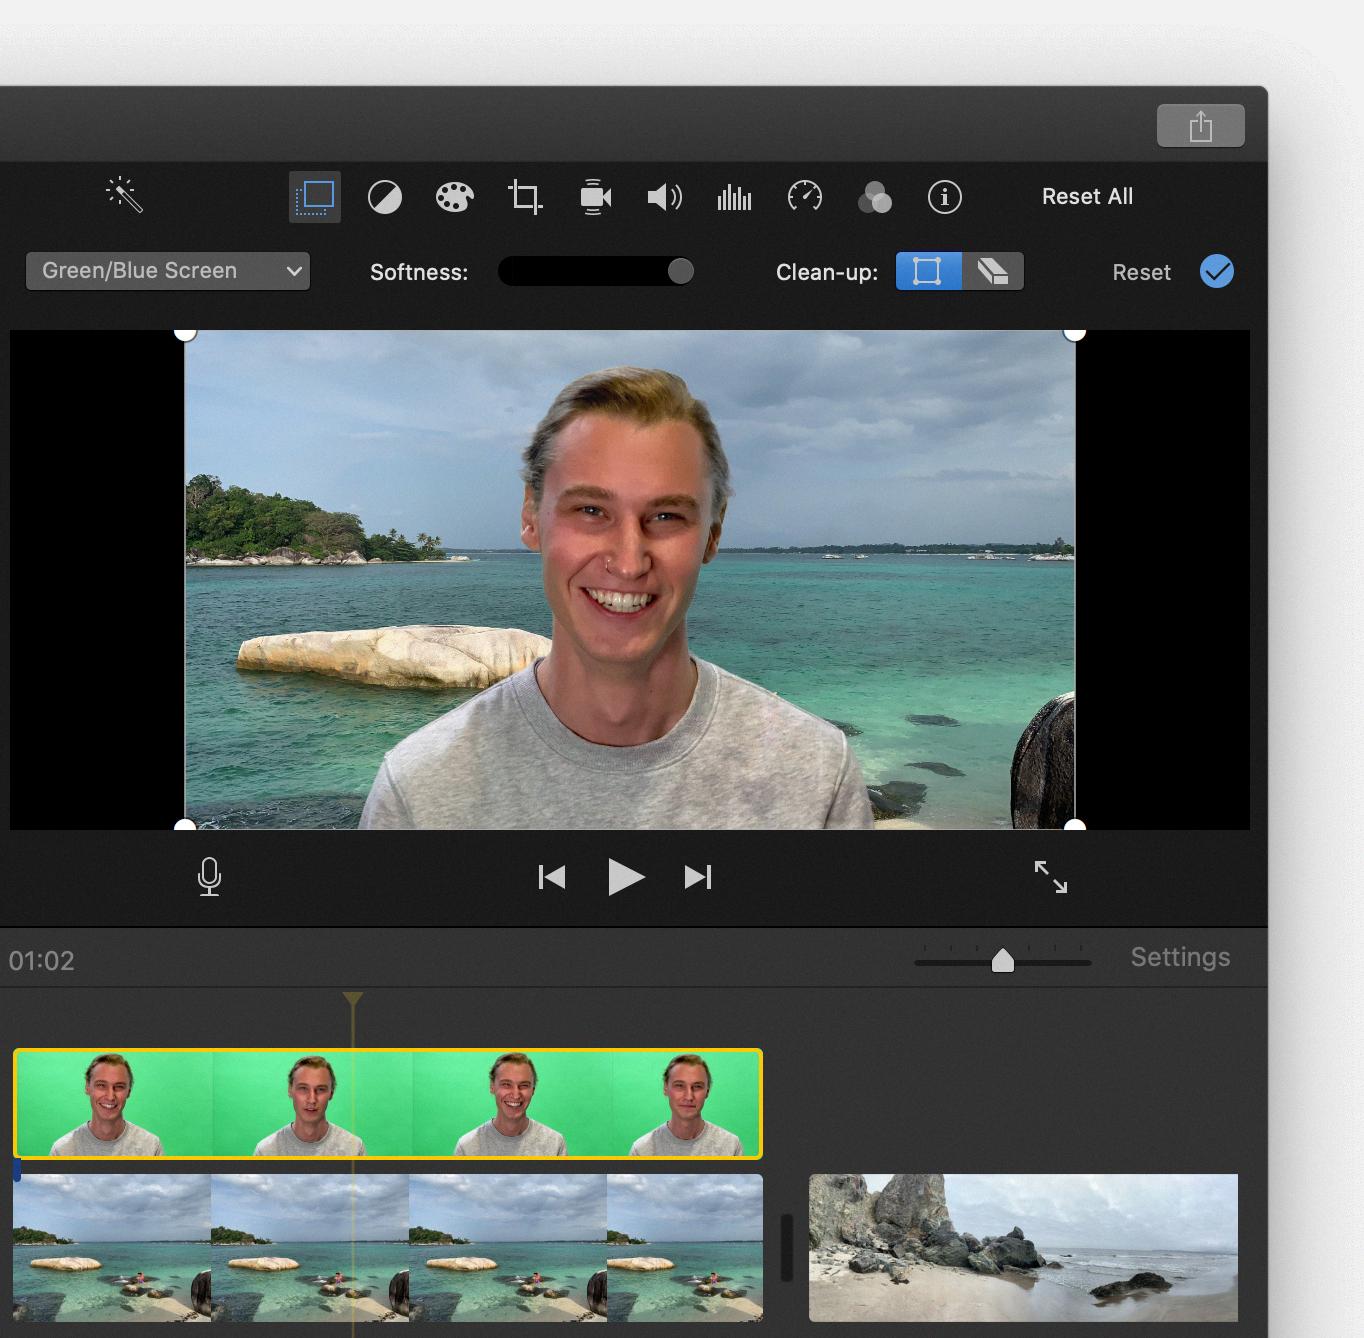
6. With the background clip selected, click on the “Video Overlay Settings” button located in the top right corner of the preview window. This button looks like a square with an arrow pointing into it.
7. From the dropdown menu that appears, select “Green/Blue Screen” to activate the background removal feature.
8. iMovie will automatically attempt to remove the green or blue color from the background clip. You can fine-tune the results by adjusting the “Strength” slider until you’re satisfied with the outcome.
9. Preview the video to see how the new background looks with the subject in the foreground. Make any necessary adjustments to the background clip or the video clip’s positioning if needed.
10. Once you’re happy with the result, save and export your video by clicking on the “File” menu and selecting “Share” > “File.” Choose your desired export settings and click “Next” to save the video to your desired location.
By following these steps, you can easily change the background of your videos using iMovie without the need for a green screen. It’s a convenient and user-friendly way to give your videos a professional touch. So go ahead and get creative with your video backgrounds and make your videos stand out from the crowd!
How Do You Get Rid of the Green Screen Background in iMovie?
To remove the green screen background in iMovie, follow these steps:
1. Open iMovie on your device.
2. Select the project or create a new one where you want to remove the green screen background.
3. Import the background clip and the green-screen clip that you want to work with. Ensure that the green-screen clip is placed above the background clip on the timeline.
4. In the viewer, tap on the green-screen clip to select it.
5. Look for the category list and tap on the desired category.
6. From the options provided, tap on the green/blue screen option.
7. The green-screen clip will now be added to the timeline, and in the viewer, tap on the “Auto” button.
8. By selecting “Auto,” iMovie will automatically remove the green or blue from the clip, leaving you with a clean background.
9. If the automatic removal doesn’t produce the desired results, you can manually adjust the settings by tapping on the “Manual” button and fine-tune the removal process.
10. Once you are satisfied with the results, continue editing your project as desired.
Remember, iMovie offers various other editing tools and features to enhance your videos further. You can explore options like adding transitions, titles, music, or applying color corrections to achieve the desired professional look.
Note: These instructions may vary slightly depending on the version of iMovie you are using.

How Do You Change the Background of a Video Without Green Screen?
To change the background of a video without using a green screen, you can use a video editing software like Movavi Video Editor. Here are the steps to do it on both PC and Mac:
1. Download and Install Movavi Video Editor: Go to the official Movavi website and download the installation file for your specific operating system (PC or Mac). Once downloaded, run the installation file and follow the on-screen instructions to install the program on your computer or Mac.
2. Add Your Video to the Program: Open Movavi Video Editor and click on the “Add Media Files” button to import your video into the program. You can also drag and drop your video file directly into the program’s timeline.
3. Remove the Background: In the timeline, select the video clip you want to change the background of. Then, go to the “Effects” tab and click on “Chroma Key” to access the green screen removal tool. Adjust the settings to remove the green screen background from your video. Movavi Video Editor will automatically replace the green screen with a transparent background.
4. Add a New Background: After removing the green screen, you can add a new background to your video. Go to the “Media” tab and select the background image or video you want to use. Drag and drop the new background onto the timeline, positioning it below your main video clip.
5. Adjust and Customize: Resize and position the new background to fit your video using the program’s editing tools. You can also apply additional effects, add text, or overlay images to further enhance your video.
6. Preview and Save: Once you are satisfied with the changes, click on the “Play” button in the preview window to preview your video. If everything looks good, click on the “Export” button to save your video with the new background. Choose the desired output format and quality settings, then click “Start” to save the video to your computer.
By following these steps, you can effectively change the background of your video without the need for a green screen. Movavi Video Editor provides an easy-to-use interface and powerful editing tools to help you achieve professional-looking results.
Conclusion
Changing a video background without a green screen can be achieved through various methods.
If you have access to video editing software such as iMovie or Adobe Premiere Pro, you can use the green-screen feature to easily remove the green or blue background from your video clips. This allows you to replace the background with any image or video of your choice.
Alternatively, if you don’t have access to such software or prefer a simpler solution, you can use online tools like Remove.bg or Unscreen. These platforms use artificial intelligence to automatically remove the background from your video clips, without the need for a green screen.
It’s important to note that while these tools can produce decent results, they may not always be perfect. Factors such as lighting conditions and the complexity of the background can affect the accuracy of the background removal. Therefore, it’s recommended to ensure good lighting and use a plain, solid-colored background when shooting your videos to achieve the best results.
Whether you have access to professional video editing software or prefer a quick online solution, there are options available to change your video background without a green screen. Experiment with different methods and find the one that works best for your needs.


