Album art is an essential component of any music collection. It not only enhances the visual appeal of your music library but also provides valuable information about the album and the artist. Adding album art to your MP3 files can be a simple and straightforward process, whether you are using iTunes, Windows Media Player, or a browser-based tool.
One of the easiest ways to add album art to your MP3 files is through iTunes. If you have a large music library, iTunes provides a convenient feature called “Get Album Artwork.” Simply go to File, select Library, and click on “Get Album Artwork.” iTunes will automatically search for album art for your music and add it to the corresponding tracks. This feature is particularly useful if your music is well-known and widely available.
However, there may be instances where iTunes cannot find the correct album art for a particular track. In such cases, you can manually add album art by following these steps: Right-click on the image you’d like to add, click on “Copy,” and then open iTunes. Find the album or song you want to edit, right-click on it, and select “Paste Album Art.” This will add the copied image as the album art for the selected track.
If you are using Windows Media Player, the process of adding album art is slightly different. First, locate the album or song you want to edit and right-click on it. Then, select “Edit” and choose “Album Info.” In the album info window, click on the “Artwork” tab. From here, you can click on “Add Artwork” to select an image file from your computer, or you can simply drag and drop the image file onto the artwork area. Once you have added the desired album art, click on “OK” to save the changes.
For those using ChromeOS, there is a browser-based tool called MP3 ID3 Tag Editor that allows you to add album art and metadata to your MP3 files. To use this tool, open Chrome and navigate to MP3 ID3 Tag Editor. Select “Choose Files” to open the Files App and upload the MP3s you want to edit. From there, you can add album art or metadata by following the instructions provided by the tool.
Adding album art to your MP3 files is a simple and effective way to enhance your music listening experience. Whether you are using iTunes, Windows Media Player, or a browser-based tool, the process is relatively straightforward. By following the steps outlined above, you can easily customize your music library and make it visually appealing. So go ahead and add some album art to your MP3 collection today!

How Do You Add Album Cover Art to MP3?
To add album cover art to your MP3 files, you have two options: adding it automatically or adding it manually.
Adding album art automatically:
1. Open iTunes on your computer.
2. Go to the “File” menu and select “Library.”
3. From the Library submenu, choose “Get Album Artwork.”
4. iTunes will search its database and attempt to find the appropriate album art for your MP3 files. If found, it will automatically add the artwork to your files.
Adding album art manually:
1. Open iTunes on your computer.
2. Locate the MP3 file to which you want to add album art.
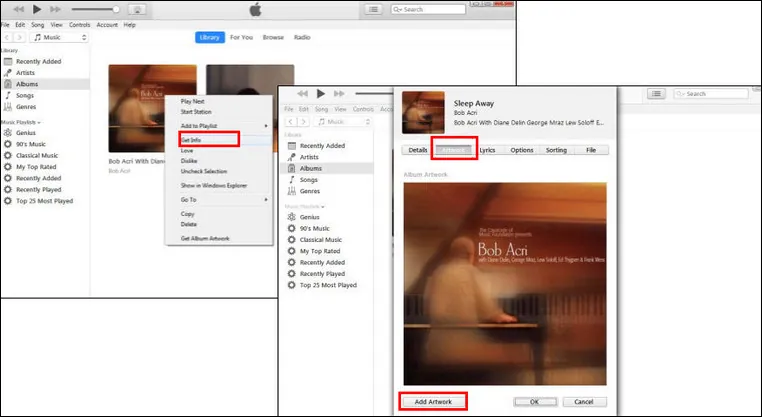
3. Right-click or Control-click on the file and select “Get Info.”
4. In the pop-up window, click on the “Artwork” tab.
5. Click on the “Add Artwork” button.
6. Select an image file containing the album art from your computer, and click “Open.”
7. The selected image will now appear as the album art for your MP3 file.
Alternatively, you can also drag and drop an image file directly onto the artwork area in the “Get Info” window to add album art manually.
Remember, adding album art enhances your music library’s visual appeal and makes it easier to identify and organize your MP3 files.
How Do You Add a Photo Album to an MP3?
To add a photo album to an MP3, you can follow these steps:
1. Right-click on the image you would like to add to the MP3 album.
2. From the options that appear, click on “Copy” to copy the image to your clipboard.
3. Open Windows Media Player on your computer.
4. Locate the specific album or song in your Windows Media Player library that you want to edit.
5. Right-click on the album or song title.
6. From the context menu that appears, select “Paste Album Art” to add the copied image as the album art for that particular album or song.
By following these steps, you will be able to add a photo album to an MP3 using Windows Media Player.
Does MP3 Support Album Art?
MP3 files support album art through the use of ID3 tags. ID3 tags are metadata containers that can be added to the beginning or end of an MP3 file. These tags allow for the storage of additional information about the audio track, including the track title, artist name, and album art.
Album art, also known as cover art, is an image that represents the album or single associated with the MP3 track. It is typically displayed when the track is played on a media player or device that supports album art display.
By adding album art to the ID3 tags of an MP3 file, users can enhance their music listening experience by visually associating the track with its corresponding album or single cover. This can help in quickly identifying and organizing music files, especially in large music collections.
To add album art to an MP3 file, one can use various software programs or media players that provide the option to edit ID3 tags. These programs allow users to import an image file and associate it with the MP3 file’s ID3 tag. The image file is then embedded within the MP3 file, ensuring that it travels with the track and can be displayed on compatible media players.
MP3 files do support album art through the use of ID3 tags. Adding album art to MP3 files can enhance the visual experience of listening to music and provide a more organized collection.
How Do You Add Album Art to MP3 on Chromebook?
To add album art to an MP3 on a Chromebook, you can follow these steps:
1. Open the Chrome browser on your Chromebook.
2. Visit the Chrome Web Store and search for “MP3 ID3 Tag Editor” or go directly to the MP3 ID3 Tag Editor website.
3. Click on the “Add to Chrome” button to install the extension.
4. Once installed, click on the extension icon that appears in the Chrome toolbar.
5. A new tab will open with the MP3 ID3 Tag Editor interface.
6. Select the “Choose Files” button to open the Files App on your Chromebook.
7. Navigate to the location where your MP3 files are stored and select the files you want to add album art to.
8. Click on the “Open” button to upload the selected MP3 files to the MP3 ID3 Tag Editor.
9. The uploaded files will appear in the MP3 ID3 Tag Editor interface.
10. To add album art, click on the “Select Album Art” button or drag and drop an image file onto the interface.
11. Choose an image file that represents the album art you want to add and click on the “Open” button to upload it.
12. The album art will be displayed in the MP3 ID3 Tag Editor interface, along with options to resize or remove it.
13. If you also want to add metadata (such as artist name, album title, track number, etc.), you can enter the information in the respective fields.
14. Once you have added the album art and any other metadata, click on the “Save Changes” button.
15. The MP3 files will be updated with the added album art and metadata.
16. You can now close the MP3 ID3 Tag Editor tab and access your MP3 files with the updated album art on your Chromebook.
By following these steps, you can easily add album art to MP3 files on your Chromebook using the MP3 ID3 Tag Editor extension.
Conclusion
Album art is a crucial component of any music collection. It not only enhances the visual appeal of the music but also provides important information about the album, such as the artist, title, and genre. Adding album art to your tracks can make them more visually appealing and organized, especially when browsing through your music library.
There are two ways to add album art to your tracks – automatically and manually. The automatic method involves using media players like iTunes or Windows Media Player, which can fetch album art from online databases. This is a convenient option if you have a large music library and want to add album art to multiple tracks at once.
On the other hand, the manual method allows you to personally select and add album art to each individual track. This gives you more control over the visuals and allows you to choose images that best represent the music. You can either copy and paste artwork from the internet or upload your own custom images.
It’s important to note that album art is not just for aesthetic purposes. It also serves a functional role in organizing and categorizing your music. By adding album art, you can easily identify and locate specific tracks or albums, especially when using music players that support visual browsing.
Furthermore, album art can also enhance the overall listening experience. When playing music on devices or media players that display album art, you can enjoy a more immersive and engaging experience. The visuals can complement the music and create a more cohesive and enjoyable listening atmosphere.
Album art is an essential aspect of any music collection. It adds visual appeal, provides important information, and enhances the overall listening experience. Whether you choose to add album art automatically or manually, incorporating this visual element into your tracks can greatly enhance your music library.


