The BOOTMGR file is an essential component of the Windows operating system, responsible for loading the operating system during startup. It is a hidden file that is stored in the root directory of the active partition on your hard drive.
In Windows 7, the location of the BOOTMGR file depends on whether you are using UEFI or traditional BIOS boot. Let’s start with UEFI boot. The BOOTMGR file can be found at /EFI/Microsoft/Boot/BCD on the EFI System Partition. This partition is usually a small, separate partition that contains important system files.
On the other hand, for traditional BIOS boot, the BOOTMGR file is located at /boot/BCD on the active partition. The active partition is the partition that is currently being used to boot the operating system.
It is important to note that the BOOTMGR file should never be moved, changed, or compressed. Doing so can lead to booting issues and may prevent your computer from starting up properly. So, it’s best to leave the BOOTMGR file untouched.
If you encounter the error message “BOOTMGR is missing” during startup, there are ways to fix it. One method is to create a bootable USB drive from an ISO file of Windows 7. You can then boot your computer from the USB drive and enter the Windows Recovery Environment. From there, you can choose the “Repair your computer” option and follow the prompts to fix the BOOTMGR issue.
The BOOTMGR file is a crucial component of the Windows operating system, responsible for loading the operating system during startup. Its location differs depending on whether you are using UEFI or traditional BIOS boot. It is important to avoid modifying the BOOTMGR file to prevent any booting problems. If you encounter the “BOOTMGR is missing” error, you can use a bootable USB drive and the Windows Recovery Environment to resolve the issue.
Where Is The BOOTMGR File Stored On The Hard Drive?
The BOOTMGR file, which plays a vital role in the booting process of a computer, is stored in a specific location on the hard drive. It is hidden in the root directory of the Active partition on the hard drive. The Active partition is the partition that contains the operating system files necessary for the computer to start up.
It is important to note that the location of the BOOTMGR file may vary depending on the specific configuration of the hard drive. However, in most cases, it can be found in the root directory of the Active partition.
To locate the BOOTMGR file on your hard drive, you can follow these steps:
1. Open Disk Management by right-clicking on the “Start” button and selecting “Disk Management” from the menu.
2. In the Disk Management window, you will see a list of all the disk drives connected to your computer. Identify the drive that contains the operating system.
3. Look for the partition that is labeled as “System Reserved” or has the “Active” status. This is the partition that contains the BOOTMGR file.
4. Right-click on the partition and select “Open” or “Explore” to access its contents.
5. In the root directory of the partition, you should be able to find the BOOTMGR file.
It is important to exercise caution when dealing with the BOOTMGR file. Moving, changing, or compressing the BOOTMGR file can lead to booting issues and potential system instability. Therefore, it is recommended to avoid any modifications to the BOOTMGR file unless you have a thorough understanding of the consequences.
The BOOTMGR file is stored in the root directory of the Active partition on the hard drive. It is crucial for the proper functioning of the booting process, and any modifications to the file should be approached with caution.

Where Is Boot Manager File Located?
The location of the Boot Manager file may vary depending on the type of boot method being used. Here are the specific locations for both UEFI and traditional BIOS boot:
1. UEFI Boot:
– File Path: /EFI/Microsoft/Boot/BCD
– Location: The Boot Manager file for UEFI boot is located on the EFI System Partition (ESP).
2. Traditional BIOS Boot:
– File Path: /boot/BCD
– Location: The Boot Manager file for traditional BIOS boot is located on the active partition of the system.
Please note that the active partition may vary depending on the system configuration.
It’s important to understand the boot method being used on your system to locate the Boot Manager file accurately.
How Do I Delete BOOTMGR Files In Windows 7?
To delete BOOTMGR files in Windows 7, follow these steps:
1. Boot into Windows: Start your computer and wait for it to fully load into the Windows operating system.
2. Open the Run dialog: Press the WinKey+R combination on your keyboard. The WinKey is the Windows logo key usually located between the Ctrl and Alt keys.
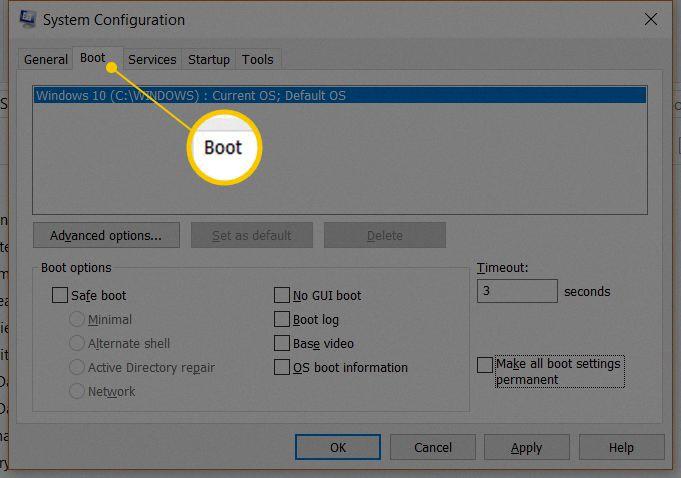
3. Type “msconfig” and click OK: In the Run dialog box, type “msconfig” (without the quotation marks) into the Open box, and then click OK. This will open the System Configuration utility.
4. Access the Boot tab: In the System Configuration utility, click on the Boot tab at the top of the window. This tab allows you to manage your computer’s boot settings.
5. Select the boot item to remove: Under the Boot tab, you will see a list of boot items. These items represent different operating systems or configurations that can be booted into. Select the boot item that corresponds to the BOOTMGR file you want to delete. Be cautious when selecting the item to avoid removing the wrong boot configuration.
6. Click the Delete button: Once you have selected the appropriate boot item, click the Delete button located below the list. This will remove the selected boot item from your system.
7. Confirm the deletion: A confirmation prompt may appear asking you to confirm the deletion. If prompted, review the information and click OK to proceed with the deletion.
8. Close msconfig: After deleting the boot item, click OK to close the System Configuration utility (msconfig).
9. Restart your computer: If prompted to restart your computer, click Restart. This will apply the changes you made and restart your system.
By following these steps, you should be able to delete the BOOTMGR file associated with a specific boot configuration in Windows 7. Please note that modifying boot settings can potentially cause issues with your system’s ability to start up properly, so exercise caution and ensure you are deleting the correct boot item.
How To Install Windows 7 When BOOTMGR Is Missing?
To install Windows 7 when the “BOOTMGR is missing” error occurs, follow these steps:
1. Create a bootable USB drive:
– Find a working computer with internet access.
– Download the official Windows 7 ISO file from the Microsoft website.
– Insert a USB drive with at least 4GB of storage.
– Download and install a reliable tool like Rufus to create a bootable USB drive from the ISO file.
– Open Rufus, select the USB drive, choose the Windows 7 ISO file, and click “Start” to create the bootable USB.
2. Boot the PC from the USB drive:
– Insert the bootable USB drive into the computer with the “BOOTMGR is missing” error.
– Restart the computer and enter the BIOS or UEFI settings by pressing a specific key (usually F2, F10, or Del) during startup. The key varies depending on the manufacturer.
– In the BIOS/UEFI settings, navigate to the “Boot” or “Boot Priority” section.
– Set the USB drive as the first boot device.
– Save the changes and exit the BIOS/UEFI settings.
3. Enter Windows Recovery Environment:
– After restarting, the computer will boot from the USB drive and display the Windows installation screen.
– Select your language, time, and keyboard preferences.
– Click on the “Repair your computer” option at the bottom left corner.
4. Repair BOOTMGR:
– In the Windows Recovery Environment, select the operating system you want to repair (usually there’s only one).
– Click on “Next” and then choose the “Command Prompt” option.
5. Fix BOOTMGR:
– In the Command Prompt, type the following command and press Enter: “bootrec /fixboot”.
– Wait for the process to complete.
– Once done, type “exit” and press Enter to close the Command Prompt.
6. Restart the computer:
– Remove the USB drive from the computer.
– Restart the computer and check if the “BOOTMGR is missing” error has been resolved.
– Windows 7 should now start properly.
Note: If the above steps don’t fix the issue, you may need to perform additional troubleshooting steps or seek professional help.
Conclusion
The BOOTMGR file is a crucial component in the Windows operating system that is responsible for the booting process. It is stored on the hard drive in the root directory of the Active partition. It is important to note that the file is hidden and should never be moved, changed, or compressed.
For UEFI boot, the BOOTMGR file is located at /EFI/Microsoft/Boot/BCD on the EFI System Partition. On the other hand, for traditional BIOS boot, the file can be found at /boot/BCD on the active partition.
If you encounter the “BOOTMGR is missing” error in Windows 7, there are several ways to fix it. One method is to create a bootable USB from an ISO file and boot the PC from the USB drive to enter the Windows Recovery Environment. From there, you can select the “Repair your computer” option and follow the instructions to fix the issue.
It is essential to handle the BOOTMGR file with caution and avoid any unnecessary modifications to ensure the proper functioning of your computer’s booting process.


