MP3 files have become a popular format for storing and playing audio files. Whether you’re a music enthusiast, a podcast creator, or a video editor, knowing how to edit MP3 files can come in handy. In this article, we will explore the different methods and tools you can use to edit MP3 files.
One of the simplest ways to edit an MP3 file is by using a basic audio editing software like Windows Media Player. This software allows you to trim and cut unwanted sections from your MP3 files. Simply open the file in Windows Media Player, locate the section you want to remove, and use the editing tools to delete it. Once you’re satisfied with the edited file, save it and you’re good to go.
If you’re looking for more advanced editing options, there are dedicated audio editing software available such as Audacity. Audacity is a free and open-source software that offers a wide range of features to edit MP3 files. With Audacity, you can not only trim and cut sections but also apply effects, adjust the volume, and enhance the overall audio quality. It provides a user-friendly interface and supports various audio formats, making it a versatile tool for editing MP3 files.
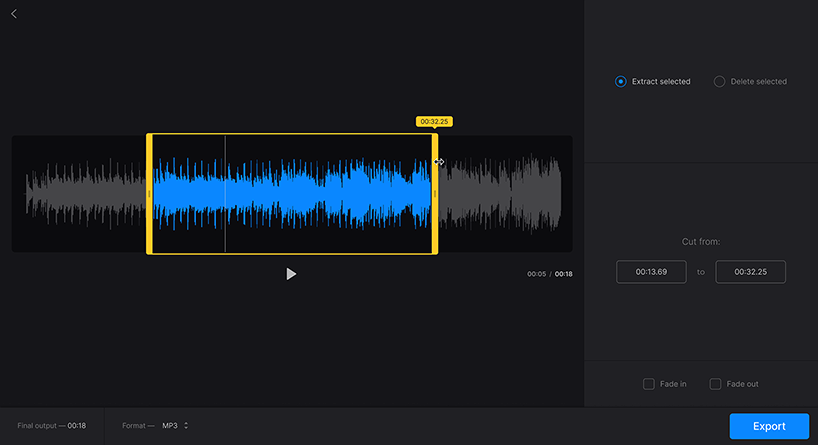
Another option to edit MP3 files is by using online audio editors. These web-based tools allow you to edit your MP3 files without the need for any software installation. Simply upload your MP3 file to the online editor, and you can trim, cut, merge, or apply effects to your audio. Some popular online audio editors include MP3Cut, AudioTrimmer, and TwistedWave.
If you’re a video editor and want to add MP3 files to your videos, Adobe Premiere Rush is a great option. This video editing software allows you to easily add licensed songs, original compositions, or narration tracks to your project. It provides a seamless integration with various audio formats, including MP3, and offers a range of editing tools to synchronize your audio with the video footage.
Editing MP3 files can be done using various tools and methods. Whether you prefer using basic software like Windows Media Player, advanced software like Audacity, online audio editors, or video editing software like Adobe Premiere Rush, the choice depends on your editing needs and preferences. So go ahead and explore these options to edit your MP3 files and enhance your audio experience.

How Do You Edit an MP3 Audio File?
To edit an MP3 audio file, you can follow these steps:
1. Select a suitable audio editing software: There are several options available, both free and paid, such as Audacity, Adobe Audition, GarageBand (for Mac users), and WavePad. Choose one that suits your needs and download/install it on your computer.
2. Open the MP3 file in the audio editing software: Launch the software and import the MP3 file you want to edit. Most software programs allow you to do this by either dragging and dropping the file into the interface or using the “File” or “Import” option in the menu.
3. Familiarize yourself with the software interface: Take a moment to explore the different tools and features available in the software. This will help you navigate and make edits more effectively.
4. Trim or cut unwanted parts: To remove unwanted sections from the MP3 file, locate the part you want to delete and select it using the software’s selection tool. Then, use the “Delete” or “Cut” option to remove that portion. You can also use the “Split” or “Scissors” tool to divide the audio at specific points.
5. Adjust the volume levels: If you find certain parts of the MP3 file too loud or too soft, you can use the software’s volume adjustment tools to normalize the audio. This will ensure a consistent volume throughout the file.
6. Apply effects or enhancements (if desired): Many audio editing software programs offer a range of effects and enhancements that you can apply to your MP3 file. These can include equalization, reverb, echo, and more. Experiment with different effects to achieve the desired sound.
7. Save the edited MP3 file: Once you are satisfied with the changes you have made, save the edited MP3 file. Most software programs allow you to choose the file format and quality settings before saving.
8. Export or convert the file (if necessary): Depending on your requirements, you may need to export or convert the edited MP3 file to a different format. This can be done within the software by selecting the appropriate export or conversion options.
9. Test the edited MP3 file: Before finalizing your edits, play the edited MP3 file to ensure that all changes have been applied correctly and that it sounds as desired.
10. Save a backup copy: It’s always a good idea to save a backup copy of the original MP3 file before making any edits. This way, you can revert to the original if needed.
Remember, the specific steps may vary slightly depending on the audio editing software you choose. It’s important to refer to the software’s documentation or online tutorials for more detailed instructions.
Can You Trim an MP3 File in Windows Media Player?
It is possible to trim an MP3 file using Windows Media Player. This software, which is commonly available on Windows operating systems, offers basic editing capabilities including the ability to trim audio files.
To trim an MP3 file in Windows Media Player, follow these steps:
1. Open Windows Media Player by clicking on the start menu and searching for “Windows Media Player.” Once it appears in the search results, click on it to open the program.
2. Once Windows Media Player is open, click on the “Library” tab at the top of the window. This will display your media library.
3. Locate the MP3 file that you want to trim in the library. You can browse your library or use the search bar at the top-right corner of the window to find the specific file.
4. Once you have found the MP3 file, right-click on it and select “Open file location.” This will open the folder where the MP3 file is stored.
5. In the folder, right-click on the MP3 file again and select “Open with” and then “Windows Media Player.” This will open the file directly in Windows Media Player.
6. When the MP3 file is open in Windows Media Player, click on the “Play” button to start playing the file.
7. While the file is playing, look for the “Now Playing” tab at the top-right corner of the window. Click on it to switch to the “Now Playing” view.
8. In the “Now Playing” view, you will see a toolbar below the playback controls. On the right side of this toolbar, you will find the “Start time” and “Stop time” fields.
9. To trim the MP3 file, first, note the current position in the playback slider where you want the trimmed portion to start. Enter this time in the “Start time” field, either by typing it or using the up and down arrows.
10. Next, note the position in the playback slider where you want the trimmed portion to end. Enter this time in the “Stop time” field.
11. Once you have set the start and stop times, click on the “Play” button to verify that the trimmed section is what you intended. If necessary, adjust the start and stop times until you are satisfied.
12. After you have set the desired start and stop times, click on the “Set start point” button to trim the MP3 file. This will remove everything before the specified start time.
13. Similarly, click on the “Set end point” button to trim the MP3 file and remove everything after the specified stop time.
14. Once you have finished trimming the MP3 file, click on the “File” tab at the top-left corner of the window and select “Save now playing.” This will save the trimmed version of the MP3 file in your chosen location.
Please note that Windows Media Player is primarily designed for playing media files and its editing capabilities are limited compared to dedicated audio editing software. If you require more advanced editing features, you may need to consider using specialized audio editing software such as Audacity or Adobe Audition.
How Can You Edit MP3 Files Online for Free?
To edit MP3 files online for free, you have several options available. One popular choice is to use a web-based tool called Flixier. Here is a step-by-step guide on how to edit MP3 files using Flixier:
1. Visit the Flixier website. You can easily find it by searching for “Flixier” in your favorite search engine.
2. Create an account or sign in if you already have one. Flixier offers a free trial, so you can use the platform without any payment initially.
3. Once you’re logged in, you will find a library or import button. This allows you to upload your MP3 file from your computer or cloud storage services like Google Drive, Dropbox, or OneDrive. Simply drag and drop your MP3 file into the library or use the import button to select it.
4. After your MP3 file is in the Flixier library, you can now trim it to remove unwanted parts. Drag the MP3 file to the timeline, which is usually located at the bottom of the screen. This timeline allows you to visualize and edit the audio file.
5. To trim the MP3, click on the file in the timeline and look for an option to trim or cut. You can usually find this option by right-clicking on the file or by selecting it and looking for a scissor icon. Once you’ve selected the trim option, you can drag the edges of the MP3 file in the timeline to choose the desired start and end points for your trimmed audio.
6. Preview your trimmed MP3 to make sure it sounds as you intended. Flixier usually provides a play button on the timeline or a preview window for you to listen to the edited file.
7. Once you are satisfied with the edits, save your trimmed MP3 file. Look for a save or export button, which is typically located near the top or bottom of the screen. Flixier may offer various options for saving, such as downloading the file to your computer or exporting it to cloud storage services.
By following these steps, you can easily edit your MP3 files online for free using Flixier. Remember to check the specific features and limitations of the tool you choose, as different platforms may offer different editing options.
Can Adobe Edit MP3 Files?
Adobe Premiere Rush has the capability to edit MP3 files. Whether you are using the desktop version or the mobile app on iPhone, iPad, or Android devices, you can easily add MP3 files to your video projects.
To add an MP3 file to your video in Adobe Premiere Rush, follow these steps:
1. Launch Adobe Premiere Rush and create a new project or open an existing one.
2. Import your video footage by clicking on the “Import Media” button and selecting the video file you want to edit.
3. Once your video is imported, locate the timeline at the bottom of the interface.
4. To add an MP3 file, click on the “Audio” button in the toolbar above the timeline.
5. Choose the option to import audio, and browse for the MP3 file you want to add.
6. Select the MP3 file and click “Import” to add it to your project.
7. Drag and drop the MP3 file onto the audio track in the timeline. You can adjust the placement and duration of the audio clip by dragging its edges or moving it along the timeline.
8. If necessary, you can also trim or split the MP3 file to fit your video by using the editing tools available in Adobe Premiere Rush.
9. To adjust the volume of the MP3 file, click on the audio clip in the timeline and use the volume slider to increase or decrease the audio level.
10. If you want to add multiple MP3 files or additional audio tracks, repeat the process by importing and placing them on separate audio tracks in the timeline.
By following these steps, you can easily add MP3 files to your video projects using Adobe Premiere Rush. Whether you want to include licensed songs, original compositions, or narration tracks, Adobe Premiere Rush provides a user-friendly interface to enhance your video editing experience.
Conclusion
MP3 files are a popular and widely used audio file format that offers a convenient way to store and play music and other audio content. They are known for their high-quality sound and relatively small file size, making them easy to share and transfer.
MP3 files can be edited and trimmed using various software and online tools, such as Windows Media Player, YouTube, and Adobe Premiere Rush. These tools allow you to remove unwanted sections, silence portions, and create customized versions of your audio files.
Whether you’re a music enthusiast, a content creator, or someone looking to enhance their videos with music or narration, MP3 files can be a valuable asset. They offer flexibility and versatility in terms of editing, sharing, and using audio content.
It’s important to remember that when using MP3 files, you should always respect copyright laws and obtain proper licensing for any copyrighted music or content you use. This ensures that artists and creators are properly credited and compensated for their work.
MP3 files have revolutionized the way we store, share, and enjoy audio content. They have become an integral part of our digital lives and continue to play a significant role in the world of music, podcasts, and other audio forms of entertainment.


