Autocorrect can be a useful feature on our smartphones, helping us type faster and more accurately. However, there are times when it can be quite frustrating, especially when it constantly changes our words to something completely different. If you’re tired of autocorrect’s antics and want to reset it, you’re in the right place. In this article, we’ll discuss how to reset autocorrect on both Android and iPhone devices.
Let’s start with Android. To change autocorrect settings on your Android phone, you need to go to the “Languages & input” section under “System” in your Settings menu. Keep in mind that the name of this section may vary depending on your device, so it could be called something like “Language & keyboard.”
Once you’ve located the correct section, tap on it to open the settings. Look for the option that says “On-Screen Keyboard” or something similar. This should lead you to the settings for your keyboard app, which is usually Gboard.
In the Gboard settings, find the “Text Correction” option. Here, you’ll be able to make adjustments to your autocorrect settings. You can choose to turn it on or off, depending on your preference. If you want to disable autocorrect completely, simply toggle the switch to the off position. If you prefer to keep it on but want to make some changes, you can explore the various options available to customize the autocorrect behavior.
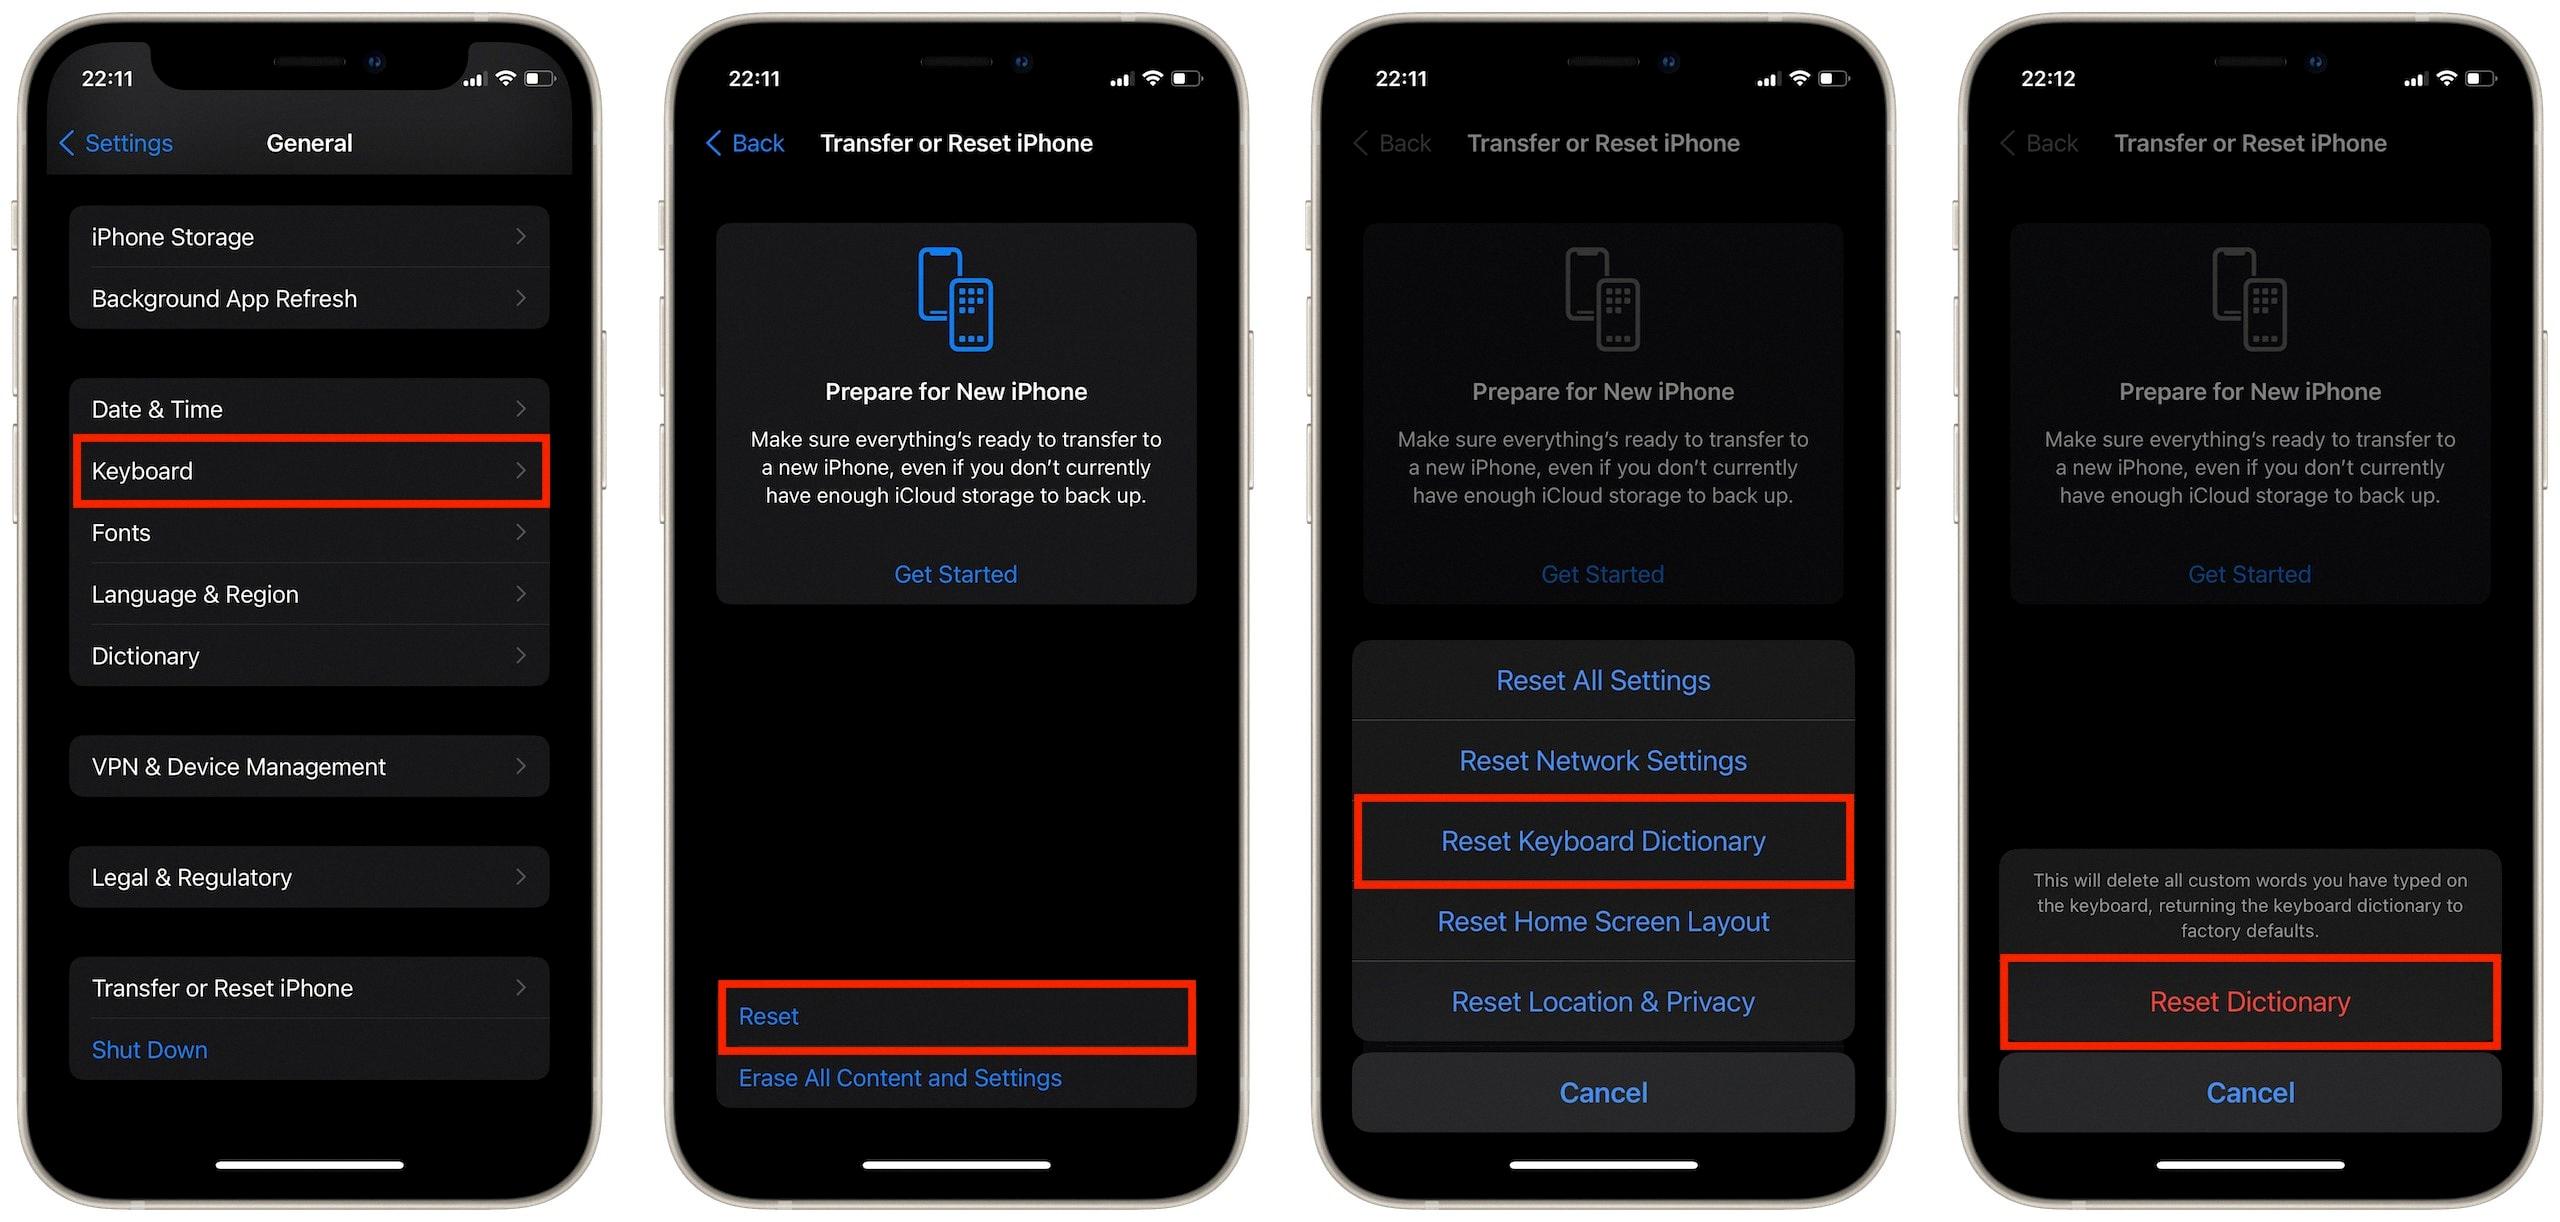
Now, let’s move on to resetting autocorrect on an iPhone. If you’re using an iPhone, you can reset the keyboard dictionary to its default state. To do this, go to your Settings app and navigate to the “General” section. From there, look for the “Transfer or Reset iPhone” option, and tap on it.
Inside the “Reset” menu, you’ll find the option to reset the keyboard dictionary. Tap on “Reset Keyboard Dictionary” to initiate the process. Please note that by doing this, all custom words and shortcuts you’ve added to the dictionary will be deleted. The keyboard dictionary will return to its default state, and you’ll have to teach your iPhone once again how you want certain words to be spelled out.
Resetting autocorrect can be a helpful solution when you’re facing issues with this feature on your smartphone. Whether you’re using an Android or an iPhone, the process is relatively simple and can be done within the settings menu of your device. By following the steps outlined in this article, you’ll be able to reset autocorrect and regain control over your typing experience.
Is There A Way To Reset Your Autocorrect?
There is a way to reset your autocorrect settings on an Android phone. To do this, follow the step-by-step instructions below:
1. Open the Settings app on your Android phone. You can usually find it in the app drawer or by swiping down from the top of the screen and tapping the gear icon.
2. Scroll down and tap on the “System” option. On some devices, this may be labeled as “General Management” or something similar.
3. In the System settings menu, look for and tap on “Languages & input.” The exact name of this option may vary depending on your device.
4. In the Languages & input menu, you will see a list of available keyboards or input methods. Tap on the keyboard you are currently using, such as “Gboard” or “Samsung Keyboard.”
5. In the keyboard settings, you may need to scroll down to find the autocorrect options. Look for a setting related to autocorrect or text correction.
6. Once you find the autocorrect settings, you may see options like “Auto-correction,” “Text correction,” or “Spell check.” Tap on this option to access the autocorrect settings.
7. In the autocorrect settings, you should find an option to reset or disable autocorrect. This option may be labeled as “Reset to default,” “Reset settings,” or something similar. Tap on it to reset your autocorrect settings to their original configuration.
8. After resetting the autocorrect settings, you can customize them according to your preferences by enabling or disabling autocorrect, adjusting correction sensitivity, or adding custom words to the dictionary.
To summarize, to reset your autocorrect settings on an Android phone, go to Settings > System > Languages & input > Keyboard settings > Autocorrect settings > Reset to default.

How Do I Clear Autocorrect Memory On My IPhone?
To clear the autocorrect memory on your iPhone, you can follow these steps:
1. Open the Settings app on your iPhone.
2. Scroll down and tap on “General” settings.
3. In the General settings menu, find and tap on “Keyboard”.
4. At the top of the Keyboard settings menu, tap on “Text Replacement”.
5. Here, you will see a list of all the custom words and shortcuts that you have added to your autocorrect memory.
6. To clear the autocorrect memory, tap on the “Edit” button at the top right corner of the screen.
7. Now, you can select and delete individual custom words or shortcuts by tapping on the red minus button next to each entry, or you can tap on “Delete All” to remove all of them at once.
8. After deleting the desired entries, tap on the “Done” button to save the changes.
By following these steps, you will be able to clear the autocorrect memory on your iPhone and reset the keyboard dictionary back to its default state.
How Do You Reset Autocorrect On Android?
To reset autocorrect on Android, you can follow these steps:
1. Open the Settings app on your Android device.
2. Scroll down and tap on “System.”
3. Look for the “Languages & input” or “Language & input” option and tap on it.
4. Under the “Keyboard & input methods” section, tap on “Virtual keyboard” or “On-screen keyboard.”
5. You will see a list of installed keyboards on your device. Locate and tap on “Gboard” (Google Keyboard).
6. In the Gboard settings, tap on “Text correction.”
7. Look for the “Auto-correction” option and toggle it off to disable autocorrect. If it’s already off, you can toggle it on and then off again to reset it.
8. You can also adjust other autocorrect settings like “Show suggestions” or “Block offensive words” according to your preference.
9. Once you’ve made the desired changes, exit the settings app.
By following these steps, you can reset or adjust the autocorrect settings on your Android device’s Gboard keyboard.
How Do You Fix Incorrect Autocorrect On IPhone?
To fix incorrect autocorrect on your iPhone, you can follow these steps:
1. Open the Settings app on your iPhone.
2. Scroll down and tap on “General.”
3. In the General settings, scroll down and tap on “Keyboard.”
4. Under the Keyboard settings, tap on “Text Replacement.”
5. Here, you will see a list of words and their corresponding autocorrect replacements. If you find any incorrect entries, tap on the word you want to edit or remove.
6. To edit the autocorrect replacement, simply modify the text in the “Phrase” field.
7. To remove the autocorrect replacement altogether, tap on the “Delete” button next to the word.
8. If you want to add a new autocorrect replacement, tap on the “+” button in the top right corner.
9. In the “Phrase” field, enter the word you would like to be autocorrected, and in the “Shortcut” field, enter the shorthand or misspelling that you commonly type.
10. Tap on “Save” to save any changes you made.
By following these steps, you can fix incorrect autocorrect on your iPhone and customize it according to your preferences.
Conclusion
Resetting autocorrect on your Android or iPhone is a simple process that can be done through the settings menu. For Android devices, head to the Languages & input or Language & keyboard section in the System settings. From there, you can disable or enable autocorrect as per your preference.
On an iPhone, you can reset the keyboard dictionary by going to Settings > General > Transfer or Reset iPhone. Tap on Reset, then select Reset Keyboard Dictionary. This will remove all custom words and shortcuts, returning the keyboard dictionary to its default state.
By following these steps, you can easily reset autocorrect and start fresh with your device’s keyboard. Whether you want to turn off autocorrect completely or simply make adjustments to its settings, these methods will help you customize your typing experience to suit your needs.


